Creative bird feeders for kindergarten. How to make a tree feeder with your own hands. Wooden bird feeder with dispenser - step by step photos
The bird feeder performs several functions at once. Firstly, it is a place for saving birds from starvation. Secondly, the feeder - decorates the exterior, gardens, parks or simply streets. Thirdly, making a feeder is quite an entertaining process that brings parents and children together and teaches the younger generation the norms of behavior and human qualities. Therefore, whenever possible, we recommend building feeders, and we will learn how to do this later.
How to make a bird feeder with your own hands
We offer you to get acquainted with the main variations of bird feeders, which are most often used for feeding them in the winter.
The first and easiest option is to make a roofless forest dining room. It has a flat shape with sides that prevent spillage of feed. Such a bird dining room is good because it attracts birds, as they do not like a closed area. The disadvantage of the feeder is that the food, under atmospheric influences, quickly gets wet and deteriorates, and the wind easily overturns such a dining room. For the construction of this variation of the feeder, one piece of plywood and bars that serve as a frame are enough. Fixing the feeder is carried out using a regular rope, in order for the feeder to attract birds, paint it in a bright shade.

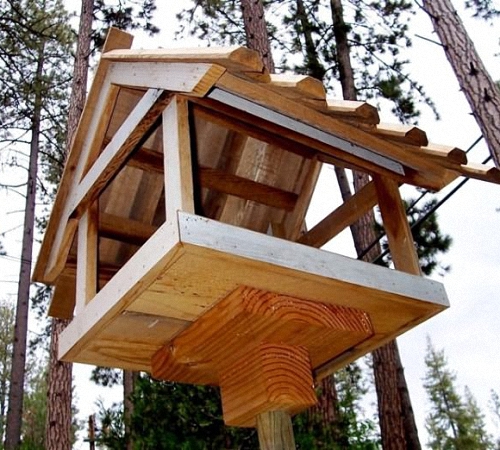
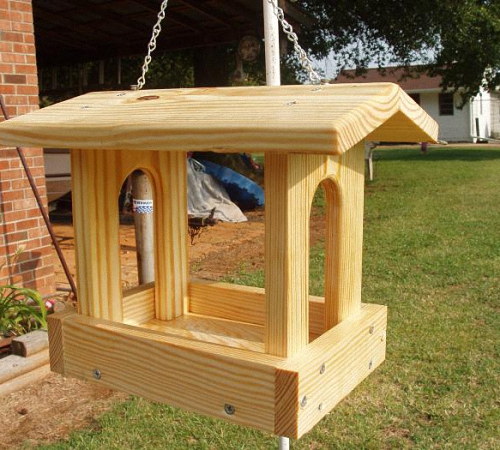
A do-it-yourself bird feeder made of wood with a roof is a more sustainable option. On a regular base, four support posts are installed, and the roof of the feeder is fixed on them. The top piece for the roof should be slightly larger than the bottom to protect the stern from rain and snow. This version of the feeder also belongs to the simple ones and does not require special experience in working with wood. Among the disadvantages of this design, we note that snow accumulates on a flat roof, the feeder becomes heavy in weight, and may fall from the tree. Therefore, it is recommended to periodically clean such a feeder from snow or install a pitched roof.
If there is a sunflower at home or large berries that birds can eat, it is enough to treat the birds with them. A variation in the manufacture of rowan beads or beads from cones is possible. You can build such a feeder from improvised materials. For example, you can put goodies in a regular grid that sells tangerines or oranges. You need to hang such a gift on a regular rope. Another way is to add wheat or other grain delicacy to unsalted melted lard, after hardening, you need to make a small ball from this mixture, which is installed in any place accessible to birds. The hardened fat holds the grain, which is gradually eaten by the birds.
To protect the food in the tangerine net, you can additionally build a roof. Thus, the food will not be exposed to moisture and snow. Periodically, such a feeder needs to be filled with new food. It is possible to supplement the main feeder with additional feeders with nets, in which there is a variety of treats. These feeders will be a great place to feed small birds.
If you have a coconut shell at home, you can also build a small feeder out of it. It will be a natural addition to any tree, and will not really stand out against its background. Two round holes must be cut in the shell. We also recommend placing grain mixed with melted fat inside the feeder. This variation of the feeder has an unusual and original design. If there is a steel mesh at home with a small section of cells, you can also build a feeder from it. Choose the diameter of the feeder individually, try not to make it too large, as a lot of feed makes the structure heavier. Make a protective cover on such a feeder to prevent food spoilage.
There are many ideas for do-it-yourself bird feeders, it’s enough to dream up and get the right materials. A feeder can be built even from cutting a branch. It is enough to connect several of these parts together to get the bottom of the feeder. The roof is made in the same way.
Some craftsmen make feeders from ordinary glass jars. They set them at a certain angle and pour food inside. You can paint such a feeder using special paints for glass surfaces. In the same way, you can make a feeder from the old part. It is better to fill it with food gelatinized, previously poured with melted gelatin. In the same way, you can make attractive bird feeder ornaments. For example, a solution of gelatin and various seeds is poured into a silicone mold, after hardening, it is possible to obtain beautiful heart-shaped, star-shaped, semicircular, etc. shapes.
Beautiful do-it-yourself bird feeder
We offer a variation of creating a cereal dining room for birds with your own hands. For this product, it is enough to use food, while the feeder perfectly complements the exterior of the garden and becomes its decoration. When performing a workflow, you will need to have accessories in the form of:
- a variety of small-sized feed, most often cereals or cereals are used;
- eggs;
- oatmeal;
- flour;
- gelatin composition;
- pencil
- thick cardboard base;
- scissors and thread.

Using a pencil and cardboard, come up with a shape for the future product. A variation in the manufacture of a dining room for birds in the form of a star, polyhedron, oval, circle or heart is possible. Using scissors, cut out the previously prepared drawing.
Prepare materials that act as bird food. It is possible to use different grains or bread crumbs. Using a needle, put a thread on the future sketch, which will later fix the feeder on the trees. In order to firmly hold the grains on the feeder, it is necessary to connect them with a natural adhesive composition.
To prepare it, combine the ingredients in the form:
- two tablespoons of oatmeal, beaten into flour;
- one egg;
- one teaspoon of honey;
- a few tablespoons of flour.
After connecting all the components, leave them for half an hour and only after this time, combine with previously prepared food.

First, the base of the workpiece is covered with an adhesive composition. In a separate container, all ingredients for the feed are combined with glue. Roll the workpiece in the resulting composition on both sides. For faster freezing of the feeders, place them in the refrigerator for 2 hours.
In the absence of any of the ingredients of the adhesive composition. You can prepare natural glue in another way. To do this, just take one pack of gelatin and soak it in warm water, according to the instructions on the package. Small grain products are combined with a solution and placed in a refrigerator to solidify.
This composition can be put in an old cup or glass, they are also fixed on trees with a rope. Such a bird canteen is quite easy to make, but at the same time it is an excellent place to feed birds in the winter season.
We also suggest that when performing the workflow, prepare materials in the form of:
- three flat-shaped candy boxes;
- glue;
- adhesive tape;
- ropes.

In order to build this feeder, it is enough to connect two candy boxes together with an adhesive solution. At the same time, they must form a roof. The third box is used as the bottom section of the feeder. This variation of the feeder is quite easy to manufacture, but at the same time it is an excellent place to feed the birds. To protect the cardboard from moisture, the feeder is covered with tape on all sides. In order to fix the feeder on the tree, an additional rope is attached to it. You can decorate the feeder with colored paper, in relation to the chosen design. The only drawback of such a feeder is the lightness of its weight. It is unstable and poorly held on weight.
Make a bird feeder with your own hands photo:

We offer another not difficult variation of creating a bird dining room. To do this, you must use a box from under any drink. The upper part of the box is fixed on the tree with a cord, and a hole is cut out on the lower part for feeding and eating food. It is recommended to additionally glue the box with adhesive tape, in order to avoid its destruction under the influence of water.
DIY bird feeder - original ideas
There are many extraordinary ideas to create bird canteens. Most often, these exterior elements are made of wood or plastic. We suggest that you familiarize yourself with the variation in the construction of PVC feeders.
To complete the workflow, you will need:
- scissors or knife;
- a plastic tank with a volume of five liters;
- wire.
In addition, food for birds should be prepared, which will be located in the forest canteen. Using a utility knife or scissors, cut a round hole in the bottom of the container. The diameter of the opening should be such that a bird can easily fly into it. A variation of the construction of several windows at once is possible, through which feed will be supplied. The upper part of the container is wrapped with wire and installed on a branch. For weighting finished product, use plywood or similar material that is laid on the bottom. This feathered canteen has a roof so the bird food will not get wet. In addition, the presence of large holes in diameter is a guarantee that there will always be a lot of birds in your feeder.

It is possible to design a do-it-yourself bird feeder using PVC bottles. When working on a dining room for birds, you will need to prepare materials:
- PVC bottles;
- wires;
- two spoons made of wood.
Using a knife or scissors, make an opening in the tank so that you can put a wooden spoon through it. 5 cm higher, make another identical hole. Set the spoons and pour the food into the bottle. On one side of the spoon, which is adjacent to the bottle with a wide edge, build a hole of a larger diameter. Thus, food, as it is eaten by birds, will spill out of the bottle. The upper part of the container is fixed to the tree, most often using wire or rope.
DIY bird feeders photo:
An easier variation on making a bird canteen is to cut a small door in a PVC bottle. In order to avoid injuring the birds in the process of getting into the feeder, all edges of the hole are sealed with electrical tape. Food is poured directly into the container.
Original do-it-yourself bird feeder
In the process of creating a wooden forest dining room for birds, you need to stock up on tools in the form of:
- wood or plywood;
- hammer with nails;
- timber;
- screwdriver;
- compositions to protect wood from high humidity.
Using plywood and a board, use a screwdriver to cut out the base for the feeder. The second part should be the same shape, only slightly larger. Thus, it will protect the feeder from moisture. Saw the timber into several parts, of which you need to make the sides for the feeder.

To fix the beam, use fasteners and a hammer. A wire or cord should be fixed on the roof, which will hold the roof on the branches. To connect the roof and the bottom of the forest dining room, additional supports are used, installed at the corners, or two - in the center. Open the feeder with an antiseptic, which prevents its destruction under atmospheric influence, it is additionally recommended to varnish the feeder.
Please note that it is strictly forbidden to feed birds with fresh bread, rye types of bread and flour, citrus fruits, salty foods, toasted seeds, oatmeal. These products will not bring any benefit to the birds, but only harm them.
Various types of grains, wheat, nuts, fruits, dried foods, lard, mountain ash with viburnum, etc. are used as food for birds. A beautiful do-it-yourself bird feeder will decorate any interior, children will be happy to watch how the birds eat food and rejoice that they are taken care of.
DIY bird feeder video:
We present to your attention several options for interesting bird feeders made. It turns out that the feeder can be easily made from ordinary plastic bottles, all kinds of boxes, wood - there would be a desire. This article will try to awaken this desire in you, thanks to which many birds will be able to comfortably survive the winter.

To begin with, let's take a look at a great many different feeders made from a variety of materials. This will help you decide on the image, choose the option that suits you.

plastic bottle and glass jar


Indeed, with the help of wood, the feeder can be given any look: you can build a mini-castle, you can put an ordinary “dining room” on racks, you can decorate the feeder with intricate carvings, etc. as far as your imagination allows and there are the necessary building materials.


It is very good when children are involved in making - they immediately form such character traits as caring for their neighbor, love for animals, responsibility, they show interest in making things, creating something!

Whatever you make your feeder out of, it is important to know the basic (and mandatory) elements of the feeder:
1. Your feeder must be with a roof - so the food will remain dry and will not be covered with snow, and it will be easy and simple for the bird to enjoy your treat;
2. Be sure to make the opening of the feeder wide enough, the birds are very shy, especially afraid of enclosed spaces. What if several hungry flyers arrive at once in your “bird dining room” for lunch? It is important to take care of this option;
3. When choosing a material for the feeder, be guided by its strength and moisture resistance: the denser and more moisture-resistant the source material, the longer your feeder will last;
4. The feeder very often turns out to be too light, therefore it reacts to every gust of wind, while grains and crumbs crumble and the birds remain hungry. To cope with this problem, you need to slightly weight the feeder. To do this, lay a piece of plywood, linoleum on its bottom (strictly according to the size of the bottom).


Now you will learn how you can independently make a similar feeder from all kinds of cereals.
This feeder looks great and, at the same time, perfectly copes with its functions! Tree branches adorned with such "decorations" give your garden an aesthetic and exclusive look. So let's get started!
We will need:
All kinds of grains, crumbs, seeds - all raw, as fried ones will only harm small flyers;
Egg;
Oatmeal;
Honey;
Gelatin;
Flour;
Pencil;
Thick cardboard;
Scissors;
Dense kapron thread.

1. Using a pencil and a regular sheet of paper, draw the shape of the future feeder. Hearts, stars, triangles, circles, squares - any geometric shapes will look beautiful;
2. Cut out a paper blank with scissors and attach it to thick cardboard. Circle with a pencil and carefully cut along the contour;
3. Take care of preparing bird food in advance. Pick up unroasted and unsalted grains, all kinds of bread crumbs;
4. Using a needle and a dense nylon thread, make a hole in the cardboard base and thread the thread into it - with its help this “delicacy” will be attached to a tree branch;
5. In order for the grains and crumbs to stick together and attach well to the cardboard base, start preparing natural glue:
- 2 tbsp. tablespoons of oatmeal (in no case oatmeal);
- 1 egg;
- 1 teaspoon of flowing honey;
- Flour.
All ingredients are thoroughly mixed in a bowl and left for 30 minutes. for swelling.
6. We apply the prepared adhesive mass to the base;
7. In another container, thoroughly mix all our grains;
8. We dip and roll in the resulting crumb-grain mixture our base coated with “glue”;
9. Ready grain feeders must be placed in the refrigerator for several hours - the mass should solidify well and acquire the necessary strength;
10. Hang such delicious “treats” on the branches of trees and watch from afar the feast of birds that have flown in to treat themselves and feast!

Dissolve one sachet of gelatin in warm water;
Pour all kinds of grains into the still warm solution;
Prepare ordinary cookie cutters, put a thread in them and fill with the resulting grain mixture;
Send the molds with the contents to the refrigerator to thicken;
Delicious toys are ready, you can safely hang them on the branches of trees!

Another "quick" option is to get a few old cups, or take ordinary plastic cups, fill to the top with the prepared mixture (on any basis from the proposed ones). After the mixture thickens in the refrigerator, tie the feeder to a tree branch with a ribbon! Quick option nothing worse! 
An ordinary cardboard box can successfully serve as a dining room for birds! However, it is advisable to pick up boxes covered with a special protective layer, laminate - this way the life of your feeder will increase significantly!

Juice boxes are ideal (they are covered with a special moisture-proof layer inside and out), from small appliances, medium boxes from postal parcels, bright candy boxes. Even shoeboxes will do a great job with the functions of the feeder!
Candy box bird feeder
You will need:
Candy box (3 pcs.)
Two medium nylon twine or two shoelaces.
Insert one end of the box into the other so that you get a triangle of three candy boxes connected to each other, as shown in the picture:
Pass the cord through the roof of the feeder, with the second cord securely attach your feeder to the tree.

candy box feeder
The feeder is ready, it remains only to fill in delicious grains and crumbs!
Even a child will cope with the manufacture of such a feeder (by the way, do not forget to involve children in this entertaining activity).
You will need:
Juice or milk box;
Long lace;
Knife or scissors.
Take an appropriately sized box and, using scissors or a knife, carefully cut a hole in the side of the box.
Through the top edge of the box, right in the middle, thread the string and fasten the “freshly prepared” feeder to the branch.

Hurry up and fill in the bird food - they have already discovered a new bird feeder and are eagerly waiting for your treat!
If you want to make a large enough feeder. To fit a whole flock of birds in it - take an ordinary postal parcel box! Glue the top carefully with adhesive tape, cut wide holes in the side moans, fix it on a tree - you're done! See what happened:
That's where there is a soul to turn around! There are a lot of plastic bottles of various shapes and colors around! There is a huge opportunity to show your creativity, invention, originality!
Let's take a closer look at the idea of turning an ordinary plastic water bottle into a bird feeder.
We will need:
- Knife or scissors;
- Plastic bottle with a capacity of 5-6 liters;
- Wire;
- Bird food.
1. Using a knife or sharp scissors, carefully (so as not to cut yourself) cut a wide hole in a plastic bottle, located slightly above the bottom of the bottle (2-3 cm will be enough);

2. You can make several windows, one on each side.
3. Wrap the neck of the bottle with a strong wire and fasten the other end of the wire to a tree branch;
4. Lay plywood or a piece of linoleum on the bottom of the feeder, with their help we will make our feeder heavier and it will not sway and turn over with every breath of the breeze;
5. Pour in bird food and wait for your invited "guests"!
Plastic bottle feeder with spoons
Let's say that you want to make a small compact plastic feeder, then take a 1.5-2 liter plastic bottle!
You will need the following materials:
1.5-2 liter plastic bottle;
Wire;
Sharp knife or scissors;
Two wooden spoons for coasters;
Bird food.

Step-by-step instruction:
1. Take a plastic bottle with a capacity of 2 liters, measure 15 cm from the bottom of the bottle with a ruler and make a through hole at this height in the very center of the bottle for wooden spoon;
2. Rise even higher (approximately to the middle of the bottle) and make another through hole for the second spoon. Only at a different angle (perpendicular to existing holes);
3. Insert through the spoon bottle;
4. Enlarge the hole on the wide side of the spoon - the grains will spill out and it will be convenient for the birds to peck them;
5. Pour the bird food into the bottle;
6. Tie the neck of the bottle with wire and attach it securely to the branches of the tree.
The feeder is ready! In a few minutes, birds wishing to treat themselves will visit it.
Another option for a plastic bottle feeder, more simplified:
We use the same materials as for the feeder with spoons. But now we don’t need spoons, but instead prepare electrical tape.

So, in a two-liter bottle we cut a large hole at a height of 5-7 cm from the bottom of the bottle. In order to make it convenient for the birds to sit on the cut edges of the bottle, we paste over the cuts with electrical tape or tape (your choice). We wrap the wire around the neck of the bottle and fasten it to a tree branch. Pour food - you're done!
DIY wooden bird feeder
We have already considered quite a lot of different options for bird feeders, made from all kinds of improvised means and even waste. It will not be right at all if a reliable and durable wooden feeder is left without attention - these are the feeders that hung on the trees in our childhood. It was them who were taught to make us at labor lessons by our Trudoviks!

Recall the manufacturing technology and - for business!
First, let's get creative and draw a little! Armed with a piece of paper and a pencil, draw the feeder you plan to make. Seeing it on paper. Estimate the dimensions of the future bird "dining room". Only after that you can start making the feeder.
As an option - use the ready-made drawings, which are presented at the very beginning of this article. The dimensions are already indicated there, the contours are clearly outlined - you can safely proceed to the next events.
To make a wooden feeder, you will definitely need the following tools:
1. Hacksaw;
2. Hammer;
3. Nails.
Prepare the following materials in advance:
Plywood of the right size;
Bars 2x2 cm;
Thin wooden board for the base of the feeder.
We go strictly by size! Dimensions are shown on the drawing.
1. From a thin wooden board (solid), we cut out a rectangular base of the desired size;
2. Now go to the plywood sheet and cut out a rectangle of the same size as the base - this plywood sheet will serve as the roof of your feeder;
3. We cut the bar into four parts, and one pair of bars should be 3 cm shorter than the first pair. Thanks to this design, the water will flow smoothly over the roof of the feeder and not stagnate on it - the roof will last much longer!
4. We retreat 1-1.5 cm from each edge of the feeder and nail the racks, first to the base of the feeder. And then we nail the roof to the racks. The front struts should be shorter than the rear;
5. We nail a wire or a strong nylon cord to the middle of the roof and fix the feeder on the tree.
Everything! The work is done, we pour the food, and admire the fun bird feast! Don't forget to take pictures - the memory will last a lifetime. There will be something to show to the grandchildren and what to make together with them!
In no case do we paint the feeder with paint or varnish - the birds do not tolerate such smells and will not visit the painted feeder with their presence!
What food is good for birds, and what, on the contrary, can harm them?
Feeding birds is a laudable occupation, but it is worth knowing that not all food is suitable for birds to eat! One food can provoke a disease of a gullible and hungry flyer, another can lead to the death of a bird, but the third one will definitely help a bird survive in a cold and hungry press and live until the long-awaited spring!
So, what can not be given to birds for food:
- Crumbs from fresh white bread;
- Crumbs from rye bread;
Skins of bananas and all kinds of citrus fruits;
Cream pies, cakes;
Chips;
Roasted and salted seeds;
Oat flakes;
Nuts.
What can and should be treated to birds:
- Raw seeds;
- Buckwheat, millet, oats, millet;
- crumbs and small pieces stale white rolls;
- Dried and cut into pieces fruits (dried fruits);
- Titmouse are very fond of small cubes of unsalted lard;
- For red-sided bullfinches, put mountain ash, viburnum in the feeder.
A few more photos of the original feeders:


Thanks to your attention and care in the winter period, there will be a real chance for more birds to survive, which, in turn, will definitely thank you later with their songs and "sanitary and health" work in your garden!
Watch also the video: Do-it-yourself bunker bird feeder in 10 minutes.
Our garden can bring us pleasure all year round. Even in winter, frosty and snowy, we are happy to watch birds and enjoy their chirping. In addition, birds help trees stay healthy during this period by destroying insects and pests, so it is very important to attract birds to our garden plot.
What will be needed for this? And just a small gift - a feeder, always filled with food. After all, in winter it is difficult for birds to get food, and you can help them escape the cold and hunger.
Wood is the most suitable construction material, traditionally used in almost any work. A do-it-yourself wooden feeder will serve you for many years, especially if you are responsible for its manufacture and strictly adhere to the drawings and recommendations. All you need in the future is to clean up the feeder in a timely manner to prevent excessive clogging and rotting of the structure.

There are three aspects of the work that need special attention. The first is the choice of material. It must meet the following criteria:
- durability - rain and snow should not cause tangible damage to it, otherwise you will have to change the feeder after every serious snowfall or downpour;
- strength - the birds that are planned to be fed should feel stable, and the feeder should not bend under them;
- smoothness - there should be no sharp edges or splinters that birds could get hurt on;
- naturalness - process the material chemicals you can’t, it will hurt the birds.

The second aspect is choice suitable place. It should be:
- open - birds should easily notice the feeder;
- not too noisy - you should not place a feeder near the road; sufficiently protected from small children and animals - cats are not averse to feasting on birds, so it is worth making sure that they do not have a chance to feast.

The third aspect is design features. The feeder should be:
- small, if it is for small birds - otherwise large birds will feed from it, driving away smaller ones;
- fairly open - birds should not have problems with access to food;
- devoid of sharp protrusions, edges and chips - otherwise it will be easy to get hurt about it;
- equipped with high sides - otherwise the birds will scatter food;
- equipped with a roof - otherwise the food will get wet with the smallest rain.
Only when all conditions are met, the feeder can be considered useful.
Do-it-yourself wooden feeder - option number 1
Stock up on the following materials and tools:
- sheets of moisture resistant plywood;
- plexiglass (in case you decide to install transparent walls);
- screws and self-tapping screws;
- jigsaw;
- paper, ruler and pencil for drawing.
So, first of all, you need to create a drawing that will guide you during assembly. Choose the model that you like, and draw a drawing on paper, determining the dimensions by eye. With the required dimensions, you will need to work consistently and carefully align them, so that in the end the feeder turns out to be beautiful and stable.
After the drawing of the product and all the components is ready, you can start marking and cutting the material. We will take as an example a rather simple, average project.

The size of our feeder will be 40 X 30 X 30 cm (length / width / height). Mark out two pieces of material of the same size - for the roof and base, and two posts connecting these parts to each other. The marking should be carried out as accurately as possible, down to the smallest detail. This will make the next assembly process easier. Now cut the structural elements and proceed to assembly.
Such a feeder looks like a miniature house and belongs to a variety of so-called bunker structures. It is easy to maintain and allows you to fill the space with food in portions to make it easier to look after the birds.
Do-it-yourself step-by-step assembly of a plywood feeder
Wood, timber, plywood and plexiglass are used for feeders not only because they are quite common and easy-to-work materials. They greatly facilitate the design.
- So, we have two details of the feeder measuring 40 X 30 X 30 cm: wooden - for the base and plywood - for the roof. You will also need 2 racks 30 cm long from a thin beam (2 X 2 cm is enough) and 2 more racks 27 cm long. This will provide a slope for the roof.
- On the base, fix the racks so that they are strictly vertical. Install them not in the corners themselves, but stepping back a little inward from the edge. It will be easier for you if you mark another rectangle inside the board, stepping back from the edge, for example, 2 cm.
- When attaching the posts, make sure that the shorter ones are in the right places, and not in opposite corners. The easiest way to fasten - self-tapping screws. Pass them through the base inside the bar from the bottom of the structure.
- You can use plexiglass as a material for the side walls. This will allow the birds to protect themselves from the wind during the meal, and you can safely watch the birds. To fix the plexiglass, make grooves in it about 4 mm on a milling machine, and use screws to fix it.
- Install a plywood roof on the racks and attach it with self-tapping screws on four sides. This is the easiest part of our job if you have chosen a shed roof structure. If the roof is gable, then the racks for it should be the same size, in addition, you will need to make a skate. Fasten the left half of the roof to the side wall, and fasten the right half and the ridge together. After that, assemble the structure and fix it with furniture hinges.

Please note: it is undesirable to cover the feeder with impregnation or paintwork materials because pungent odors can scare away birds and harm their health.
So, a simple, but at the same time beautiful and functional do-it-yourself plywood feeder is ready. You can install it on any flat surface. And if you want to place it on a tree, make rope or twine hangers that you can throw on a branch.
Do-it-yourself wooden feeder - option number 2
Making a wooden feeder does not require any effort, for this you just need to stock up on the necessary tools and you can proceed. For work you need to prepare:
- tape measure, pencil and carpentry corner;
- a jigsaw or a hacksaw, a drill with thin drills for wood and a screwdriver + self-tapping screws (or a hammer + nails);
- plywood or boards, bars for racks and sides, sandpaper and wood glue.

Please note that a feeder assembled on self-tapping screws instead of nails is more durable.
Preparatory stage
First of all, you should prepare a project for the feeder. You can find suitable drawings on the Internet or come up with an original design yourself.
Based on the prepared drawing, where the dimensions of all elements should be indicated, calculate the amount of materials needed. Correctly select the length of the fasteners for the sides, taking into account the thickness of the bottom and the section of the bar.

But we chose not such a drawing as presented above, but the simplest feeder, which can be easily assembled in five minutes, which we will describe in the future.
Assembling the feeder
Step 1: We mark up and use a jigsaw to cut out the components of our “structure”.

Step 2: We nail or fasten the bars to the bottom or screw them onto the screws, which will serve as the sides, from the two smaller sides we fasten the bars end-to-end with the edge of the bottom, we fix the other two with an indent from the edge of 5 - 7 mm, it should turn out like this:

Step 3: From the sides where we screwed the indented bars, we fasten the side walls with self-tapping screws.

Step 4: Our feeder is almost assembled, it remains to securely fix the side walls together. To do this, we cut another cloak to the size of our feeder and fasten it from the inside to self-tapping screws.

That's all, our "house" for feeding the birds is ready, after passing the rope through the roof, you can hang it in any convenient place.

Do-it-yourself wooden feeder - option number 3
An alternative option for a wooden feeder will be another design option made of plywood. The material allows you to choose any modification:
- open;
- with a gable or flat roof;
- with bunker.

Plywood is a wood-derived material that is much cheaper and lighter in weight. Before you make a bird feeder out of wood, you must definitely select the appropriate drawing. In this case, it is necessary to take into account the type of birds living in the region. Large birds such as magpies, pigeons and jays can eat all the food, leaving small birds without food. Therefore, if the feeder is designed for tits, the openings should be such that large species cannot reach the grains.
To work, you will need the following tools and materials:

- water-based adhesive;
- nails and hammer; plywood sheet;
- timber with a section size of 2x2 cm.
In accordance with the drawing, markings are applied to the plywood sheet. After that, all the details are carefully cut out with a jigsaw. A square element 25x25 cm will be used as a flooring for the bottom. For the construction of the roof, you need to take larger parts, otherwise moisture will drain onto the feed. The edges of the resulting blanks must be sanded.

From the timber you need to cut 4 racks 25-30 cm long each. If the structure will have a shed (flat) roof, a pair of bars should be shortened by 2-3 cm. The cut is made at an angle. All joints of parts are treated with an adhesive composition, after which they are fastened with nails. Racks are installed on the bottom, and sides are fixed to them. A roof is installed at the top of the racks. The design can be installed permanently or suspended using a hook and hardware.

How to make a bird feeder
Bird feeders are a great topic for both bird lovers and inventors of small architectural forms. How to do simple or fancy feeder from cardboard boxes, from plastic bottles, from cans, from a wooden block or a bucket of mayonnaise, as well as from packaging for a cake and from everything else, what to feed titmouse and what sparrows eat look and read - ideas fly in the air and land on this page.
The cutest and most beautiful "cafe" for birds
 What a beauty!
 Master Class
1. With a hot knife, cut the bottle in two places along the basting. See for yourself what width of the strip to cut, there are no exact dimensions.
 Cut according to the mark
 2.See the picture below. Cut out a wider strip, get a more squat figure, cut out less - the product will be higher.
 The height of the feeder depends on the height of the cut piece
 3. At the bottom of the bottle, cut a hole for the birds to land on, as shown in the photo. Do not forget to walk along the edge of the window with a hot knife so as to melt the cut and make it not sharp. The bird will sit on the edge of the window with its paws and should not be cut.
 To prevent the birds from cutting their paws
 Paint the bottom of the bottle with acrylic paint.
4. When the paint is dry, make two holes with a hole punch (or a hot nail) in the bottom of the bottle, on either side of the entrance to the feeder at the same distance.
 Hole punch makes holes neater than a nail
 5. Symmetrical holes must also be made in the upper part of the bottle, twine will be threaded through these holes, with which the upper and lower parts of the bottle will be connected and this beauty will be hung.
 Connect the bottom and top of the structure with twine
 6. Color the top of the bottle and don't forget the cork. Let dry.
7. The twine will be threaded according to the scheme:
 The twine connects the top and bottom of the feeder, and the knots are pulled up through the hole in the cork
 8 Make a hole in the cork, take the knots and pull the two ends of the twine by the knots through the hole in the cork.
 Pass the twine through the hole in the cork
 9Decorative detail. Make additional holes, as shown in the photo, on the bottom and top of the bottle and fasten the parts with decorative rivets. This will additionally fasten the details and give the look of a “brand item”.
 Rivet holes
Align the rivet holes on the bottom of the product with the same holes on the top.
 Rivets especially decorate
  Raffia palm string bow
 And from such bottles, funny feeders would also turn out.
 minion feeder
 From cardboard boxes.
Any cardboard box with a hole cut out, hung up and filled with food, is a feeder. For example, a box from Rafaelo or boxes from New Year's children's gifts, which are accumulated in every house in abundance after the New Year.
We use milk bags, paint and decorate with buttons and twigs. Glue with silicone glue with a glue gun. (I bought myself a glue gun at a hardware store, it was 3 times cheaper there than in a needlework store).
 Feeder from a milk bag with buttons
  feeder from cardboard box
 Raffaelo box
  Christmas gift boxes
 By the way, if there is no balcony, but only a window, then the cardboard device will come in handy, it will not break the window when you lower it out the window onto the windowsill. My only fear is that in this house the neighbors are not happy to feed the pigeons so close to the cars. It would be necessary to make the hole in the box small, then the pigeons would not be able to feed on the windowsill, but the tits would scurry back and forth and delight the child and kitten with their bustle. And so after all it's boring to look at the dove's ass sticking out of the box.
 The girl hangs the feeder outside the window (So much effort, but only the pigeon's ass is visible).
 Bird "bistros" from cans
 Tin can feeders
  To prevent the birds from cutting themselves, smooth the landing edge of the feeder.
 Baby formula cans are very bird-friendly.
Lauren Martin, a French horticulturist, has set up a whole feeder garden in her home.
From plastic bottles, it's easy.
The simplest homemade bird canteen that allows you to pour a full bottle of seeds, as a small hole prevents the seeds from getting enough sleep.
 The simplest bird feeder
 We do this according to the scheme:
 How to make the easiest plastic bottle feeder
  Make it easy
 From other improvised materials.
From the packaging for the cake.
 Cake for tits
 wooden bar idea
 bird bar idea
 From plastic buckets for mayonnaise.
 Bucket for birds1
  Bucket for birds2
 wooden blocks
 It is quite difficult to make, but the look is very eco-friendly
 From whole coconut.

When the holiday is over and the flesh of the coconut is eaten, the capacity of the coconut feeder will be filled with simple food in the form of seeds and the exotic restaurant will turn into a budget eatery.
Two options for one technology:

How and where to place top dressing.
This is actually an important question. After all, we live among people and our interests or the interests of our feathered friends should not conflict with the interests of the people around us.
If the droppings of birds that we bring to our window or balcony regularly fall on the lower balconies or on the cars of our neighbors, expect trouble. And do we need it?
Solving this problem is simple. You need to know a few things.
1 Feed pigeons only on the ground, away from parking lots, balconies and window sills, so that pigeon droppings do not harm us and our neighbors.
2 Sparrows, unlike tits, do not fly away immediately as soon as they take food, they sit in the same place where there is food and poop in the same place and throw the husks from the seeds in the same place. Such a fellow sits on the edge of a bottle or a perch, takes the seeds, pecks and throws the husk back into the seeds or next to them. Spit, brat, all around. Tits are afraid of him and wait, sitting on the branches nearby, when he is full. Therefore, a container with seeds should be hung away from the wall of the house,
1. Here's at least how my neighbors did, look at the video.
This is a Yurok, they are wintering with us. These birds are like sparrows, they sit until they are full and try not to let the tits in, and the titmouse fly up, take a seed and peck out a seed from a branch.
2.Or place inside the balcony so you can clean up after your guests.
 Cup on the balcony
  Titmouse love fat
  Serious feeder
  Titmouse on the slope of the window
  We fix the feeder with a dowel
  Feeder with lid - very convenient for filling with seeds
  "Bread pipeline"
 A child living in this house called this structure a "bread pipe"
What do tits eat
For feeding tits, unroasted sunflower seeds, unsalted lard, fat, nuts (chopped, with soft pulp, such as walnuts) and an exotic option - a sawn coconut suspended on a string, are suitable.
What not to give birds
You can not give salted fat, fried seeds, smoked meats, rye bread.
Titmouses will not eat either buckwheat, or millet, or rice.
But sparrows will eat millet and crushed grains and raisins.
By the way, wild grapes () on your balcony will also attract birds. An alpine jackdaw flies to us, see the video at the end of the article.
Fat treat
 Treats for the birds
 Salo can simply be hung on a thread or cut into pieces and put in a vegetable net, I made such a design on my feeder, which is also an observation deck for my cats in the summer.
In winter, it is not easy for birds to get their own food under the snow. You can help them by making a bird feeder with your own hands. Get your kids involved in this fun activity. In the process of working together, children can be told about how important it is to feed birds in cold weather, what kind of food should be poured, and which birds fly to the feeder in winter.
Why is it important to feed birds in winter?
 Ornithologists give the following figures: out of every ten tits, nine die during the winter, mainly from hunger. The metabolism of birds is designed in such a way that they need to eat throughout the daylight hours, and in cold weather, even more calories are required to maintain life. A well-fed bird retains heat without problems until the morning, and a hungry bird has little chance of surviving a frosty night. There is especially little food in the second half of winter, when most of the berries and fruits have already been eaten or covered with snow.
The device of the feeder is quite simple, by making it yourself, you will save a lot of bird lives if you do not forget to fill it in a timely manner.
What birds can be seen at the feeder in winter
 In central Russia, more than ten species of birds fly to feeders. In cities, tits, sparrows, pigeons, and crows are more common. In large parks, gardens, on the outskirts or in the countryside, woodpeckers, goldfinches, waxwings, nuthatches, bullfinches, jays and many other birds can be seen on feeders. The most frequent visitors to the bird canteen are tits - a large yellow-breasted and black-and-white Muscovite and their closest relatives - blue tit and princelings.
Feeder in a hurry from a plastic bottle
 Despite the unpresentable appearance, plastic bottle feeders can most often be seen on trees. They can be made from any container, but it is better to choose transparent plastic so that you can see how the feeder is empty. They have a lot of advantages:
- Waste plastic containers can be found in any household. Instead of filling the trash can with them, you can do a useful thing.
- To make such a feeder, you only need a kitchen or clerical knife and a piece of rope. If you want to do it as neatly as possible - mark the cutting lines with a marker and give it to the children - let them paint the future feeder. Such a beautiful bird canteen will be clearly visible on the white snow, and you will not miss it when you fill up the food.
- from plastic bottles you can make several - different shapes and types. By carefully observing the arriving birds, you can see the flaws in the design and make a new one without any problems.
And, finally, a person with any skills can easily and quickly make such a feeder. Teenagers can be instructed to make their own.
Rinse containers of strong-smelling liquids thoroughly. Birds have a delicate sense of smell and a strong smell can scare them away. It is better to take a container from under bottled water.
The easiest option is to cut a large hole in the side wall of the bottle. It should not be done too high so that the feeder does not turn into a trap. There should be a few centimeters left to the bottom. The cap on the bottle must be left so that snow and rainwater do not get inside through the neck. Choose a place for the feeder so that cats and other animals cannot jump into it from the ground or climb through a thick branch. At the same time, the bottle must be well fixed.
There should always be a variety of food in the feeder. Make sure you don't run out of food.
 An interesting and convenient design of several inverted bottles mounted on a wooden pallet. It allows you to simultaneously feed a larger number of birds with different food.
How to make a tree feeder
 Surely you have already made a few pieces from plastic bottles and hung them in a park or your garden. Now you can take on a more difficult task and make a do-it-yourself bird feeder out of wood. The simplest and most affordable material for it is plywood. It is durable and quite resistant to moisture. For work you will need:
- a sheet of plywood of a suitable size;
- wooden slats;
- pencil;
- jigsaw;
- hammer;
- nails or screws;
- screwdriver or screwdriver.
Plywood needs to be cut with a jigsaw according to the dimensions shown in the photo below. It is advisable to nail slats to such a bird feeder along the perimeter of the bottom so that the food does not spill out of it. Plywood can be replaced with fiberboard, OSB or hardboard.
 The assembly must be carried out in the same sequence in which the house is being built. The bottom is screwed to the base, then the gables. The roof is attached to them. Provide fasteners to a tree, pole or any other high structure.
The dimensions in the picture are approximate, and you can change them, but it is not desirable to make a large feeder with only corner posts, so that it does not turn out like in the photo below: 
For the same reason, you should not mount your craft directly on a tree trunk or a thick branch.
What food do winter birds need
Now you can make any bird feeder with your own hands. It remains to find out how to fill them and how to prepare food so that the birds are satisfied.
 You can start collecting food for birds in the summer. Collect and dry the seeds of watermelon, melon, sunflower, pumpkin, hemp. All seeds must not be roasted. Shredded dried white bread, cottage cheese mixed with dried bread so that it does not stick together, unsalted lard, acorns, bunches of mountain ash, elderberry will go into action. For granivorous birds, bunches of weeds are dried in autumn - nettles, quinoa, burdock, horse sorrel.
If it was not possible to prepare the food in advance, ready-made grain mixtures for parrots and other ornamental birds are suitable.
You can not pour salty and spoiled foods into the feeders, including putting salted lard, moldy bread, millet, fried seeds. Black bread, pies, whites and pizza are also not suitable.
Having made a bird feeder with your own hands, you will save a lot of birds, and you will meet spring with their cheerful singing. And in gardens and parks, they will help get rid of many pests on trees.
Homemade feeders - video