How beautiful to decorate a wooden bird feeder. For everyone and about everything. Cardboard box bird feeder
Winter time is a serious test for birds. Every day it becomes more and more difficult to find food. Take care of the birds - hang a feeder made with your own hands from the simplest materials at hand, which we usually throw in a landfill. We have selected photos and original ideas for making feeders that do not require special skills and complex drawings.
How to make a bird feeder with your own hands?
By accustoming the birds to the feeder, you can observe the entertaining turmoil of birds and the secret life of birds.
Some of them defend their rights in a fight with relatives, others enter into competition with other species, but without exception, all carefully look around so as not to miss the attack of a small hawk, which is very interested in the visitors of the feeder.
Materials for the manufacture of feeders can be very diverse, but there are some general design rules:
- the feeder should be, first of all, convenient for the birds, there should not be any difficulties when extracting food;
- the roof and sides will help protect the food from snow, rain and wind. From exposure to moisture, the food can deteriorate and become moldy, which means it will turn into poison for birds;
- it is desirable that the material from which the feeder will be made is resistant to moisture, otherwise this design will not last long and a new one will need to be made;
- walls and corners should not be sharp and prickly;
- feeders for small birds are made small so that larger and more aggressive species do not encroach on their food;
- it is better to place feeders on tree branches or attach them to the walls of outbuildings at a height of about one and a half meters, so that cats do not offend the birds, and it is convenient to add food to feathered friends.
Advice. Birds get used to a permanent feeding place and are ready to travel many kilometers to the feeder. Therefore, feeding must be constant, otherwise the birds may die.
Plywood bird feeder
You can buy a feeder in a hypermarket, or you can make it yourself in a few hours. A plywood feeder can be made open, with a flat or gable roof, provide a bunker compartment if you can not constantly monitor the amount of feed in the feeder. Of course, you will need drawings, fortunately, there are plenty of them on the Internet with ready-made sizes of parts for cutting. Choose the design that you like, the drawing will facilitate the work and ensure that the end result is exactly what is shown in the photo.
When choosing a drawing for a future feeder, consider the bird population in your region. Jays, pigeons and magpies can eat all the food, leaving little titmouses hungry. To prevent this from happening, make the size of the openings of the feeder so that large birds cannot reach the feed.
So, you will need a hammer, an electric jigsaw, nails of a suitable length, water-based glue, sandpaper, plywood, 20 x 20 mm timber. Consider the simplest feeder.

Wooden bird feeder ideas and drawings
Wooden feeders are attractive because they will last a long time, keep their shape well - this is due to the properties and reliability of wood. To make such a feeder, you will need at least minimal skills in working with tools and a drawing. The board for manufacturing should be 18 - 20 mm thick. Consider the option of making a feeder, which you can do yourself or take a photo as a basis for a drawing. We will need a 4.5 x 2 cm timber for the racks, a 25 x 25 cm square of plywood for the bottom, two pieces of 35 x 22 cm for the roof, nails, self-tapping screws and glue.

Such a feeder can be installed permanently on a dug-in pole or drill two holes in the ridge, screw in a screw with a hook and hang it on a wire. Several birds can fly up to the feeder at the same time, the food is protected from the wind by the sides and the roof, the feathered friends of the garden will like such a cozy dining room.
If there is a gazebo on your site, hang a simple feeder without a roof there. It is enough to make a side and a bottom. If you want to paint the feeder or open it with varnish, then use water-based compounds so as not to harm the birds.
Advice. To prevent the tree from splitting, the tip of the carnation must be made blunt, and a hole must be drilled under the self-tapping screw before screwing in.
Making a cardboard feeder (suitable for children)
One of the simplest feeders. The cardboard option is interesting in that it can be made in a place with children and at the same time have a great time with them. This would be a great craft for kindergarten or elementary school. There is a lot of room for creativity here. Cardboard is a great option, it is only afraid of straight water. But if you want to play it safe and make the feeder more resistant to moisture, then you can glue the outer elements of the feeder with wide adhesive tape, especially its upper and lower parts. In the forest or in the park, such a feeder can easily last all winter and part of spring.


Cardboard feeder collage. Photo livemaster.ru/topic/179659-delaem-kormushku-iz-kartona
The set of tools and materials is minimal, and if you don’t have something from this list, you can always find a replacement for it. So we need these materials and tools:
- A pair of cardboard sheets, (A4 format or more) ;
- Ruler;
- Adhesive tape (for structural reliability);
- Stationery knife;
- A tourniquet or a piece of nylon rope to hang the feeder;
- Pencil or felt-tip pen;
- Glue for cardboard or glue gun;
- Hole puncher.
If such a feeder is going to take the prize as the best craft in your kindergarten, then you have to sweat a little in terms of external design. Here our cardboard will give odds to any Tetra-Pak (this is a milk or juice bag), you can draw beautifully on it and decorate it in every possible way. Undoubtedly, the prize from kindergarten will be yours!
pumpkin feeder
But here, as they say, words are superfluous - everything can be seen in the photo collage. I would like to add that such a feeder looks very attractive and unusual and will be a real decoration of your garden, this is due to the shape of the feeder and its color, which looks great against the background of white snow. 
This option is also suitable for making with children. And such a beautiful, bright craft in kindergarten will definitely not go unnoticed.


Bird feeder out of the box Tetra pak) from juice or milk
You can make a feeder from a milk bag or a tetra pack from under the juice, like this. This is even for a child. For this you will need:
- a clean juice bag;
- a piece of nylon rope or wire to hang the feeder;
- adhesive plaster;
- marker;
- scissors or utility knife.
First of all, we mark and cut holes on opposite sides of the tetra pack. To make it convenient for the birds to take food and fly out. We glue the window on the underside with adhesive tape for the convenience and safety of the birds. We pierce a hole under the holes with scissors and insert the cardboard folded into a tube, which remains from cutting the holes above. In the bent corners we make small holes for the wire or rope. And tie to a branch.
The feeder can be attached to a tree trunk. Such a feeder will not sway in the wind. For this, feeding slots are made not on opposite sides of the package, but on adjacent ones. On the opposite side, we fix the wire in the slot and fasten it to the tree.
You can make a feeder out of two juice bags. We cut the first package along the narrow sidewalls, leaving the top not cut. We cut off the third part from the second tetra pack and cut a hole on the front side of the package - this will be the stern board or the bottom of the feeder. We combine the bottom with the first package so that we get a triangle. Parts can be connected with glue, wrapped with tape or pierced at the bottom of the sidewalls to insert tubes for cocktails.
Bird feeder from plastic bottles 1.5 - 2 liters
Consider some variations of the execution of the feeder with your own hands from plastic containers.
Option number 1. The simplest feeder
Symmetrically, on both sides of the bottle we cut out two holes: round, square, rectangular or in the form of an arch. Jumpers should remain between the holes. If you make a slot in the form of an inverted letter "P" and bend the plate up, you get a visor from the rain. You can stick a band-aid or fabric tape on the bottom edge of the hole - the edges will not be pointed and the birds will sit comfortably. We make symmetrical holes in the lower part and insert the stick - the result is a feeder with a perch.
You can attach such a dining room for birds on a tree by wrapping a jumper with tape, rope or other suitable material, as seen in the photo. If you make a hole in the cap of the bottle and insert the ends of the twine, and then tie them into a knot, you get a loop that can be thrown over the branches of garden trees.
Option number 2. Bunker feeder.
This design is rational in use in that the feed can be poured with a margin for several days. The feed, as it is eaten by the birds, will automatically fill up on the feeding ground itself.
You will need two bottles of the same volume. We mark one bottle with a marker before cutting. We make holes at the bottom, as in feeder No. 1, and remove the upper third of the bottle. We make two symmetrical holes at the top - a ribbon or twine will later be attached to them for hanging the feeder. In the second bottle, we cut several holes at the narrowest part - food will spill out of them. Do not immediately make large holes, it is better to expand them later. We fill the bottle with food, tighten the cork and insert the bottle into the first bottle cut off by a third.
Option number 3. Feeder with spoon
We make a hole in the cork and insert the twine for hanging. Then we symmetrically make two holes the size of a spoon. Above the bowl-shaped deep part of the spoon, we cut a hole in the bottle, slightly expanding it so that the birds can take food. We fill the feeder and hang it up.
Advice. With a red-hot needle or small nail, make several holes in the bottom of the feeder to remove moisture that has got inside.
Bird feeder from a plastic bottle 5 liters
Probably, in every house there is an empty plastic five-liter water bottle. It is very simple to make a feeder in one evening for feeding birds in the winter from this material. Such a container will hold much more food than a smaller plastic bottle, as can be seen in the photo. Several holes will allow you to comfortably feed several birds at once.
It's very simple and fast option, invite your children or other family members to take part in the manufacturing process: find a ribbon or wire to tie the finished feeder to a tree branch, prepare a treat for the birds. Prepare a clean bottle, a sharp knife, secateurs or a clerical knife.
We cut the hole based on how we plan to fix the container on the tree:
- horizontally - cut a wide hole from the side of the bottom of the bottle and the same from the side of the neck;
- vertically - at a height of 5-7 cm from the bottom of the container, we cut several square holes or three rectangular ones.
It is convenient to tie a bottle by the neck to a branch with wire or twine. If the feeder is made in a horizontal version, then make two holes on the wall with a knife, through which pass the twine for tying. To prevent the feeder from swaying in the wind, put a quarter of a weight brick on the bottom, and load a treat on top.
From a five-liter bottle, you can also build a bunker feeder. To do this, you will need a five-liter bottle and two 1.5-liter bottles, a marker, a stationery knife and a rope.

With a little ingenuity, you can create unusual canteens for birds from the simplest plastic bottles that will decorate your site.
Shoe box bird feeder
Everything is simple here. We take a dense shoe box with a lid. We make a round hole in the lid. The hole needs to be shifted slightly from the center to the bottom edge of the box (a little different in the photo), this is necessary so that the birds can get to the food that will lie at the bottom of the box.
We make a small hole in the upper part of the box and insert a tourniquet or rope into it. Tie an old pencil or stick to the end of this rope. We will then tie the other end of the rope to the branch of the tree on which we plan to hang the feeder. Then you can wrap the box with wrapping paper, but this is for the aesthetic component, you can not do this.
We make a roof from ordinary cardboard and put it on glue. Next, we glue the lid to the box itself with tape, as in Figure 3, 4, and also thread the rope through the lid.


At the moment when we hang the finished feeder on a tree, the roof may peel off from the box, but this is not scary, it cannot go anywhere, because. rope will hold it.
And in the picture below is an even simpler version of the shoe box feeder. But there is no need to explain anything, everything can be seen in the photo. The whole box is simply rewound with tape, which, by the way, is very practical. And in our opinion it turned out - original and unusual.

Cardboard box bird feeder
To make a bird's dining room with your own hands, the simplest material will fit, which is stored in abundance on the balconies of most families: boxes from electrical goods, cardboard packaging from food products. Choose thicker cardboard with a laminated coating, the laminate will slightly increase the life of the feeder. Although, as written above, wide tape can be used for these purposes. The advantage of this design is that there is already a bottom, walls and roof of the future feeder, which needs to be slightly modified by cutting square or rectangular holes on the sides.
You will need a nylon cord, scissors or a clerical knife and adhesive tape. Since cardboard is a very short-lived material and is afraid of moisture, the finished feeder wrapped with tape will last until the next season. Having cut through the side holes and fastening the cord, you can hang the feeder and fill it with treats for birds that will not take long to wait. Put sand or some pebbles on the bottom so that the structure does not shake much with the wind.
You can do it a little differently. We glue the lid of the box perpendicularly so that the lid serves as a stern stand, and the second part of the box is a side and a roof. We glue the structure with adhesive tape. We make two hooks from the wire: we bend a piece of wire in half and pierce the “ceiling” of the feeder with the ends, twist and bend from the inside. By connecting the hooks, you can hang the feeder on a branch. As you can see in the photo. Now pour the food and wait for the guests.
Bird feeder on the window (with suction cups)
Such feeders are a very interesting option for the overall development of children, and adults too :). The feeder is attached to the window, or rather to the glass, with the help of suction cups. Usually such feeders are also made transparent in order to fully enjoy watching the birds. If you have suction cups, you can make such a feeder yourself, for example, from the same plastic bottle, but you must admit that after all it will not be as aesthetically pleasing as the finished version from the store. Children will probably start taking pictures of it all, and photos with yellowed, cloudy bottles will, to put it mildly, not so hot. Purchased options look very nice.


DIY bird feeder: video
Types of bird feeders: photo


How to make a bird feeder
Bird feeders are a great topic for both bird lovers and inventors of small architectural forms. How to do simple or fancy feeder from cardboard boxes, from plastic bottles, from cans, from a wooden block or a bucket of mayonnaise, as well as from packaging for a cake and from everything else, what to feed titmouse and what sparrows eat look and read - ideas fly in the air and land on this page.
The cutest and most beautiful "cafe" for birds
 What a beauty!
 Master Class
1. With a hot knife, cut the bottle in two places along the basting. See for yourself what width of the strip to cut, there are no exact dimensions.
 Cut according to the mark
 2.See the picture below. Cut out a wider strip, get a more squat figure, cut out less - the product will be higher.
 The height of the feeder depends on the height of the cut piece
 3. At the bottom of the bottle, cut a hole for the birds to land on, as shown in the photo. Do not forget to walk along the edge of the window with a hot knife so as to melt the cut and make it not sharp. The bird will sit on the edge of the window with its paws and should not be cut.
 To prevent the birds from cutting their paws
 Paint the bottom of the bottle with acrylic paint.
4. When the paint is dry, make two holes with a hole punch (or a hot nail) in the bottom of the bottle, on either side of the entrance to the feeder at the same distance.
 Hole punch makes holes neater than a nail
 5. Symmetrical holes must also be made in the upper part of the bottle, twine will be threaded through these holes, with which the upper and lower parts of the bottle will be connected and this beauty will be hung.
 Connect the bottom and top of the structure with twine
 6. Color the top of the bottle and don't forget the cork. Let dry.
7. The twine will be threaded according to the scheme:
 The twine connects the top and bottom of the feeder, and the knots are pulled up through the hole in the cork
 8 Make a hole in the cork, take the knots and pull the two ends of the twine by the knots through the hole in the cork.
 Pass the twine through the hole in the cork
 9Decorative detail. Make additional holes, as shown in the photo, on the bottom and top of the bottle and fasten the parts with decorative rivets. This will additionally fasten the details and give the look of a “brand item”.
 Rivet holes
Align the rivet holes on the bottom of the product with the same holes on the top.
 Rivets especially decorate
  Raffia palm string bow
 And from such bottles, funny feeders would also turn out.
 minion feeder
 From cardboard boxes.
Any cardboard box with a hole cut out, hung up and filled with food, is a feeder. For example, a box from Rafaelo or boxes from New Year's children's gifts, which are accumulated in every house in abundance after the New Year.
We use milk bags, paint and decorate with buttons and twigs. Glue with silicone glue with a glue gun. (I bought myself a glue gun in hardware store, there it was 3 times cheaper than in needlework).
 Feeder from a milk bag with buttons
  Cardboard box feeder
  Raffaelo box
  Christmas gift boxes
 By the way, if there is no balcony, but only a window, then the cardboard device will come in handy, it will not break the window when you lower it out the window onto the windowsill. My only fear is that in this house the neighbors are not happy to feed the pigeons so close to the cars. It would be necessary to make the hole in the box small, then the pigeons would not be able to feed on the windowsill, but the tits would scurry back and forth and delight the child and kitten with their bustle. And so after all it's boring to look at the dove's ass sticking out of the box.
 The girl hangs the feeder outside the window (So much effort, but only the pigeon's ass is visible).
 Bird "bistros" from cans
 Tin can feeders
  To prevent the birds from cutting themselves, smooth the landing edge of the feeder.
 Baby formula cans are very bird-friendly.
Lauren Martin, a French horticulturist, has set up a whole feeder garden in her home.
From plastic bottles, it's easy.
The simplest homemade bird canteen that allows you to pour a full bottle of seeds, as a small hole prevents the seeds from getting enough sleep.
 The simplest bird feeder
 We do this according to the scheme:
 How to make the easiest plastic bottle feeder
  Make it easy
 From other improvised materials.
From the packaging for the cake.
 Cake for tits
 wooden bar idea
 bird bar idea
 From plastic buckets for mayonnaise.
 Bucket for birds1
  Bucket for birds2
 wooden blocks
 It is quite difficult to make, but the look is very eco-friendly
 From whole coconut.

When the holiday is over and the flesh of the coconut is eaten, the capacity of the coconut feeder will be filled with simple food in the form of seeds and the exotic restaurant will turn into a budget eatery.
Two options for one technology:

How and where to place top dressing.
This is actually an important question. After all, we live among people and our interests or the interests of our feathered friends should not conflict with the interests of the people around us.
If the droppings of birds that we bring to our window or balcony regularly fall on the lower balconies or on the cars of our neighbors, expect trouble. And do we need it?
Solving this problem is simple. You need to know a few things.
1 Feed pigeons only on the ground, away from parking lots, balconies and window sills, so that pigeon droppings do not harm us and our neighbors.
2 Sparrows, unlike tits, do not fly away immediately as soon as they take food, they sit in the same place where there is food and poop in the same place and throw the husks from the seeds in the same place. Such a fellow sits on the edge of a bottle or a perch, takes the seeds, pecks and throws the husk back into the seeds or next to them. Spit, brat, all around. Tits are afraid of him and wait, sitting on the branches nearby, when he is full. Therefore, a container with seeds should be hung away from the wall of the house,
1. Here's at least how my neighbors did, look at the video.
This is a Yurok, they are wintering with us. These birds are like sparrows, they sit until they are full and try not to let the tits in, and the titmouse fly up, take a seed and peck out a seed from a branch.
2.Or place inside the balcony so you can clean up after your guests.
 Cup on the balcony
  Titmouse love fat
  Serious feeder
  Titmouse on the slope of the window
  We fix the feeder with a dowel
  Feeder with lid - very convenient for filling with seeds
  "Bread pipeline"
 A child living in this house called this structure a "bread pipe"
What do tits eat
For feeding tits, unroasted sunflower seeds, unsalted lard, fat, nuts (chopped, with soft pulp, such as walnuts) and an exotic option - a sawn coconut suspended on a string, are suitable.
What not to give birds
You can not give salted fat, fried seeds, smoked meats, rye bread.
Titmouses will not eat either buckwheat, or millet, or rice.
But sparrows will eat millet and crushed grains and raisins.
By the way, wild grapes () on your balcony will also attract birds. An alpine jackdaw flies to us, see the video at the end of the article.
Fat treat
 Treats for the birds
 Salo can simply be hung on a thread or cut into pieces and put in a vegetable net, I'm on my feeder, which is both observation deck for my cats in the summer, I made such a design.
Foreword
When winter comes, especially frosty and snowy, many wintering (non-migratory) birds move closer to human habitation in search of food. Feeding them is not only noble, but also exciting, because the bright plumage and sonorous chirping of winged guests will delight both adults and kids. And how to make a feeder from a wide variety of improvised materials, we will tell in this article.
Features of bird feeders
When making a mini-dining room for flying guests, regardless of the chosen scheme, important nuances should be taken into account:
- Birds do not hear well, they perceive smells poorly, but they see well. Based on this, in order for them to realize that there is a source of food in front of them, the food must be clearly visible.
- Also, the feeder should be equipped with sides and / or stable enough so that the food is not blown away by the wind. Scattering seeds on the ground, we run the risk of feeding not birds, but cats or other predators, and, unfortunately, birds. To prevent such an outcome on firmly fixed structures, special protective devices are needed.
- In the bottom you need to make several small holes. They are needed to drain water that gets into the rain so that rot or mold does not start.
- Be sure to secure the sides. Sharp or metal edges are not allowed - birds can damage the paws.
Important! The feeder should not be constantly full - pour food 1-2 times a day. By overfeeding birds, you run the risk of weaning them to forage on their own.
Easy ways to make bird feeders
There are a lot of options for making a bird dining room. Depending on the availability of materials and skills, you can assemble something simple or a real tower. Below are examples of various designs.
Almost the easiest option, even a child can do it on his own. Need to cook:
- a clean dry box or juice / milk packaging (take at least a liter volume, Tetra Pak is better - it does not get wet);
- scissors or knife;
- rope;
- adhesive tape (optional);
- plastic straw / straw;
- weighting agent.
Feeder-garland
Very simple and New Year's. You only need a thin strong rope (or twine, or wire, but always braided). We string or wrap food on it: pieces of unsalted fat, clusters of berries, dried fruits (apples, pears). You need to hang such a feeder tightly so that the birds can sit comfortably.
Did you know?It is worth putting the most unexpected, at first glance, things in the bird feeder. Thoroughly crushed eggshell rich in essential feathery calcium, and fine river sand will aid digestion.
Tin can feeder
It is made quickly and simply, looks compact. You will need:
- tin or metal can (for example, from conservation);
- small stick;
- rope/tape.
Manufacturing:
- place the jar horizontally;
- approximately to the middle you wind the tape (if necessary, make an additional fixation on the glue), leave the long end;
- attach a stick to the bottom edge of the hole (the bird will sit there);
- wind the free end of the tape to the branch (the jar should hang parallel to the ground).
pumpkin feeder
A bright and original solution that does not require special skills. You will need:
- a whole large pumpkin;
- sharp knife and spoon;
- two long, strong, not too thick straight sticks or plastic tubes;
- a couple of meters of strong twine / rope / wire.
There are 2 ways. First (if the fetus is not very large and / or it does not have a tail):
- horizontally cut off the upper third;
- scrape out false pulp and seeds;
- taking a gap from the edge, pierce the pumpkin with sticks crosswise, through the walls - so that the ends of the sticks stick out of the pumpkin;
- attach ropes to the outer ends of the sticks;
- tie them to a horizontal tree branch or other suitable support;
- fill with food.
Second (if the pumpkin has a strong and long tail):
- make two large holes approximately in the middle on different sides of the fetus;
- remove the pulp and seeds;
- tightly tie the rope to the tail;
- attach to height.
Video: pumpkin feeder
Feeder "string bag"
Freezing feeding method:
- pour seeds, cereals, berries with melted fat (or interior fat, or peanut butter);
- form a large lump;
- freeze it until hard (put in a bag and freezer);
- remove the package and put the resulting product in a string bag (a handbag made of medium-sized mesh).
Metal mesh feeder
It is done in almost the same way as the "string bag", but there are some differences. So, the food does not need to be fastened with fat, you can take bulk. Here is an example of an interesting mesh feeder.
Would need:
- well bending mesh (plastic or stainless steel);
Important! Choose the size of the cells so that the food does not spill out, but the birds can easily get it.
- 2 plastic saucers (pallets from under flower pots are suitable) - this is the bottom and lid;
- rope;
- construction ties.
Manufacturing:
- roll the cylinder from the grid, fasten it with ties;
- in saucers make 4 holes around the edges;
- fasten the bottom with ties to the cylinder;
- pour food;
- make a hole in the middle in the roof;
- fix the rope there (you will hang the feeder for it);
- fasten the roof with ties.
Plywood feeder
The strongest and most durable option, but also the most difficult.
You will need:
- plywood sheets (with water-repellent impregnation);
- 4 strong rails (optional);
- saw;
- nails/screws;
- hammer / screwdriver.
There are many schemes for building, so we will give only general principles. The feeding trough consists of:
- bottom / floor where bird food will be poured;
- a roof that protects against precipitation (horizontal or sloping);
- 4 supports connecting the bottom and the roof (or two opposite walls, then the supports are not needed);
- low sides so that the food does not spill out.
The final look of the finished structure depends only on your imagination and skills. Before starting, we recommend making a drawing with dimensions and cutting the material based on it.
Such a feeder can be placed on a post, railing at home, hung on thick branches.
Video: plywood bird feeder
Wooden feeder
A birdhouse made of wood differs from a similar one made of plywood only by a large weight, which should be taken into account when placing it. Also, if the boards are not impregnated, they should be varnished for durability. However, there is another option - a log feeder. It should be 25-30 centimeters in diameter and about half a meter in length. To make a feeder out of it, you need:
- log itself;
- rope;
- axe;
- strength, dexterity and patience.
The process itself is simple, but lengthy - an oval recess is hollowed out with an ax. Depending on its size, the feeder is placed with a recess to the side (if it is large), then the roof is obtained, or up (then the roof can be built from a board and slats). Due to the large weight, such a structure is placed only on strong supports (pillars, ceilings).
Did you know?If you live in a private house with a personal plot, you can derive practical benefits from the feeder - birds that are used to flying to you for food may well begin to nest nearby, and with the onset of heat, they will rid the garden and garden of pests.
Video: how to make a bird feeder
You need to fill the feeder with suitable food for the birds so as not to harm them. Under no circumstances should you put:
- Bread and any bakery products(cookies, bagels, muffins). They are hard to digest, but do not give strength.
- Salty, peppery, spicy. Chips, snacks, and any human food is not a good option.
- Rancid, moldy, spoiled cereals.
The optimal composition of top dressing:
- Sunflower seeds (raw, without salt). They contain a lot of healthy vegetable fats, suitable for almost all wintering birds.
- Cereals: wheat, oats, millet. They like to consume granivorous (for example, sparrows).
- Lard and/or meat (unsalted). Titmouses and woodpeckers peck at him with pleasure.
- Dried berries (hawthorn, mountain ash, viburnum). Prefer snowmen.
- If prepared in advance, you can diversify the bird's menu with maple seeds, ash, cones, nuts and acorns.
Important! The feeder needs to be cleaned from time to time. Since birds shit where they eat, this will quickly lead to unsanitary conditions that can become a source of infections.
As you can see, by spending a little extra materials and your time, you will help the birds survive the winter. Get close to nature.
Birds living in wild nature needs protection and care. It is especially difficult for them during the winter: when it is cold outside, it is so hard to find shelter and food.
That is why caring people try to feed our younger "brothers" as much as possible. One of the ways that will not only help the birds, but also decorate your garden, is a feeder made from improvised materials.

In this article, we have collected some of the most affordable options - focusing on descriptions and photographs, using already unnecessary items (plastic bottles or old dishes), you can easily equip a place where flocks of birds will gather.
Material selection
After evaluating the resources you have to create a feeder, you can choose an idea to your liking. However, it is worth remembering that not only it depends on the configuration appearance, but practical characteristics such as sustainability.

That is why a good feeder must meet the following requirements:

Wear resistance and durability. Preference should be given to wood or plastic that can withstand weather conditions without getting wet from rain and snow, without collapsing under gusts of wind.

In addition, the birds themselves are often the cause of damage to the feeder - in search of crumbs, their beaks and claws scratch and tear fragile materials.

Proper size. Remember that if you cut a small feeder, for example, from a tetrapak, then large birds will not be able to eat from it, and small ones will start fights for a place and shake out food on the ground.

No sharp edges, "pulling out" carnations, etc. Birds are very delicate creatures, their feather protection and skin on their legs cannot prevent cuts from sharp objects, so make sure that your feeder is not dangerous for them, especially if it is made of glass, plastic or knocked together from planks!

Location and installation
Choosing the right place is extremely important!

Choosing the most suitable position in terms of landscape design, evaluate:

Accessibility for birds. Perhaps the feeder will be closed from them by thick branches, or, conversely, too open, and then, with a strong wind, the birds simply will not be able to get close to it.

Difficulty for cats. These animals are excellent hunters, especially those who live in villages and holiday villages. They are stronger, faster and more agile than their domestic counterparts, and therefore, sneaking up to the feeder, they can cause great damage to the bird community.

Ideas for creating a do-it-yourself feeder
There are a huge number of different types of feeders - it all depends on your imagination and the materials available.

We will try to consider both the simplest and the most original ideas.

House made of wood or plywood
Despite the seeming complexity, such a design can well be assembled with unnecessary boards, pieces of wood, glazing bead, plywood and, of course, special glue or nails.
Note!

The basis should be a heavy flat plank. For the manufacture of walls and roofs, you may need a drawing, however, it is quite possible to get by with an eye.

A wooden feeder, depending on how much attention you pay to it, can become not only a place for feeding birds, but also an elegant decoration of your garden.

Plastic bottle feeder
This type of feeder is very easy to make and is great if you decide to involve children in the process of creating. You need to cut one or two holes in the bottle in such a way that it is possible not only to pour the food, but also access to it is not difficult.

Of course, you should try to make the cut edges come out neat and not too sharp (in addition, it is advisable to glue them with tape).
If you are using a small bottle (1.5-2 liters), then you can do it in two ways: cut a square or rectangular hole in the bottle, or prefer a U-shape so that you can bend a piece of plastic and make a visor.

In the event that you decide to use a large bottle (5-6 liters, in which drinking water), you can make a large side cut. So it will be possible not only to fill up more food, but also give the birds room to maneuver.
Note!


In order to prevent the wind from ruffling a light bottle, it is worth putting a stone or a brick fragment on the bottom. This also applies to the next type of feeder.

Tetrapack bird feeder
In order to make a bird feeder, you can also use juice or wine boxes.

To do this, follow the same technology as in the previous case: mark the place of the cut, cut it out in shape, glue tape (or adhesive tape) on the underside of the opening, then make holes for a strong rope in the upper part of the tetra pak. It remains to hang the feeder in the place of your choice.
Shoe box feeder
The cardboard from which the shoe box is made cannot be considered a durable material, but it is sufficiently resistant to moisture, and if it is cold outside, such a feeder can hang until spring.

The manufacturing technology of the feeder, as in previous cases, is also very simple: make four to six holes for the rope, cut on the sides and put a weight on the bottom - for stability.

Note!

Other options
The above options are extremely popular - such feeders can be found in any country house. If you want to make a unique feeder with your own hands, you should take unusual materials, for example, old tableware: a cup and a saucer.
In the autumn, you can cut a product from a pumpkin or zucchini; in winter, halves of an orange peeled from the pulp are suitable for this. Such feeders will surprise your neighbors and will undoubtedly decorate the garden!

DIY bird feeder photo


Hello, Dear readers of the site season-stroy.ru
In continuation of the topic of caring for our smaller brothers, I previously wrote about how to make for starlings, today we will learn how to build. This is especially true in winter, when there is not enough natural food, and the bait of birds remaining to winter in our area is most necessary.
In this article, I offer my version of a bird feeder with detailed diagrams and drawings.
Making a bird feeder. Feeder drawing.
Before proceeding directly to the process of making a bird feeder, let's prepare a workplace.
For work, we need the following tool - a jigsaw or a hacksaw, a hammer, a screwdriver. We will fasten the structure with the help of self-tapping screws, nails and wood glue.
We use a bar as a material, plywood - 4 mm, a bead, a wooden corner, mainly these are the remains of the previous ones.
So let's get started.
1. We start assembling the feeder from the base. To do this, we use pre-cut to size bars. We lay them out as shown in the figure and fix them with self-tapping screws, gluing the junction points. This is how the box turned out.

2. Cut out a 23 x 23 cm square from plywood. It will serve as the bottom of the feeder. After we nail it with nails to the resulting box.

3. We fasten the side bars in the amount of 2 pieces, we will subsequently make perches on them. We use a bar 33 cm long, fasten it onto self-tapping screws, so that the overhang of the ends on each side is 5 cm.

4. We mount racks under the roof. We fix four racks 20 cm long on the inner sides of the box, as follows.

5. Let's start assembling the roof. To do this, we separately assemble two frames according to the scheme.

Now we fasten the frames to the racks using self-tapping screws and glue. One note: so that the bar does not crack when screwing in the self-tapping screw, it is advisable to pre-drill a hole for it.

6. We make a roof. As such, we use plywood, cut into two rectangles 21 x 33 cm. Align and nail it to the frame on nails.

7. To give the roof a finished look, we make a skate. For the ridge, a wooden corner is suitable, which we glue on carpentry glue.

8. It remains to make the crossbars, the so-called perches. For this, I used a regular glazing bead and wood glue.

9. I plan to hang the feeder on a tree and these screws came in handy to solve this problem.
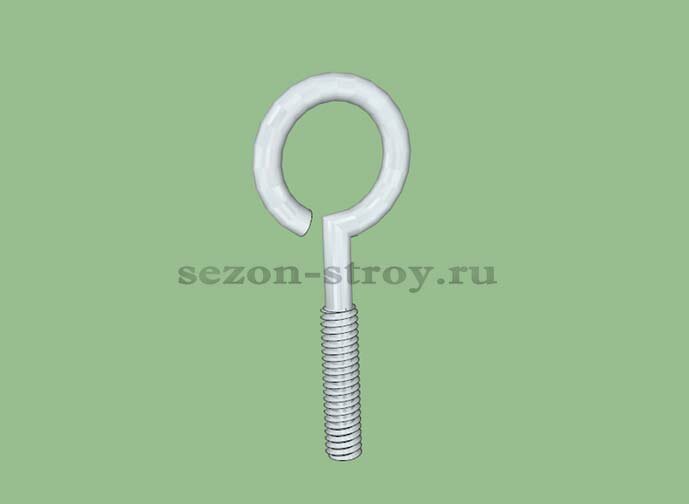
Having previously drilled a hole of the desired diameter in the ridge, screwed in two screws.

The product will look more neat and aesthetic if you cover the caps of the self-tapping screws with wood putty, and then sand it with sandpaper until it is even.
To prolong the life of our crafts made of wood, I treated it with a protective solution. In this case, I do not advise using solvent or white spirit impregnation, it is better to do this with a water-based composition.
Well, to add zest to our creation, I decided to paint the feeder. I got an airbrush from a friend, mixed some paint, prepared a stencil, and this is what happened in the end.


Now it remains only to hang and pour food. As such, oats, dried berries, sunflower seeds, millet, fruit pieces, etc. are suitable. For the feeder, choose a place closed from the wind and inaccessible to cats.
So, having spent a little time, they did a good deed. I'm sure everyone can do do-it-yourself bird feeder, and thereby contribute to the care of animals.
If the article was useful to you, subscribe to the site update and share with friends in the social. networks.