Do-it-yourself fashionable postcard: magic box or a box with a surprise. Master class on creating a Magic Box with a cake inside with your own hands Magic box scrapbooking ideas
How to make an original postcard and spectacular gift wrapping at the same time? There is nothing easier! You just need to cut them correctly, decorate them with taste and turn them into a box with a surprise with your own hands! This little box, also known as a magic box, reveals its secrets when the lid is removed. The inner walls of such a postcard are decorated with photographs or simply good wishes for the addressee. How they can be arranged for different holidays, how to fill and how to decorate, more similarly in this article. As well as a step-by-step master class on how to make a box with a surprise with your own hands, having 2 sheets of scrapbooking paper, some decor and one free evening in stock.
Content ideas
Magic box is an unusual postcard and, oddly enough, absolutely universal! It is perfect for small gifts. Here are some good ideas.
1. The most ordinary money, which is so often given to everyone around, will look much more interesting if it is rolled up in the form of a scroll, tied with a satin ribbon and placed inside such a postcard, surrounded by a variety of three-dimensional decor - flowers, butterflies, rhinestones, and inside, on the walls , write your wishes and leave signatures as a keepsake. In the master class at the end of the article you will find a description of how you can quickly and beautifully make a money mount inside.
2. Such packaging is ideal for gift certificates of various salons and shops. You can attach it to the bottom in exactly the same way as money. If the card is hard, then you can make an envelope-pocket for it at the bottom or on one of the side walls.
3. Ornaments or other jewelry will look just great in a magic box and will surely become a real surprise for the gift recipient. You can attach a paper cake with a removable lid to the bottom, or simply build a small pillow covered with velvet with your own hands.
4. A CD or flash drives are also nice to put in such a beautiful postcard. For disks, a pocket is most often made on the side wall using scrapbooking paper. In the future, in such a package it will be convenient not only to give, but also to store any important and memorable little things.
Decor themed boxes for different holidays
Magic box can be made for any holiday and even without it. You can make such a thing with your own hands and give it as a small sign of attention without a reason at all, but just like that, for Have a good mood. For example, decorate the sidewalls inside with bags of different tea or coffee, place a cupcake in the center and present it to a friend or work colleague before starting a working day.
If another important date is on the nose, and you are painfully looking for the right gift, then here are some thematic ideas for different holidays that can inspire you to make a festive box with your own hands. 
For a birthday
The most traditional holiday for such gifts. Even if you just give money inside, you can beat the idea itself in such simple ways:
- place a photo of the birthday person in the center, and write wishes for memory on the side walls;
- make the box “multi-walled”, that is, glue more walls inside, only 5 mm. narrower, and stick photos on each side, united by one idea (for example, “smiles of all friends” or “ best photos this year"), you get a real mini-album;
- if there are no photos, you can simply place inside a decorative composition of butterflies or flowers on springs that will jump out when opened.
New Year's
Winter-colored paper, Christmas pictures, blue or red stamp ink, tinsel decorations, confetti and small Christmas decorations - all this will look cute and harmonious.
Another idea is to make a small box (in the master class, a diagram is given for a 10x10 format, but here you need to take a size of 5x5 cm, no more), put a candy inside, tie a satin ribbon on the outside and hang it on a Christmas tree as a toy. Any child will be sincerely delighted to find a favorite treat inside the surprise.
Also, the magic box can be an excellent packaging for a Christmas tree toy. self made, for example, a painted glass ball or a bell hidden under a lid inside the box.
Wedding
Ideal and always appropriate packaging for a wedding gift, if you decide to give money. A wedding magic box will help you add a hand-made element to your usual gift and stand out in the crowd of guests. To perform it according to the master class below, take cardboard with a delicate decor, pastel colors, prepare lace and paper or fabric flowers in light shades. All this is perfectly combined with the theme of the holiday. 
Easter
Magic box will be the perfect packaging for any Easter souvenir. In order to place a painted testicle inside, you can line the bottom with sisal or paper shavings. If you want to put a cake inside, the bottom and walls must be laid with baking paper.
You can decorate the walls with decorative stickers, pictures with painted chickens, thematic inscriptions. There is a whole collection of images of pre-revolutionary Easter cards that are perfect for such decor.
Manufacturing instructions
Materials for the master class.
1. Cardboard with a density of at least 180g:
- sheet 30x30cm. - for the main template,
- sheet 15x15cm. - for the lid.
2. Paper for scrapbooking 30x30cm. - at least 2 sheets (needed for decoration)
3. Decorative materials - three-dimensional flowers, ribbons, beads, etc.
4. Scrap tools - edge and corner punches, if available, gold or bronze acrylic paint or an ink pad for tinting paper cuts.
5. Scissors, glue stick, pencil with a ruler and an eraser.
The box can be made in any size, it is only important to make a pattern correctly. In this master class, we will take the size 10x10x10 cm.
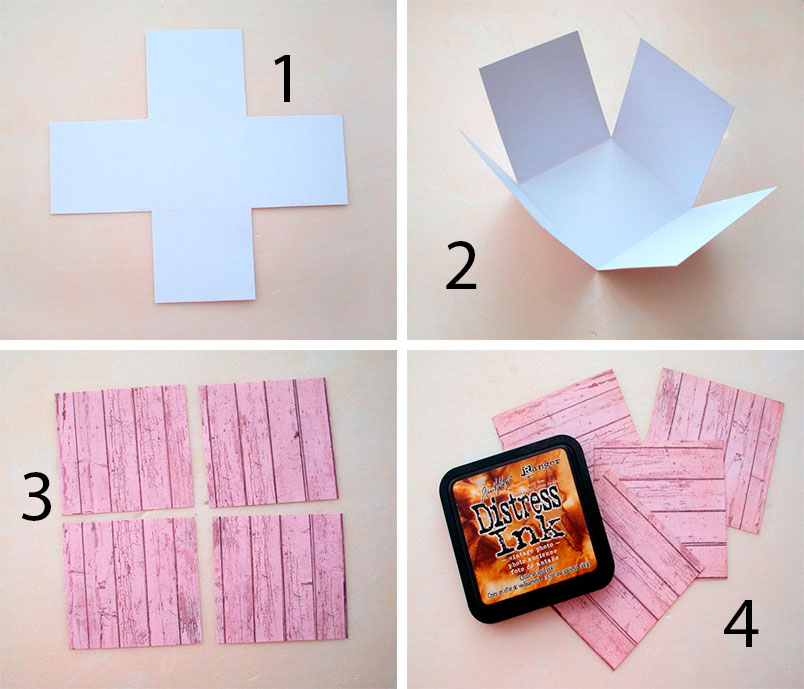
1. We draw a sheet of 30x30cm. into 9 squares with a side of 10cm. We press lightly with a pencil, then all the lines will be erased.
2. Cut four corner squares from the workpiece. We draw along the remaining pencil lines with a creasing stick or any other convenient tool (I use a knitting needle). 
3. We remove all traces of the pencil and paste the four remaining squares on the side walls of the box inside, stepping back 1-2 mm. from the fold lines so as not to touch them. Now the walls are reinforced and will look stronger than ordinary thin cardboard.
Advice. It is better to glue all the details with a glue stick, because PVA cardboard can warp.
4. We take scrapbooking paper and cut out 4 squares with a side of 9 cm from it to decorate the outside of the side walls and 4 more squares to decorate the inside. If the paper is double-sided, then it is most convenient to take 4 squares on one side and 4 on the other.
5. We tint each side of each square with a stamp pad or acrylic paint. In each square, we cut out one figured corner with the help of a Martha Stewart figured hole punch and glue all the squares in their places on the front and inside of the box. 
6. At the bottom of our postcard, we will build a mount for a cash gift using paper lace. Cut out a strip of scrapbooking paper, working both sides with an edge hole punch, and glue its ends to the bottom of the card. Now you can put banknotes rolled up there.
7. Let's move on to the second part of our master class - making the lid. For her, you need a square of cardboard measuring 14.2x14.2 cm. 2 mm. needed for a margin so that the card closes neatly and evenly. We take a ruler and draw lines at a distance of 2 cm. from each side. 
8. We cut 2 cm from both sides along the marked lines as shown in the photo. This will be needed in order to glue the sides of the cover. All fold lines must be punched so that they bend evenly.
9. To decorate the lid, cut out 2 squares of scrapbooking paper 9x9 cm: glue one inside, the second on the top of the lid. In addition, we cut out 4 rectangles from the same paper 9x1.5 cm. and glue them on the sides of our cover. Of course, do not forget to tint the edges of all parts before gluing. This will give depth and texture to the details. 
10. Glue the sides of the lid. After drying, we put the lid on the box and try on how it sits. Everything is fine.
11. It remains to decorate our postcard with voluminous decor and you can give it! Flowers can be made from any suitable cardboard: cut them out according to the template with a clerical knife and cut them out with a hole punch. To make them look voluminous, the edges of all the petals need to be twisted with a knitting needle or a toothpick outwards. Pens can draw veins on the leaves or stamens. Toning the edges of the petals in the selected color scheme will enhance the effect of volume and make the decor an integral part of the overall composition. Flowers for postcards can also be made using fabric or ribbons.
The master class on making a box with a surprise with your own hands is completed. Now you can enjoy the result of your work and look forward to the pleasant moment of presenting such an original gift. 
Try to make a magic box with your own hands, and you will get a lot of pleasure not only when handing it over, but also during its production! Do yourself a favor and immerse yourself in the wonderful world of creativity, where beauty and harmony rule. With the help of this simple master class, you can learn how to make a simple and exquisite gift that will remain in your memory for a long time, and will always please!
New Year is approaching, there is very little left, and we will again plunge into the atmosphere of the holiday, good mood, magic and, of course, gifts!
Gifts are different: big and small, serious and humorous, expensive and symbolic. But almost every gift needs wrapping. It allows you to add mystery to the moment of giving, the first impression of the gift depends on it, which means that it should be bright and memorable.
I offer a master class on making a DIY Magic Box gift box. Magic box or a magic box will be a great addition to a gift, whether it be jewelry, cash, souvenir, perfume and much more. The box combines not only the function of storage, but also the function of a postcard, because inside it are warm words and wishes. But first things first.
To work, you will need the following materials:
- thick watercolor paper (cardboard),
- square pieces of scrap paper - 5 pcs.,
- rhinestones on an adhesive basis,
- 1 large brads (button),
- satin ribbon 2 cm wide, 15 cm long,
- fabric flowers
- paper flowers
- stamens of several shades,
- Printed on paper for watercolor Wordart (inscriptions at your discretion),
- contour stickers,
- double sided tape,
- glue "Moment",
- scissors,
- stationery knife,
- ruler,
- knitting needle.

How to make a DIY Magic Box
First you need to decide on the size of the box, it depends on the size of the gift. I will make a box 9x9 cm. Accordingly, from paper for watercolor I will make a square blank measuring 27x27 cm. Using a ruler and a knitting needle (you can use any sharp, thin object), you need to divide the square into 9 identical parts.


Now you need to cut off the extra parts, i.e. corner pieces to end up with a cross. If we bend the four parts that we have left to the center, we will get a model of the future box.


Let's take a lid for the box. To do this, you need to cut out a square of watercolor paper measuring 13x13 cm (based on: 9 + 2 + 2, where 9 cm is the size of the bottom of the box, 2 cm is the height of the lid). Using a ruler and knitting needles, draw, as shown in the photo.

Fold the edges towards the center. You can cut off the corners, as in the photo, so that later it would be more convenient to glue the cover. Having smeared the corners with glue, we form a lid. 
From scrap paper of any shade, we cut out 5 squares measuring 8x8 cm. Four of them will be used to decorate the sides of the box, one to decorate the lid. Using double-sided tape, carefully glue the squares to the outside of the Magic box and onto its lid. 
Let's put the lid aside and start decorating the inside of the box. To do this, we need glue-based rhinestones and fabric flowers. 
Their number can be different, depending on your desire and taste. On average, you need 25-30 flowers with a diameter of 1.5 cm and the same number of rhinestones. We glue the flowers to the bottom of the magic box with Moment glue and make the centers of the flowers from rhinestones. 
Let's move on to the lid. We will decorate it with a paper flower, satin ribbon and stamens. Satin ribbon can be omitted and limited to a large flower. I glued the tape in the middle of the lid, hiding the ends of the tape under the lid. 
Now we take stamens, brads and a flower. With the help of brads, we attach the flower and stamens to the lid. 
The lid is ready!
We decorate the outer sides of the box with contour stickers. I decorated the magic box with butterflies and flowers. 
Only the inside of the box remains, which we will also decorate in a peculiar way. To make the box remind you of the holiday for a long time, we will glue beautiful wishes inside it. To do this, on white watercolor paper, you need to print Wordart (these are words or phrases written in a beautiful font), you can download it on the Internet. 

Our magic box magic box is ready.

A box with a surprise (Magic Box) is a unique gift that is suitable for all holidays. Birthday, New Year, Valentine's Day, March 8, February 23, wedding, teacher's day and other celebrations ... The main gift is a surprise - it can be sweets, a flash drive, money, a photo and everything that you want to put in a box. However, the very design of the box evokes joyful emotions and emphasizes the theme of the celebration. In this article we will look at: how to make a box with a surprise with your own hands.
You will need: thick white paper, pink scrap paper, pencil, scissors, ruler, not writing pen, glue moment, distress ink, decoration elements - lace, shabby tape, stickers, flowers, berries and a surprise gift of your choice.
Master Class
- Box size 7 cm: make a cross of 5 squares, the sides of which are 7 cm.
- Draw the folds with a non-writing pen and lift the squares up to form a box.
- Cut out 4 squares of scrap paper measuring 6.8 cm.

- Tint the edges of the squares with ink and glue lace on each square.
- Glue the box blank on the front side with squares.
- Prepare 4 6.8 cm squares from other scrap paper.

- Tinted the edges of the squares, decorate with stickers and glue the inside walls of the box.
- Make the cap in this way: prepare a square with a side of 10.1 cm. Draw the sides of the cap 7.1 cm and the height of the cap - 1.5 cm, then cut as shown in the image.

- Draw the folds with a non-writing pen, fold and glue the cap.
- Cut out the details for the lid from scrap paper of the following sizes: the ends of the lid - 6.9x1.3 cm; three squares - 6.9 cm.
- Tint the details and set aside.
- Prepare a square and 2 pieces of shabby ribbon, glue the ribbons to the back of the square, then glue to the bottom of the box and tie a bow.

- Glue the lid of the box with scrap paper parts.
- Decorate the lid to your taste and place the surprise inside the box.
The little box is ready!
You will need: A4 thick white paper, scrapbooking paper, glue, ruler, scissors, 4 paper clips, a crochet hook or a non-writing pen, decoration elements - twine, pendant, figurines ...
Master Class

You will need: creasing board, fantasy knives, scissors, ruler, “Crystal” moment glue, pva glue, scrapbooking paper, watercolor paper, acrylic plastic, Raffaello sweets, decoration elements – snowman, pompom and other decorations…
Master Class
- Prepare a sheet of white scrap paper measuring 21x26 cm. The size of the finished box is 5x10x4 cm.

- Make a scoring (draw lines with a non-writing object) on a side equal to 21 cm at a distance of 4; 4; 5; 4; 4; and on the side of 26 cm - 4; 4; 10; 4; 4;
- Cut off the excess and assemble the box.
- Make the lid of the box in this way: take watercolor paper, make a creasing by adding 1 mm to each side - 5.1; 4.1; 5.1; 4.1; + 2 cm for gluing (see photo).
- Paste the outside with scrap paper, glue and try on the box.

- Glue a strip of acrylic plastic to the back of the snowman and wait for it to dry.
- Glue the snowman by the strip to the inside of the box and wait for it to dry.

- Decorate the box however you like, glue on a pom-pom and place the candies inside the box.
Christmas box with a surprise is ready!
You will need: black cardboard, gray leatherette, scrap paper, hat elastic and black eyelets, a ruler, a creasing tool (not a writing pen, a crochet hook), a chipboard (cardboard cutting figures for decoration), a sewing machine, black threads, glue, a decorative inscription, a gift set - a bottle of alcohol, a screwdriver, a pack of cigarettes, a pill for the morning or something else ...
Master Class
- Cut out a rectangle from black cardboard for a box measuring 37x27 cm. The height of the box is 8 cm, the length of the bottom is 23 cm, and the width is 13 cm.
- Cut out a 27.2 x 17.2 cm rectangle from cardboard for the lid. The lid is 3 cm high, 23.2 cm long and 13.2 cm wide.

- Cut out the corners (8cm x 8cm squares) of the large rectangle.
- Punch and bend along the marked lines.
- Punch through the lid of the box as shown in the image.
- Cut out triangles near the corners of the lid and fold along the marked lines.

- Measure each side of the box and lid, then prepare the pieces of leatherette according to the resulting dimensions. Prepare the scrap paper parts in the same way, just make them a little smaller than the leatherette parts.
- Sew the details of leatherette and scrapbook paper together.
- Sew one of the rectangles to the front of the lid.

- Glue one rectangle to the bottom of the box.
- Install the eyelets and attach the elastic band as shown in the image.
- Line the inside of the box with scrap paper rectangles.
- Install eyelets and elastic holders for other gift items.

- Glue the lid of the box and glue the outside of the box and lid with stitched rectangles.
- Fill and decorate the box with lettering and a chipboard.
You will need: cutting mat, stationery knife, scissors, glue, ruler, pencil, crochet hook for creasing, scrapbooking paper, distress ink for tinting edges, 8x9 photos, decoration elements - ribbons, pompoms, figurines ...
Master Class
- The size of the finished box is 10x10x10cm.
- Prepare 3 squares of thick paper measuring 30x30cm, 29x29cm and 28x28cm.

- Make a scoring by dividing each sheet into 9 squares. For the first sheet, step back from the edge 10cm; for the second 9.6 cm; and for the third 9.3 cm.
- Trim the corner squares of each leaf to make crosses.
- Paste the blanks with scrap paper, round and tint the edges.

- Glue three blanks together in the center.
- Make a lid this way: take a 20.3cm square of scrap paper; step back 2.5 cm 2 times on each side, score as shown in the image, then make cuts along the dotted lines and assemble the cover.

- Glue the photos and assemble the box.
- Decorate the box as you like and tie with a ribbon.
The photo box is ready!
You will need: 3 A3 sheets, black pastel paper 50x65 cm, 2 types of scrapbooking paper (red and with flowers), Moment Crystal glue, pencil, ruler, red satin ribbon, mug, 4 bars.
Master Class
- Take a sheet of A3 format and redraw the diagram of the box.

- Take another sheet of A3 format and redraw the side edges of the box.

- Take the third sheet of A3 format and redraw the diagram of the box lid.

- Cut out pieces from 3 sheets.
- Glue the sides of the box.
- Fold 2 times inside the edge of the lid.
Hello, friends!
I think everyone who was even the least interested in scrapbooking paid attention to intricate square boxes with a lid and folding walls, called magic box (in Russian - a magic box or in a borrowed version - magic box, magic box). They are very laconic on the outside, but as soon as the lid is removed, a truly miraculous transformation takes place, the shape changes, and bright, meaningful, and sometimes almost fabulous pictures open up to the eye - with blooming flowers, flying butterflies - pictures. Such an unexpected contrast causes a real explosion of emotions. It is no coincidence that many craftswomen have their own variations of such boxes with a surprise in their creative arsenal.
And today I want to bring to your attention a master class on creating a magic box ( magic box) with fluttering butterflies, which was prepared for us by Vita Ermakova.
Vita's original works are well known in the Land of Masters. Some of her creations have also been presented on our website (in this workshop) and in e-book"27 Ways to Confess Your Love".
The new master class turned out to be quite voluminous, so I had to break it into 2 parts. But on the other hand, you can see how to make a magic box, as they say, “from and to”. At the same time, due to the abundance of practical techniques and tricks, this MK, I am sure, will be useful to many beginners in scrapbooking.
Materials and tools:
- cutting mat and soft embossing mat;
- a dummy or stationery knife, scissors, a ruler, an embossing tool, tweezers;
- paper: white whatman paper 190-240 g/m², colored design paper 160-240 g/m², watercolor textured paper 160-250 g/m², scrapbooking paper;
- scrapbooking stamps and ink, ink pad;
- foam sponge;
— for embossing: transparent and gold-colored powder, transparent embossing ink (or PVA glue), embossing hair dryer (or iron);
- double-sided tape and foam tape;
- hole punches (clerical, edges and curly);
- glue gun;
- decorative elements: ribbon, half beads (or liquid pearls);
- unnecessary plastic packaging (for example, from headphones).

Do not be afraid of this abundance :) - many materials and tools are easily available, something you can do with your own hands. In addition, you can always, using the ideas presented in the master class, come up with and implement your own version of the magic box, with your own design.
To simplify the creation of box details, a set of templates has been created, which can be downloaded here:
The file also contains templates for cutting out individual decorative elements (fence and twigs).
Master Class:
magic box (magic-box) with fluttering butterflies
1. Preparing the base and lid of the magic box.
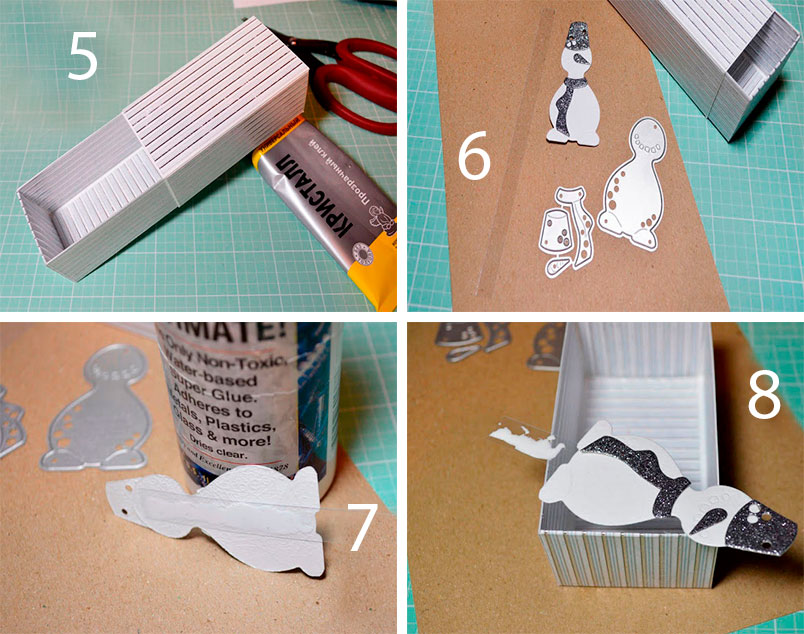
Let's start by making the base and cover reamers. Thick Whatman paper is used here (but variations are possible depending on the idea and what is available). We print the templates, then cut, crease and bend the parts. The base consists of 3 parts, glue them (using glue or double-sided tape), as shown in the photo.

Next, we cut out from colored thick paper (in this case, pink is chosen) cards for decorating magic box surfaces: 8 pieces with dimensions 72 × 97 mm (for the side walls of the base), 4 pieces 22 × 74 mm (for the side walls of the lid), 2 pieces 75×75 mm (for the upper surface of the cover and the inner bottom of the base). This can also be done by printing the appropriate templates.

The light green color looks very nice on a pink background, so the outer cards will be decorated in this color. To do this, you will need scrapbooking dies and stamp ink.

When creating a pattern, you can make several prints of different parts of the stamp on the card (see the photo below). But before that, it is advisable to practice on a rough card cut out of plain office paper in order to avoid mistakes and get the best result.

For stamped cards, we tint the edges. You can do this with a foam sponge or just a piece of foam rubber.

Similarly, we process the card for the upper surface of the lid.


You can choose vignettes for the sides of the lid. We also stamp and tint.

Now let's select a stamp for cards that will be used to decorate the inner surfaces of the base of the magic box. In this case, the choice fell on a stamp with congratulatory inscriptions in different languages and rich pink ink.

First, the imprint was made in the center of the card diagonally, and then in the corners. Then the card was tinted around the edges.

We return again to the square card for the cover. We glue all its edges and the middle from the wrong side with strips of double-sided tape. We peel off the protective paper layer in the center completely, and only partially along the edges - this is in order not to tear off the card several times if it suddenly sticks crookedly. They attached a card without pressing it tightly, tried it on - and you can remove the remaining protective papers.

We glue the sidewalls, taking into account the fact that there should be a distance of 1.5 mm from the fold lines.

After that, you can assemble the cover. We glue the side walls with double-sided tape.

We glue the walls of the base of the magic box with prepared cards from the outside and inside.

This is what our magic box will look like when assembled.

But this is still just the outer shell. All the "magic" of such a box lies in the interior decoration. And we are approaching the most interesting and informative stages.
2. Making paper butterflies decorated using embossing technique.
Generally embossing(from English. embossing- embossing) is a technique for creating a three-dimensional pattern. There are two varieties - dry (stamping with stencils) and wet (it is also called hot) embossing.
For the design of paper butterflies, we will use the second option. I must say that the use of wet embossing “in accordance with all the rules” requires the availability of special materials and tools: embossing powder, a special stamp pad with transparent ink, and an embossing dryer. However, there are some tricks that allow you to replace individual ingredients with improvised means and get the result no worse. The only thing from this list that you will definitely need is embossing powder.
In this particular case, the transparent powder "WOW!" was used. This is what the branded jar looks like:

The role of the transparent ink is to adhere the powder to the surface to be treated. With this ink, the paper darkens several tones. And when the powder melts, a beautiful glossy effect is obtained.

If you do not have transparent ink, you can use ordinary PVA glue (it is known to become transparent when it dries). Let's take a closer look at this method.
So, we apply PVA glue on a flat and smooth surface (for example, a piece of plastic or a plastic file) and blot the foam sponge thoroughly.

Then, on the stamp with a butterfly, gently, barely touching, apply glue with a sponge. It is even better to do this several times with a break of a few seconds to get an even white coating.

And now we do everything very quickly, because a thin layer of PVA dries very quickly. Paper and an open jar of powder should already be ready. We put an adhesive print on the paper, quickly cover it with powder and gently shake off the excess onto the paper.

Usually the powder is burned with a special hair dryer with a heating temperature of 200 degrees. It is certainly more convenient, but in the absence of a hair dryer, it is quite possible to adapt to an iron. How to do it correctly will be clearly demonstrated in the second part of the master class using another decor element for a magic box as an example (subscribe to updates so you don't miss anything).
After the powder has been melted, we cut out the butterflies along the contour. You will need 4 in total.

Let's give each butterfly volume by going over the paper with an embossing tool - a stick with a round tip - on a soft rubber mat.

Here, the butterflies are ready to take off =). But in order for them to really fly out when opening our magic box, we will fix them at the ends of elastic and transparent plastic strips that can be made, for example, from unnecessary packaging from headphones.
We cut out the strips and glue the butterflies with a thermal gun - firmly and reliably.

* * *
On this, perhaps, the first part of the master class on creating a magic box with fluttering butterflies will be completed. In the second part, Vita will demonstrate how to fix the butterflies inside the box, make the rest of the decor elements (including the wet embossing method), and how to put everything together into a single composition.
This will happen very soon. Follow the mail if, of course, you are already subscribed to site updates. If not yet, I invite you to do it right now - there is a lot of interesting things ahead!
And, of course, friends, leave your impressions in the comments, ask questions, share own experience in creating magic boxes :).
See you soon!
Yours Inna Pyshkina.
How beautiful to give money for a birthday? To donate money, you can use an envelope. But, it will look cheap and not original. For such a gift, it is better to make a special gift box with a surprise, which will serve not only as an envelope, but also as a greeting card. This postcard is called magic box. Translated from English, magic box(magic box) - magic box.
The technology for creating a gift is simple, even those who are not familiar with the concept of scrapbooking can make a box for money with their own hands. So that you understand how to make a magic box on your own, we suggest looking at master class on creating a Magic Box with a cake inside.
What materials will be required:
- Whatman format A3;
- Scrapbooking paper;
- Double sided tape;
- Double-sided pink paper;
- Black gouache;
- Printout with pictures of Teddy Bears;
- Scissors ordinary and figured;
- A simple pencil and ruler;
- Compass;
- PVA glue, but it is better to use Moment Crystal;
- Glue gun;
- Tulle;
- Coral lace;
- Threads and needle;
- Watercolor paints and brush;
- Sequins, stamens, half beads.

DIY magic box making process
1. To make a box with a surprise, you will need scheme. According to the diagram shown, we draw the base and cover on A3 paper.

2. After that, we cut out the blanks according to the markup.

3. We perform folds on blanks, while forming three-dimensional forms.

4. Next, proceed to decorate the outer part of the magic box. To do this, cut out 4 squares of 9 * 9 cm in size from scrapbooking paper (for the base of the postcard). Then, cut out one square measuring 9.3 * 9.3 cm and four strips measuring 9.3 * 1.7 cm (for the lid).

5. We glue the paper blanks to the base of the postcard using double-sided tape.

6. After that, glue the lid of the box.

7. To decorate the lid of the magic box, we will make voluminous roses from paper, which we will make with our own hands. To make one rose, you will need 4 paper templates. They must be moistened in water, and then shaped into petals. Then, from the blanks, you should collect a rose according to the diagram shown.


8. In total, you need to make 4 small and 1 large rose.

9. Roses can be painted with red watercolor, but it is better to use acrylic paints or sprays.

10. Cut out 3 leaves from paper and paint them with green watercolor.

11. Glue roses and leaves on the corner of the lid.

12. Glue the stamens between the leaves, and decorate the free corners of the lid with half beads.

13. Let's start decorating the inside of the magic box. First, you should cut out 5 squares measuring 9 * 9 cm with curly scissors.

14. Glue pink squares on all sides of the box.

15. We put stamps in the corners of the squares.

16. Cut out the Teddy Bears. Glue one teddy bear on each of the 4 sides of the box.


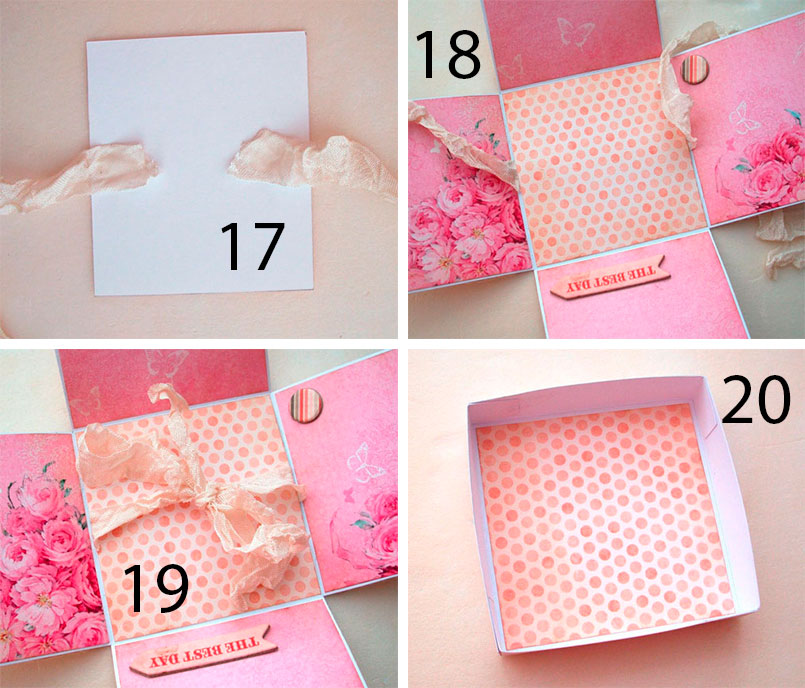
17. We make a loop for money.


19. We glue the cardboard blanks and get 3 bases for a cake of different diameters. Regarding the size of the bases, we cut out 3 circles (it is convenient to perform them with a compass).

20. Glue the circle to the base.

21. To hide the errors of the cardboard blank, decorate the top of the cake with tulle. To do this, cut out a circle of suitable size from tulle and collect it along the edge on a thread.

22. We put the tulle on the base of the cake and tighten the thread from the inside.

23. We glue 3 tiers of the cake together.

24. Decorate the top of the cake with a paper rose and sparkles. Glue lace and sequins on the side.

25. Glue the cake to the center of our magic box.

Gift box magic box with a surprise is ready!


If you decide to make a box for money do-it-yourself magic box, use materials related to the upcoming event. The main thing is to understand the idea of implementation, it is always about the same, and it doesn’t matter what magic box you decide to make, for a wedding or a birthday. In our scrapbooking store, you will find everything you need to create such a gift. Such a gift can please any loved one.
Thank you for your attention!