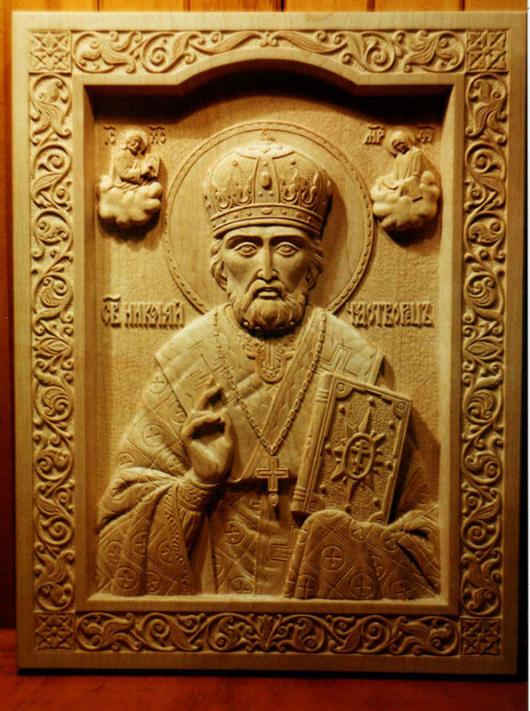
Sketches of figurines for woodcarving. Slotted thread: simple detailed instructions and features of the implementation of work (80 photos). Image of a man in an ornament
The ancient art of carving wood and plywood has always been considered a fascinating pastime; with the help of carved decorations, towers and huts of unique beauty were erected, most of which are still classified as architectural monuments. Wood carving, or wood carving, is becoming a popular craft, used to make large and small masterpieces. Beginning craftsmen are helped to create masterpieces by ready-made stencils for wood carving - special templates for creating three-dimensional ornaments and patterns.
The ancient art of wood carving has always been considered a fascinating pastime.
Stencils for woodwork are used to transfer ready-made identical patterns to a three-dimensional plane. Most often, such work is done to decorate walls and window casings, which is why sketches for working with wooden surfaces are considered the most common.
Carved patterns made using a stencil are divided by craftsmen into several types:
- ribbon carved ornament;
- carved platbands;
- carved balusters;
- pilaster;
- towels
- brackets.
For such ready-made templates even a novice master can compose and independently create a unique drawing and a real masterpiece of carved art. With the help of a ready-made stencil, you can easily decorate any wood product. Artistic cutting and openwork drawings, as a rule, will come in handy when decorating:
- pieces of furniture;
- dishes;
- frames for paintings or photographs;
- caskets.
In the event that the master wants to convey certain national motifs or features of the subject in his work, you should first study the subtleties and nuances of ornaments and patterns.
How to learn woodcarving (video)
Sketches for patterns: instructions
For those craftsmen who have recently picked up tools, experienced craftsmen recommend considering the following nuances when preparing for work:
- the engraving template should be as simple and understandable as possible, without complex and ornate elements;
- for each type of thread there are templates for work;
- lines from the existing template to the material for work are transferred as accurately as possible, since this is the only way to achieve accuracy in work.
When choosing a drawing for its subsequent transfer to the material, it is worth considering a number of subtleties that will help to make the product professionally and skillfully.
- For a large product, you should not choose an openwork ornament or a pattern with small details. Such a pattern will be lost on the finished item and will not make it unique.
- Small things are not decorated with patterns with large elements and ornamental details, so as not to hide the shape and uniqueness of the product.
- The proportions when transferring details to fragments of the product should be observed to the finest so as not to violate the integrity of the finished ornament.
You should not start work without first creating a sketch, which you can make yourself or download ready-made photos from the Internet.
Carved mirror frames: an interesting idea
Art Nouveau interior lovers will love carved frames framing paintings or mirrors.
Such interior items not only look rich and unique, but add a special “zest” to the interior of the room. For cutting frames for a mirror, experts recommend using several basic styles for work.
- The double baroque style contains two contours inside and outside, represented by openwork curls. The craftsmen included a feather profile in this style, it reflects some lightness and elegance of a rectangular piece.
- For mirrors, the feather profile with a back is ideal, providing a dense back, where the mirror is attached.
- The refined profile also has the style of a dumbbell, despite the somewhat massive frame. It is these frames that hold a heavy and massive mirror well.

Art Nouveau interior lovers will love the carved frames framing paintings or mirrors.
For the manufacture of mirror frames, special decoration methods are also used:
- gilding with preliminary polishing;
- varnishing with a transparent composition;
- patina, or artificial aging of wood;
- antique decoration with cracks called craquelure.
In order to transfer the pattern from the stencil to the product, soft pencils are used, transferring the ornament as accurately and accurately as possible.
Stencils pictures for jigsaw and woodcarving in pencil: how to make
Those craftsmen who are just starting to try themselves as a woodcarver should understand that high-quality cutting can be done only after the template for cutting has been correctly prepared.
- Initially, it is worth deciding on a blank for carving. For novice craftsmen, geometric carving on a plane or a simple wooden figure is better suited.
- A sketch is made on paper with a pencil, while the main zones and places where carving is planned are clearly defined on it.
- With the help of special devices for drawing, the image is transferred to graph paper.
- Repeating parts are made of thick paper or thick cardboard.
- The finished paper pattern is fixed on a wooden base and copied.

In the manufacture of stencils for carvings made in the slotted technique, craftsmen recommend initially using thick paper for patterns.
Geometric and flat-relief carving: what is it
Name geometric carving on wood comes from the main details and elements at the heart of the pattern: geometric shapes, figures and their elements. Use such ornaments to decorate furniture, household utensils.
To create this engraving, you will need a simple set of tools:
- a piece of board made of soft wood;
- special knife-jamb;
- simple soft pencil;
- ruler.
In the manufacture of the product, an overhead paper blank is not required, since elements of a geometric pattern can be applied directly to a wooden blank.
relief carving is done in a similar way, but the pictorial elements are not geometric shapes, but images of animals, elements of nature, people. This type of carving is also used for making backgammon.

The finished product can be treated with a colorless varnish
For such a wood engraving you will need materials:
- a set of cutters for wood;
- soft wood blank;
- sandpaper, pencils.
A product is manufactured in accordance with a certain sequence of actions.
- The wood is pre-cleaned and prepared for work. The drawing is applied to carbon paper and transferred to the workpiece.
- The contour carving is made according to the drawing, the relief and the frame of the product are pre-selected.
- Upon completion, the work is processed with stain, dye or simply watercolors. Cleaned up with sandpaper.
The finished product can be treated with a colorless varnish.
Flowers: Wood Carving for Beginners
Flowers are one of the main elements of many wood carving patterns. Cutting this element is not difficult, it is important to follow the sequence of actions and the principle of operation.
- A pattern in the form of circles is applied to a wooden surface and the details of the future flower are marked.
- The central circles are cut in a circle, after which they are cut from the outer circle to the center.
- After marking the petals, they are cut along the contour, cutting off the triangles between the petals, after which the outer contour of each petal is cut.
- An incision is made inside the flower, rounding the center of the drawing element.
You can decorate the picture with any additional motifs; the geriolac base of the product provides ample opportunities for toning
The most ancient art is woodcarving. It can decorate the house and interior elements. Many different simple patterns have become excellent, which attract with their elegance and precision.
Woodcarving ornaments have been used as a decor for a long time. An ornament is a pattern that has combinations of various forms: geometric, plant, animal, bird, human, etc. The elements that make it up can be repeated or alternated. More complex components can be simplified for a better perception of detail.
Cut-out ornaments in the traditions of Russian patterning are familiar to many of us - carved shutters and architraves, valances, friezes and balusters, decorative balconies - the Russian hut has been famous for these decorations since ancient times. And until now, many owners of country houses prefer magic carving to practical plastic. True, subtle work is now being done with the help of new technologies.
The geometric ornament is characterized by various simple patterns., when combined, you can get amazing drawings that fascinate with their beauty. Most often presented as decorations are stripes, stars, rosettes, etc. Other wooden elements also make sense and give a great look. Among other geometric patterns, there are:
- A dot is an element that is used separately, but is reused as a decor.
- The line is a frequently used pattern, intended mainly for separation.
- The zigzag or broken line symbolizes water.
- A rhombus or square delimits a space filled with patterns.
- Polygons (hexagons, octagons, etc.) are often used in oriental woodcarving.
- Crosses mean the creation, construction of something, etc.
- Twisted or spiral, or other curved elements.
- The circle is filled with a pattern and is responsible for a separate composition.
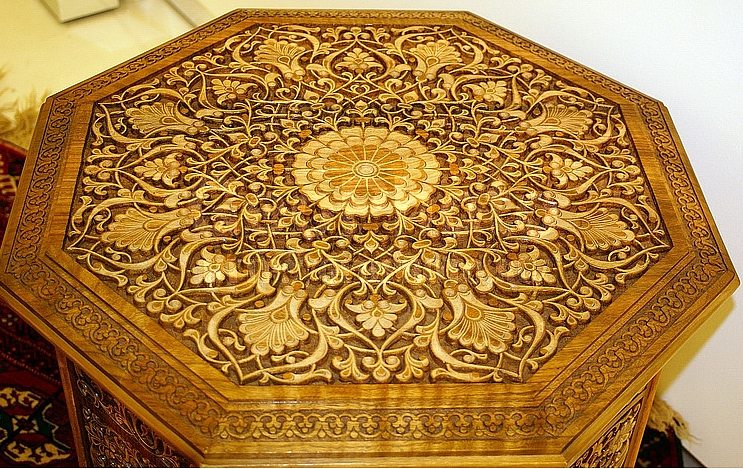
Description of floral ornaments
Performed in different varieties or repeated separately. They can be an excellent composition, on which there can be drawings of a tree, a fruit plant, a flower, etc. Floristry is depicted naturally or in a simplified or stylized form. It is considered the most popular after the type of geometric ornament. Since ancient times, the most commonly used were wooden grapes, oaks, laurels, lotuses, ivy, etc.
Gallery: woodcarving (25 photos)


Properties of an animal (zoomorphological) ornament
 This carving shows drawings of various animals, which may be fictional as well as real. They are often stylized. These are very old drawings. Among the patterns there are not only whole wooden elements, but also individual parts of the body of animals (heads, wings, paws, etc.). Often used in combination with different types ornaments. Can be used for various threads.
Ornament with the image of a man
In wood carving, a wooden man can be depicted schematically or more realistically. Use it for decorative interior details. It goes well with different types of patterns.
Among all the ornaments of woodcarving, one can distinguish such wooden decorative or symbolic image types, for example:
- Hieroglyphs, inscriptions, etc.
- Emblems, emblems, etc. (heraldry).
- Miscellaneous symbols (yin-yang, lotus, cross, etc.)
The main forms of different patterns
It all depends on which one is used. There are the following forms:
- A ribbon shape or border that runs along the edge or frames the product.
- Garland - wavy shape (mainly used with floral ornaments).
- Rosette - an independent form in the form of a flower, a polygon, etc.
- Palmette - fan shape with decoration.
- Arabette is a complex patterned element made up of geometric, plant shapes.
- The wreath is used in the plant form of ornaments.
- The braid is made with interlacing components (strips, ribbons, stems, etc.).
- An openwork ornament requires the implementation of the sawn carving technique (making a through background image).
Sketches (album) for the formation of patterns
 Initially, before starting wood carving, you need to make a sketch on paper (you can in your workbook) of the same size. You can do this on a printer or copier (reduce, enlarge, etc.). You can also draw freehand using cells for linear scaling. On a tree, this carved ornament is duplicated using plain carbon paper. For a through thread, you can make a simple template by cutting it out with scissors so that you can apply it further and trace it with a pencil on the workpiece. You can buy special patterns or find images on the Internet; the Slavic pattern is very beautiful and ancient.
Wood carving is a kind of arts and crafts, which at one time was widely used and especially popular in the territories of modern Russia. Almost every region of the country has its own traditions of carving ornaments, patterns, figurines of people and animals on wooden surfaces. Wood generally belongs to the favorite materials of the Russian people. Perhaps the “roots” of this love go deep into history and are lost somewhere in the times of pagan beliefs, when any natural objects were given a sacred meaning, and trees were generally considered a “genus”, that is, the progenitor of existence, the personification of mother nature. Be that as it may, wood is indeed a very “warm”, cozy, homely material, which is also environmentally friendly. On the this moment there are many ways to process wood, but traditional carving is a step above any "industrial" techniques. Carving ornaments, paintings, figurines, craftsmen put their soul into their work. We won’t be able to teach you how to give a part of yourself to the created product, but we will introduce you to the basics of working with wood, which will be useful to any novice carver.
History of origin and development
Wood can rightfully be considered one of the oldest materials used by man. Since the dawn of time, people have realized how affordable and easy to process wood can be. She began to be attracted everywhere for construction. The art of carving is closely intertwined with a separate type of architecture - wooden architecture. People never suppressed their inner desires surround yourself with beautiful things. This desire for beauty often became the impetus for the development of art in different directions. Carving is no exception. As usual, at first all the best were placed on altars for the deities who were worshiped in those days. The Shigir idol is considered the most ancient example of the art of wood carving. It was found during excavations near Yekaterinburg. The product is a figuratively cut column with thematic drawings on the surface. According to scientists, this idol was created in the middle of the VIII century. They made a larch pillar (contrary to the common misconception about oak). In addition to the Shigir idol, there are also later finds decorated with carved elements, but the technique of those masters was primitive and rude. A modern person would rather call them original than beautiful. Here the influence of the poor tools used by the masters of those times affected.
And now let's take a big jump of almost ten centuries and fast forward to the 16th century, when the first artels of carvers began to appear. From the realm of rituals and paganism, wood carving gradually moved to everyday life. They began to decorate sparse furnishings and wooden utensils with bizarre patterns. The technique has become more elegant, thanks to an expanded set of special tools that the masters began to use. In addition to ordinary wood, even tree roots and burl (a kind of growth) were used. With their bizarre, irregular shapes, they evoked abstract associations and encouraged carvers to create original asymmetrical household items. Artels massively decorated churches, cathedrals, palaces and houses of wealthy citizens. Most household utensils (from chests to spoons) were covered with decorative patterns. Since even representatives of the middle class tried to decorate houses, a separate direction appeared called house carving. Many examples have survived to this day. Most of them have become official monuments of art. In parallel with the house carving, a more complex technique appeared - volumetric. Relief decorations required great skill from carvers, but the result was worth it. Carvings were used to decorate chests, chairs, toys, coasters, gingerbread boards (similar to trays), spoons, snuff boxes, caskets, headboards, architraves and shutters on windows. Although a couple of decades ago this type of art was in decline, gradually the traditions of ancient Russian wood carving are being revived. After all, it is not in vain that they say that everything new was simply well forgotten.
Thread types
Woodcarving is classified into the following subtypes and directions:
- Volumetric (sculptural). The image (mark) is completely or partially separated from the background. The technique is similar to bas-reliefs.
- Flat-relief. The image stands out against the background, due to the deepening of the latter.
- Welt (openwork). Refers to cross-cutting technology. The background in the products is removed completely. Previously, they were often used to decorate icons and paintings as frames.
- contour. It is considered one of the simplest techniques. Often used by beginners for hands-on learning. Contour carving is a pattern that is formed by the intersection of shallow lines. If compared with the art of sculpture, then the closest analogue of this technique is anchor or koilanaglyph.
- Geometric. Like contouring, it belongs to simple techniques that even beginners can do. The pattern is formed from various geometric shapes and their interweaving. Despite the apparent simplicity, the work is transformed by the play of light and looks very beautiful.
- Embossed. There is practically no flat surface in the product. Each element of the pattern with a different height protrudes above the surface. There are two subtypes of carving: high relief and low relief. In the first case, the image protrudes by almost half the volume, and in the second, only by a couple of centimeters.
- Eastern. It is characterized by an abundance of elegant ornaments obtained by crossing straight and curved lines. As an addition, flowers often appear in the drawings.
The above techniques are referred to as the main ones, but the list is not limited to them. Much less often they use carving techniques with a selected and pillow background, oval cutting.
Where can be applied
Wood carving is widely used in interior and landscape design. Although such products most of all correspond to the ethnic Russian style, good job masters can organically merge into the Scandinavian, eco-direction, eclecticism, Provence (in general, any kind of country music), modern, classic and even fusion. The interior uses either carved household items (chests, caskets, inkwells, coasters, furniture elements) or decorative details that play the sole role of decoration (cornices, frescoes on certain areas of the walls, edging of arches, doors). To decorate the exterior of the house and the territories adjacent to it, arbors, benches, platbands, pediments, gates and gates, fences made using the wood carving technique are purchased.
The choice of material for work
When choosing wood, you should pay attention to three criteria:
- Weight. The heavier the bar or board, the stronger it will turn out. ready product. This rule applies to all types of wood.
- Humidity. Do not use raw wood for work. Sooner or later, it will dry out, and this is fraught with deformation of the material, which can also affect the thread.
- General state. The more growths, knots and deformed fibers in the bar, the more difficult it is to work with such material. Such defects do not allow the master to move the tools in the right direction, as they will constantly “stumble” over obstacles.
If the wood carver stocks up on his own in a neighboring forest, then the material must be dried. It is advisable to carry out this procedure in the summer, since the tree should lie in the open air for 1-2 weeks. If the workpiece has impressive dimensions, then this period is increased to 1-2 months. Do not leave material outside during the "rainy season". There will be no sense in such a procedure, since with high level environmental humidity, water from the micropores will not disappear. After street drying, the wood is brought into the house, but not placed next to heating appliances. Residual moisture will be removed within a week. For small-sized workpieces, digestion technology is suitable. They are put in a container with water, which is heated and boiled for 2-3 hours. This express method allows you to quickly "squeeze out" the remaining moisture from the micropores of wood. After the procedure, the blanks are allowed to “rest” in the house for about a week.
Basic Craft Tools
In order for the work to be successful, skills and abilities alone are not enough, you also need to use high-quality tools. It is possible that Nicolo Paganini compensated with his skill for the possibilities of the violin by playing on one string, but this legend is one of the exceptions to the general rule. The standard list of woodcarver tools includes:
- Board for carving. It is superimposed on the work surface in order to protect it from damage. It is used only in cases where the master does not yet have a permanent place to work.
- A set of chisels. These carpentry tools differ in the shape of the pointed steel tips, but we will talk about them in more detail later.
- Knives. Along with chisels, they are actively used for cutting patterns. There are several subspecies of knives, differing both in appearance and functionality. Cutter knives and shovel knives differ only in the cutting angle of the beveled blade. The technique of flat-relief carving is indispensable without the latter. Bogorodsk knives got their name in honor of the area where local craftsmen actively used them to work on traditional toys. Usually sold in a set. There is one subtype of this variety of instruments - "Tatyanka". A characteristic element of these knives are elongated handles. They allow you to transfer the maximum force to the tool with which the master presses. They are used in the so-called "power carving".
- Stichel. Outwardly, it is very similar to a chisel, but has a characteristic mushroom-shaped handle. It allows the master to cut the thinnest lines.
- Spooners. The tool is usually used to work with spoons, which is already clear from the name. However, it can also be used in other techniques, if it is necessary to make a neat hole in the tree in the shape of a circle or semicircle. It is a steel plate on the handle. At the end, it is either half-rounded or looped into a ring.
- Pattern. It is used as a stencil to transfer the image drawing to the workpiece.
- Nichrome wire. It is used only for burning out individual elements of the image when finely working with details. Requires safety precautions. If the wire is heated, it easily burns through the top thin layer of wood fibers.
And now let's take a closer look at the varieties of chisels, which can rightfully be considered the main tool of the carver.
Types of chisels
Depending on the characteristics of the blade and the scope of application, chisels are classified into the following types:
- Direct. They have flat blades. The tool is used to level individual areas of the workpiece or to clean it at the preparatory stage of work.
- "Jaws". The cutting angle of their blades varies from 35 to 70 degrees. Widely used in geometric carving.
- Cranberries. They are considered a kind of semicircular chisels. Used to process the background and cut out large convex figures. They have a curved blade, vaguely resembling a "cup" of a rose petal.
- Corners (geismus). The blade, which is shaped like a groove, leaves characteristic "grooves" on the workpiece.
- Semicircular. As a rule, these chisels are used for three-dimensional carving, but can also be used in flat-relief technology. Tools differ in bend radius and blade length. On the workpiece, with their help, concave circles and lines are made, the depth of which is regulated by changing the pressing force on the chisel.
Each master in the set has his own “favorite” tools that he uses most often. Usually such a touching attachment develops over the years of work, when the carver has already developed his individual style of work. Beginners, on the other hand, can only fill themselves with “bumps” by trial and error until the ideal tool is found.
Operation Precautions
When carving wood, there is always a risk of damage to the hands of the master, and the fingers for carvers are the main tool of work. All devices are sharp enough and just one awkward movement is enough to cut the skin, or even cut off something important. Therefore, you should not neglect the safety rules that are not so difficult to follow:
- The work surface must be stable. Professional carvers have special workbenches for this purpose. Beginners often work at regular tables that can sway.
- You need to cut only from yourself. Matches are lit according to the same rule.
- Lighting in the room should be directed to the work surface. Shadows should not fall on the table. Otherwise, you will have to work very close to the part, which is fraught with damage not only to the fingers in case of excess.
- Workpieces that are processed must be secured using special fasteners.
- When sharpening tools, be sure to use goggles. After the process, you can not check the sharpness of the blade on the fingers. For this, any unnecessary bar will do.
- Accuracy is the key successful work. Each tool should lie in its place (preferably in special organizers). Thus, the master will eliminate the risk of a chisel or knife falling to the floor with subsequent damage to the legs. It is also necessary to remove chips from the work surface in a timely manner. Otherwise, there may be an irresistible desire to do this during the cutting process. One awkward movement while working with power tools can spell disaster.
- When working with power tools, you need to pay attention to the wires. You can’t let them curl, because it’s easy to get confused in such “balls”.
As mentioned above, geometric carving is considered one of the simplest, so it is ideal for teaching beginners. Requires a minimum set of tools to work. During the cutting process, only precision matters. The elements of the picture should have a clear symmetry. The images themselves consist of repeating zones that form a single elegant composition.
Technology and sequence of geometric carving
The drawing in the technique of geometric carving is based on various simple shapes: circles, triangles, squares, rectangles, trapezoids and rhombuses, which are complemented by straight and broken lines. Contrary to the misconceptions of the inhabitants, the finished compositions are devoid of angularity and rudeness. The play of light and shadow emphasizes the relief of the image. Plots, as such, geometric carving does not have. It conveys the mood and vividly demonstrates the skill of the author. The finished product can amaze with the complexity and subtlety of work, and sometimes adheres to the principles of laconism, which does not affect its perception in any way. Very often, the composition is based on traditional Russian ornaments, which were previously considered "amulets" from evil forces. The process of working in the technique of geometric carving is conditionally divided into stages:
- Preparatory. It includes the manufacture of a blank (blank) and rough leveling of its surface, that is, the removal of defects, chips, relief elements.
- Work on the composition using knives.
- The final stage. Final processing of the workpiece: grinding, impregnation with special compounds, coating with varnish or paint.
After drying, the carved craft can be used for its intended purpose.
To work in the technique of geometric carving, you will need a minimum set of tools:
- Pencil, compass and ruler (pattern) for drawing up an accurate drawing.
- Two types of knives: "jamb" and "feather" (a kind of Bogorodsk knives).
The first type of knife is used to cut straight lines that form angular geometric shapes, and the second is used for "grooves" with soft curves.
Create a pattern sketch
Masters who have a “full hand” apply patterns directly to the workpiece using a pencil and a compass, a ruler. For beginners, it is better to first draw a sketch on paper or use ready-made drawings that can be easily found on the World Wide Web. The patterns are printed out, after which they are applied to the blank and traced along the contour using carbon paper. When the drawing is completely transferred to the workpiece, you can start cutting out the composition.
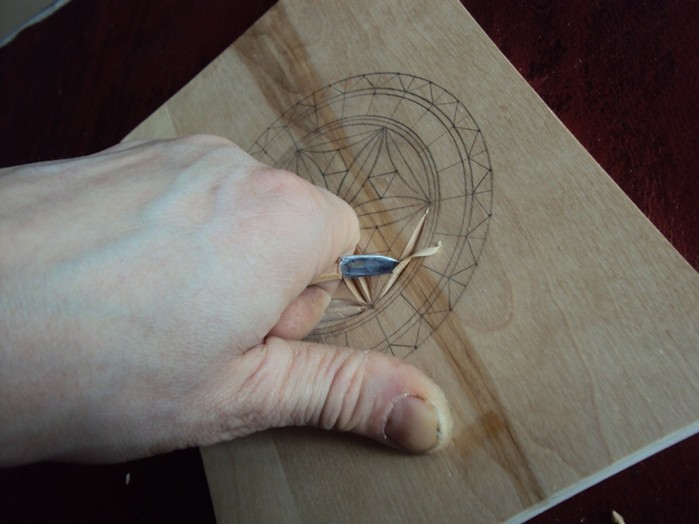
Cut out patterns
You need to start with soft details (circles, petals, smooth lines). For work use a pen knife. It is clamped in the hand between the palm and the index finger. The thumb is set aside and leaned against the workpiece. It will serve as a support. The bent index finger will become a regulator of the pressure force on the tool and its angle of inclination. The depth of the "groove" will depend on this. Remember that you need to cut "from yourself". First, one part of the composition is processed (left or right depends on the leading hand), and then the blank is turned over and the second part of the pattern continues to be cut out.
Now the joint knife for working on triangular elements comes into play. This instrument is held differently. It is clamped between the index and thumb, like a pencil, but at the very end of the handle, closer to the blade. The "heel" of the knife is driven into the workpiece with force at an angle of 45 degrees, but not at the very edge of the figure, but with a slight indent. It must be done so that the notch has “sloping” edges. "Grooves" with such a relief look more beautiful. The edges of the triangles must converge. Using the same algorithm, cut out the remaining elements of the picture. The spent pieces of wood should be in the form of pyramids, then the work is done correctly.
During the cutting process, it is easy to check the sharpness of the knife. If the chips are drawn in a continuous “ribbon”, then the tool is sharpened well. If it crumbles and falls off in pieces, then the knife is not suitable for cutting. Even sharp tools need to be sharpened periodically during operation. For these purposes, a piece of genuine leather is used, on which a small amount of any polishing paste based on chromium oxide is applied.
Grinding and impregnation of the finished product
To smooth out the roughness of the edges of the "grooves", the surface of the craft should be lightly sanded with sandpaper. Then the product is impregnated with a special compound. Some varnish the crafts, but most craftsmen prefer the waxing process (wax mastic) or oiling the surface. In this case, the craft will acquire a light, natural shine. Usually use linseed, dandelion, mint, seven-herbal oil. These compounds are great for impregnating dishes. The craft is thickly lubricated with a tool, after which the oil is “rubbed” into the wood. Now the product should dry. It is best to put it outside to dry under the sun. Some put products near the battery or use a hair dryer to speed up the process.
Master class molds for printed cookies
To make a mold for printed cookies, you first need to cut the blank. The width and length of the blank depends on the size of the future confectionery. You can focus on generally accepted standards and try on the usual anniversary or coffee cookies bought in the store. As for the choice of wood, larch, beech, oak are suitable for these purposes. The workpiece is cut out of the board using a jigsaw. Then it is fixed on the working surface and a pre-prepared sketch of the image is transferred. All details of the composition on the cookie should be convex, so the background does not need to be processed. The set of tools for the job varies depending on its complexity. To make it easier to cut, you need to select a source image drawn with halftones. Then it will be easier for the master to navigate with the depth of cutting elements. For printed cookies, inscriptions, simple landscapes with trees and birds, animals, flower arrangements, “bouquets” of ears are often chosen.
Cut out the signs
The plates are usually irregular in shape. The contours of the product emphasize the curves of the letters, so you will have to tinker with the workpiece, sawing out extra fragments in certain places. The letters can be drawn by hand using a pencil and a ruler, or you can download a ready-made inscription from the Internet. It is very easy to make plates, so the option is ideal for beginner carvers. For work, a joint knife and the Tatyanka Bogorodsk set are enough. After cutting, the plate is sanded and stained. When the composition dries, the recesses are additionally emphasized with a second layer. The inscriptions on the plates for the bath are complemented by clouds, oak or birch leaves, ladles, basins with brooms. For the street, a beautiful, even font and neat curls along the contour are used, since the drawings will be out of place here. In the same way, you can make an original sign for a trading shop or a pub, for example.
Woodcarving is an amazingly beautiful and very popular type of manual woodworking in our time. Carved interior details conquer with their magnificent appearance and reflect rich national traditions.

Creative people who simply “itch” their hands to do something very interesting and useful should pay attention to woodcarving. Girls and women may think that this is only a male occupation. And they will be wrong, because there are no less women masters of woodcarving than men.

About woodcarving for beginners
To decorate the interior and exterior space, various types of carvings and techniques for implementing the plan can be used. If you are interested in this type of needlework, then you should understand that you need to master the methods and techniques of woodworking, acquire the necessary tools and improve your carving skills.
In the modern world of smartphones and tablets, a wooden stand decorated with wood carvings looks very original.


Skillfully executed carving in the form of simple and ornate patterns and ornaments seems to enliven the world and endows it with sophistication, charm, emphasizes the taste of the owner of luxurious things and the talent of the master.


The works of the best carvers adorn the temples. Pay attention to the photo of the iconostasis of the upper church of the Savior Not Made by Hands, which is located in Moscow, in the Church of the Intercession of the Most Holy Theotokos in Fili.

Modern masters with a delicate taste create real masterpieces.

And thanks to the technologies of finishing and protecting the finished product from the destructive effects of mold and insects, these wood carvings have been serving people for hundreds of years.
Pay attention to the magnificent carved pieces of furniture:


Stylish doors:

Amazing handmade figurines:


Very often, connoisseurs collect handmade carvings. Wonderful chess worthy of any collection.

Perhaps, over time, your masterpieces of woodcarving will be carefully kept by collectors or decorate temples.
Types of woodcarving
Of all types of woodcarving, the most interesting openwork or through thread on a tree, which has some transparency, in which only the image remains, without a background. An example is an overlaid carving - this is an ornament that is attached to a finished background after being made by a master.

Geometric carving on wood – this is a type of carving in which a pattern is formed using many simple geometric shapes (often a diamond is used).

Oriental carving on wood is distinguished by bizarre forms. Egypt is the cradle of oriental wood carving.

relief carving on wood. In this technique, the image is located above the background or at the same level with it. These are carved panels of various shapes with a three-dimensional image.

- this is a flat-relief carving, but distinguished by an abundance of carved and stucco decorations, various flowers, curls, leaves, figures of people in unnatural poses, fabulous fantastic animals.

It originated in the village of Kudrino. Well-known products in this type of carving are caskets, vases, dishes, ladles, and home decor items. The main element is a floral ornament: rosettes, curls and twigs.

Volumetric (sculptural) carving Great for making sculptures, animal and human figurines, toys. - a subspecies of volumetric thread. This is the main craft of the village of Bogorodskoye in the Moscow region. The famous Bogorodsk toys are figurines of animals and people made of linden and alder.

Most often used to decorate wooden Scandinavian churches. With images of Gods and various animals, wood carvers decorated inside and outside church buildings.

- the simplest and rather peculiar type of carving. On a flat background, the master cuts grooves - grooves, forming a pattern. Carved landscapes - images of landscapes on a tree.


All these types of carving are rather conditional. Each master chooses the most acceptable of them, taking into account work experience, wood quality and creative inspiration.
What can be carved?
The simplest staircase is transformed, decorated with carved balusters. Balusters- these are curly columns in the form of columns, a stylish and noble decoration of the stairs. Wooden balusters look organic with a spiral wooden staircase.

Bas-relief. Another name for "low relief". This is a sculptural image on a plane. Most often these are figures of people and animals. .

Choosing wood carving tools
As in every business, wood carving has its own secrets, nuances that allow you to reveal the beauty of wood in a wonderful ornament. It is necessary to pick up special tools for wood carving and stock up on the necessary blanks and sketches for wood carving, which will be embodied in the form of drawings, borders, lace or genre scenes.
Basic Toolkit
Very high demands are placed on the quality of carving tools. Of course, craftsmanship plays an important role, but well-chosen and sharpened tools will help bring your idea to life. Experienced carvers at first glance at the tool will tell about its quality, and beginners are lost in the store from a huge selection.
IN basic set for wood carving includes:
- several knives and chisels;
- needle files;
- hacksaws for metal;
- vise;
- sandpaper;
- drill with several types of drills;
- bars.

Knives should be made only from high-quality steel. It is better to buy them in specialized stores for creativity. Although on initial stage just sharpened knives will do. Knives from Tatyanka, Narex, Kogatana and others will serve as an excellent start.
It is not necessary to choose an expensive foreign-made instrument, because domestic instruments can be of the same good quality, but much cheaper.
With the growth of skill, you may need a set of tools, a milling machine, a drill, etc.

Chisels for carving
Sometimes, instead of a chisel for wood carving, a sharpened screwdriver or file is used.

Flat chisel- This is a long rod, at the end of which there is a flat cutting edge. Very often it is used for the primary processing of wood.
Chisel semicircular It is one of the most important tools for the job. They differ somewhat in the degree of roundness, that is, they are medium, round and sloping.
Still happens V- a figurative version of chisels. It can be useful for geometric woodcarving, which we will introduce you to below.
For beginners, a small set for woodcarving, but of good quality, is enough to immediately get used to the correct movements and pressure.
In this video, a wonderful master A. Yuriev shared with us which tools to choose for carving.
How to protect yourself from injury when carving wood
Any tool of a master carver can be compared with a straight razor, therefore, when working with it, safety measures must be strictly observed. The material must be positioned so that the knife or chisel can be worked freely, eliminating the possibility of a sharp edge hitting the hands.
The place to work should be comfortable and clean. All unnecessary tools at the moment should be neatly folded, because they are very sharp and can cause injury.

Work materials
Each type of wood for carving has its pros and cons. It is easy to work with soft wood, but there can also be a lot of marriage. These are aspen, linden, birch. For beginners, this wood is best suited.

Oak, boxwood, mahogany are more expensive and complex woods. It is hard and durable, so it is difficult to carve from such wood. Very often there are troubles when working with such types of wood. Either the instrument or the master may be damaged.
An experienced carver can easily work with various woods, including juniper. Well, for beginners it is better to use inexpensive materials - spruce, pine, pear or birch.
Whatever tools are chosen for woodcarving, safety precautions must be strictly observed!
Geometric thread technology
Geometric wood carving is considered the easiest and is great for beginners. To create a conceived drawing, you need to have a small set of tools for wood carving and clearly withstand the drawing. For geometric woodcarving, symmetry and repetition are of the utmost importance. This achieves a wonderful play of light and shadow.


Cutting boards in this technique, wooden panels look great in the kitchen.

Geometric carving consists of sequential sawing out of simple geometric shapes: rectangles, triangles, squares, rhombuses. But the result is a wonderful ornament that looks different in different lighting conditions.
Execution sequence any wood carving is like this:
- First, a blank is made of wood (board, deck, blank).
- Next, rough leveling of the surface of the workpiece, in which all defects and roughness are removed.
- Then a decorative relief is formed with special cutters.
- After the completion of the main thread, finishing - grinding, impregnation, painting, varnishing.
You can not work with the workpiece on your knees! The master must have a table to work with.
Master class "Geometric woodcarving on a cutting board"

Instruments. You will need 2 wood carving knives: a triangular joint knife and a pen knife, a ruler, a compass, a pencil.

A triangle joint knife is needed for cutting triangular shapes of various configurations, as well as for cutting long straight lines. To cut long lines such as a petal or a groove, a pen knife is used. Carving knives should be sharp and comfortable.
First step. We make a sketch of the pattern on the board. It can be applied with a compass and ruler. Or you can print the patterns for carving taken on the Internet and transfer them to the prepared cutting board using a carbon paper.

Second phase. Cut out the petals. We use a pen knife.

During operation, the thumb is firmly pressed against the board, and the index finger lightly touches the wood. This will help to adjust the depth of entry of the knife into the surface and the angle of inclination. And the thumb will help move the blade smoothly. First, cut in one direction at an angle, then turn the board over and cut on the other side.
If the shavings curl in a “string” - the knife is good, sharp. It must be periodically undermined with a piece of leather with GOI paste.

Third stage. Cut out the triangles with a cutter. With a “heel”, at an angle of 45 degrees, we cut the knife into a tree, without bringing it to the edges of the pattern on three sides. The slots should be joined on all sides in the form of a pyramid. The sliver, falling out, forms a beautiful triangle.


Fourth stage. What could not be cut off, we carefully clean it so that the edges are frequent and even. By the same principle, we cut grooves and triangles around the perimeter of the board.
Fifth stage. We grind everything with sandpaper, process it with natural impregnation. Everything! The work is done. We decorate the kitchen useful and beautiful cutting board with wood carving.
Drawings for woodcarving
To perform wood carving, photographs, drawings and sketches are simply necessary. A large pattern for wood carving is used for dimensional products: for the facades of houses, interior decoration with carvings of churches, windows.
For interior items and furniture, carvers use small patterns, which are carefully worked out by the master.
YOU WILL USE
We offer you an archive of . Choose, print, create.
Video wood carving workshops for beginners
Of course, the wood carving looks especially impressive in the video. Channel "HAND-CARVED WOOD" shows the features of geometric carving for beginners.
Women's view of woodcarving. Channel tatiankacarving shows us how to make flower petals and leaves.
Konstantin Belyaev on his channel he talks in detail about the cutters for woodcarving.
And on this video Ivan the Builder shows how to make relief plane carving:
We will be very happy if this article inspired you to take up woodcarving!
Artistic wood carving always looks very impressive. Most people do not even know how such products can be implemented. It seems that this requires great physical strength, and in addition, artistic taste and education. However, cutting a beautiful ornament is not as difficult as it seems, you just need to learn a little technique and, as they say, fill your hand. We will show popular drawings for learning wood carving techniques, which will be useful for beginners and masters!
It's not a secret for anyone that for manual creative work it is necessary not only to master the skills of this art, but also to have inspiration, desire and, of course, time. In order for all these parameters to come together, drawings can help the master to study simple woodcarving. For the birth of an idea, not only drawings help, but also photographs of the work of other craftsmen.
There are sketches for various types of woodcarving, and here you can find a sketch that suits you for free.
Parsing drawings for woodcarving: sketches for geometry
For beginners, drawings for geometric carving are well suited. This is an easy and effective type of wood carving. To do this, you just need to determine for yourself which sections are convex and which are concave, in which case the correct picture on the tree will come out.
Boards in geometric and flat-relief technique.
Stencil.

Stencils can be changed - for example, reduce the number of elements, or, on the contrary, add details for a more interesting result.
Stencils for slotted carving.Artistic carving is also of other types. One of the simple cutting techniques with the right tool, such as a router, is a slotted thread. It is also called openwork because the finished product, made accurately and accurately, looks like lace. It has no background - it is cut out of the pattern. Hence the name. To practice this type of wood carving, you need to have a firm hand and cut clearly along the contour of the stencil. A fabric or foil of a contrasting color is placed under a product made using this technique with a milling cutter or jigsaw. The photo shows examples of finished work, as well as sketches suitable for this technique.

Contour carving is different in that a contour drawing is cut out on a tree. In this technique, you can make a lot of different paintings; it is not necessary to take a ready-made stencil for carving for it. For the decor of the nursery, you can circle the coloring and use it as a sketch. Also, if you do not know how to draw, you can take any pencil sketch and transfer it to the tree. In this technique, images of animals, birds, as well as landscapes and still lifes are well obtained. The images clearly show examples of what can be carved on wood using this technique.

Black-lacquer carving is a kind of contour carving, where a light contour is cut out on painted wood.
Examples and stencils for flat-relief woodcarving.This view differs in that the drawing is above the background. In this case, the pattern has the same height. The background is textured, and it is smooth. The edges of the cut pattern, as a rule, are ovalized, that is, they are carefully sanded so that they are smooth, as if oval. This technique requires a little more skill than the others, but the products made in this way look amazing. The photo shows examples and sketches for carving in this style.

Drawings for caskets can be distinguished as a special kind. They can be made in various techniques: slotted carving, laying a base of fabric, foil or noble varieties of wood of a suitable color under the pattern; flat notched thread, which includes geometric and contour, or another subspecies. It differs in that depressions are made to the same depth in a flat background. In the case of the geometric technique, the recesses are usually in the form of triangles or quadrilaterals. In addition, there is also bracketed carving, which is also a kind of flat notched carving and is well suited for decorating caskets. In the images you can see boxes made in various styles.