Chiaroscuro in photography. Shadow in photography. What is backlight in photography
Because, to be honest, I didn't know how to use my flash, and more importantly, I didn't know how to read light. Yes, there is no mistake here. As a photographer, you not only see light, but you must also master the art of reading light - the type of light, the quality of the light, and how the light will affect your image.
The more I photographed people and places, the more I realized that finding light in the shadows is not so scary and intimidating.
Master the shadows
Imagine for a moment the confidence you would feel if you could walk into any room and think to yourself, “Yes, I can handle it.” And I don't mean using an on-camera flash or a studio light to light up the whole scene. I mean using only available light to create magical photographs.
Now don't get me wrong, I really love natural light images because I find them light, airy and inviting. But shooting in low key style and using shadows to create dramatic portraits is just as fun.
Over the past few years, I have felt a little limited in my photography in terms of photographing in bright, open, natural lighting conditions. Living in Chicago, our summers are quite short, and autumn is usually a mixture of rain, thunderstorms and more rain. I realized very quickly that I needed to get out of my comfort zone and figure out how to shoot indoors and do it confidently and creatively.
The first thing I realized was that shadows play a very important role in shaping light, creating mood, depth and drama. If you don't have a lot of floor-to-ceiling windows that fill the room with light, then taming shadows can be the perfect solution to boost your creativity.
No. 1 Equipment selection

If you have a choice between prime and zoom lenses, choose the former. Primes are generally considered fast lenses with f/1.8 apertures or more, allowing more light to enter the camera's sensor. I use my Canon 50mm f/1.2 80% of the time I shoot indoors.
Also make sure you measure correctly. Most of the time I use spot metering and my center point is set to the brightest area of my subject's face and skin. This in itself will help produce a well-lit image. This way the highlights will be properly exposed and the shadows in the rest of the scene will have a range of hues.
Make sure the image is properly exposed. If an image is underexposed, trying to correct it in post will only add noise. In general, I prefer to overexpose my photos by at least 1/3 of a stop no matter where I photograph. I have found that this allows me to minimize noise and retain as much shadow detail as possible.
My white balance is set to "Auto". You can select White Balance using Custom Function K to reduce processing time later. I find that the Auto mode works very well in most cases, and there is no problem if small adjustments are required in post-processing. A little bit of noise as you increase the ISO will be appropriate, especially if the room is really dark.

#2 One light source
A single source of light, such as a small window or an open door, can do wonders. When you're working with dark spaces and limited lighting, you'll be surprised how little light you really need.
If you have north-facing windows, they tend to produce softer and more directional light than east- or west-facing windows. They tend to bring out strong light depending on where the sun is in the sky at the time you are photographing.

The magic of backlighting.

The bride looks out the window, and her profile is evenly lit. But the dark drapes behind her make the background almost black - I really love the drama of light and dark going on in this photo, this is achieved by placing the subject in a certain place.
#3 Direction and quality of light
Both the direction and quality of light play a significant role in the mood of an image. Therefore, understanding its variety, nature, and use of each will help you make informed decisions about how to achieve your ultimate goal.
Hard, focused light tends to enhance the overall drama of an image, bringing out texture and detail and creating contrasting shadows with sharp, defined edges. Soft, diffused light produces shadows that are soft, with fuzzy edges that recede gently (fade out), making them beautiful and versatile for people shots while minimizing texture and detail (i.e. imperfections).
The angle and direction of the light depends on the shooting style and your intent for the image or the entire photo shoot. As a general rule, I don't place the object facing the light source, because that makes it flat and one-dimensional. I prefer to light my subjects from the side so that the depth and size of the shadows emphasize the features of the subject and the rest of the frame.
Backlighting an object has its uses, especially if you want to give it some abstraction and an airy, dreamlike feel.

On the left, the bride is looking straight out the window, so the light on her face is even and soft. On the right, the bride looks out the window, but at an angle of 45 degrees. As such, her portrait is a mixture of more dramatic light with darker shadows.
#4 Mathematics in photography
The mathematical inverse square law describes how illumination from a light source changes with distance.
Imagine a beam of light that expands and grows with distance. Now mark the object in a place close to the source itself and the light will be hard. But if you move an object in a straight line about 6 feet from the light source, how much less light will hit the object? When the distance is doubled, the light hitting the object is reduced by three-quarters.
In a real world context, let's say you have a background to work with and maybe a surface to bounce light into the scene. Plus all kinds of diffusers and filters to change the light source, as well as choosing the placement of the object in relation to the background and light source, and positioning yourself and the camera.
In general, you can add drama to an image by placing your subject close to the light source and away from the background. The light will illuminate the object, and everything behind it will be hidden in the shadows. This is a quick and easy way to create a dark background. Conversely, placing the subject further from the light source and closer to the background will create a more evenly lit scene with a smooth transition between light and shadow (the background will also be lighter).

On the left, the bride is farther away from the light source and therefore more in shadow compared to the image on the right, where she is facing the window light and closer to the light source. Therefore, most of her face is illuminated by the light coming from the window.
#5 Modify your light source
If you find an excess amount of natural/available light, using modifiers is an easy way to control the amount and intensity of light in your subject.
Curtains and blinds can be used to reduce or diffuse light, making it softer and weaker. You can reduce the size of the light source to increase shadows and drama with curtains or partially closed doors. Remember, the more light you let in, the less intense the shadows.
I hope these examples motivate you to look at shadows differently. There are no monsters hiding in them! In fact, they are very useful in creating a dramatic effect in your photos.

I remember when I was just starting out as a biological camera tripod, I decided to do an apple photo shoot and ran into a problem. Namely: what is better to use to illuminate the subject - a candle bought for a couple of kopecks in the nearest store, or an electrician neighbor, Uncle Petya, with an extension cord and a table lamp. But both of these options disappeared pretty quickly - the candle burned out while I was choosing where to put the apple. After all, you can’t put it anywhere!
This is where Beethoven's Moonlight Sonata comes to mind. And why? Because very good music composition. So in our ungrateful business, the main thing is composition! The shooting location must be chosen very carefully. I chose the wrong place - I failed the photo shoot. Not the horizon filled up, but in general the entire photo shoot! Remember: you chose the right place and lighting - consider that you were almost published on a glossy spread.
But back to my apple photoset. During the same period of time that the candle burned out, Uncle Petya managed to find my father’s stash, and by the time the photo was taken, my “soffit” was swaying slightly, casting incomprehensible shadows and emitting an indistinct lowing.
I had to learn materiel. Nights without sleep, surrounded by cups of coffee and tea, kilowatts of electricity burned and megabytes of traffic spent were not in vain: I managed to determine the basic concepts and rules for using light in photography!
To begin with, let's remember the school problem about apples, like "Petya has 3 apples ...". Everyone remembers that these apples had to be divided, acting as Robin Hood - taking a part from the rich and giving it to the poor. It is the same with photography, because it will not be just an image. He needs what? That's right, share! And we will divide by "three". In the frame, you need to select 3 different plans: back, middle and front. But this does not mean that you have identified plans and the task is solved. No, we're just getting started!
The next step is to study such a thing as "compositional center". That is, a place or object on which emphasis is placed that attracts the eye. And this is not necessarily something of an unusual shape, like a giraffe sitting on the back of a camel. Although, I confess, I would have looked at the outlines of such a rider for a long time.
But the compositional center can be realized in any way: a human silhouette, a bright element of clothing, or just any object, horizontal lines or objects, shooting against the light, using a contrasting background. In this regard, the choice and option for its implementation depends solely on your imagination and skill.

One of the main and most commonly used methods is shooting against the light. It allows not only to clearly outline the shape of an object, but also to create something new, unusual. It should be remembered that light is not an easy thing and can be of three types: directional, diffused, or mixed.
It should be remembered that directional light often makes the subjects being shot flat, so even Hollywood stars know not to neglect the shadows in this case. This, in fact, they collect such crowds of fans. Again, you can't limit yourself to 1-2 shots - the photographer has to make a lot of "brush strokes", changing the point of view slightly to get the right exposure. But you can get a little creative and use reflected light.
Moreover, it is not necessary that it be reflected from something shiny, but we are experimenting - let it be reflected from the object itself! Just do not forget that many objects do not reflect light, but pass it through themselves.
To emphasize some features of dark or plain objects, it is recommended to use diffused light. To help a beginner, I will immediately give a few examples.
Morning - cheerfulness, freshness. Light and shadow, their sharp transitions into each other, the rays of the sun in the morning mist - you can create and create!
At noon, when the sun hangs overhead, even on a cold winter day, you can depict the Caribbean coast, where it is now +35 Celsius.
In the evening, the colors are washed out, turning into halftones. Lots of natural shades of yellow and blue. Transparent shadows, constantly changing their shape. An almost perfect time to create a spectacular masterpiece!

Night. There are a lot of tricks and subtleties here! If you use a sophisticated modern camera, then lighting problems can be solved with a flash. But it's so uninteresting - after all, we decided to CREATE! Therefore, we remember what moves can help us: the light of the moon; glare cast by a fire; sparklers and fireworks. Even a banal match at night can work wonders with its light!
By the way, since we have touched on this topic, a few words about the outbreak. Flash - that's our everything when shooting portraits! Also, with its help, you can “dig deeper” in the shadows, reduce them. Artificial flash light is very good for use in "Action" style photos - sharp, fast edges and outlines of objects in motion.
And, for starters, do not forget to decide what kind of picture we need: contrasting or calm. The first option is quite simple - select the main tone of our image with a bright spot (for example, a bright, colorful belt on a person) and click on the camera shutter. For a calm shot with the colors of objects, we are more careful, we do not use "flashy". The use of a shaded filter is welcome. And do not forget - before pressing the shutter button, check the set shooting mode again. It won't be redundant!
“So, how did the whole saga with the apple end there?” - you ask. I can't answer you directly. But I can hint - have you seen the Apple logo? ;)
Read 4580 once
The word “photography” literally translates as “drawing with light”. That is why beautiful light is the key to a good picture. It takes constant practice to learn to "see" the light, "catch" the light, and use it to advantage. But for starters, it would be nice to summarize in your head a little theoretical knowledge about light in photography. This is what we will do!
light in photography can be classified according to the following parameters:
- the nature of the lighting (soft or hard light);
- method of obtaining lighting (directional, diffused, reflected);
- direction of light relative to the subject (front, side, back, top, bottom);
- the role of this or that source in the general light-shadow pattern (drawing, filling, backlighting, modeling and background);
- depending on the nature of the source (natural and artificial light);
- by color temperature (warm or cold light).
You can endlessly select more and more types of light, but we will focus on the presented division.
Soft light and hard light.
 hard light has a characteristic picture, which is easy to recognize by the sharp contrast between light and shadow, a minimum of halftones. In hard lighting, shadows from objects become deep, and highlights become pronounced. The texture of the subjects is also emphasized. The simplest example of hard light is the sun on a bright afternoon. Also, hard light can be created by using flashes directed at the subject without using any attachments. hard light give studio devices with a reflector or with a honeycomb-type nozzle, tube, etc.
 Soft light characterized by a calmer pattern - a maximum of halftones and gradients. Therefore, in classic portrait photography, the main source is a soft light source - a studio device with a photo umbrella or softbox, or soft light from a window. Also an example soft light may be natural light on a cloudy day, or light in the shade of a building on a sunny day.
How to get the desired black and white pattern.
You can control the light (when shooting in a studio or with flash) or use what is around (when shooting outdoors or indoors without a flash). Be that as it may, the photographer can use three different methods of obtaining kind of light.
 directional light obtained by using a fairly powerful source, aimed at the subject from a short distance, without the use of additional attachments. Therefore, directional light is usually hard with a characteristic black and white pattern.
 reflected light obtained by reflecting the main source from any surface. It can be a mirror, a white homogeneous material, a silvery surface or a plain wall painted in a single color. White and silver surfaces do not change color temperature (i.e. retain their natural colors). Colored surfaces give off colored reflections when light is reflected from them, so they must be used with care. Reflected light is in the middle position between directional and diffused light.
scattered light- this is the light from the main source, which passes through translucent substances before reaching the subject. Cumulus clouds in the sky, a piece of translucent fabric, a sheet of paper, curtains or professional devices (translucent umbrellas, softboxes, etc.) can serve as a diffuser. Also scattered light is the light in the shade on a sunny day. Diffused light is the softest, giving smooth transitions between light and shadow on the subject.
You probably visually imagine that the light can be directed at different angles relative to the subject: directly at the model (“head on”), from the side, at 45 degrees, from behind, from above or below. The way of transferring volumes on the subject depends on the angle of illumination. Surely you have heard expressions like “flat light” and “volumetric, artistic light”. So, in order to convey the volume that we see in the real, 3D world with the help of a photograph, a two-dimensional image, it is necessary to use light that emphasizes the volume of objects.
Best for this task side light, and in combination with accent backlighting, it creates the maximum artistic effect. Only side light is a rather broad concept, it can be placed at different angles. How to set the side light correctly depends on the model and the features of its appearance. It also creates a beautiful light-shadow pattern top light, which is often used for model shooting in the studio. But low light is mainly used to fill in shadows or to create a specific shooting effect for horror films.
The role of light sources in the lighting scheme
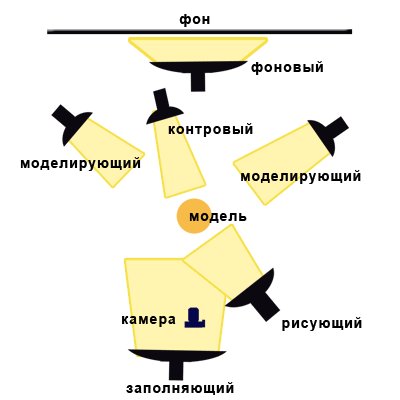 Now let's consider the role of different sources depending on their participation in the overall picture of the illumination of the subject. You've probably come across terms like fill light, key light, back light etc. Let's see what all these terrible concepts mean. In fact, there is nothing complicated:
key light- This is the main source of illumination in the lighting scheme. It is he who draws the main volumes of the object, hence the name. In the English-speaking world, this light is called "key light", i.e. key light. Source key light there is usually one, and it is the most powerful compared to the rest. Side or top light is classically used as key light.
fill light- light that is used to evenly illuminate the entire scene. It is usually used either to highlight shadows, or to generally equalize the illumination in the frame in order to be able to properly expose the picture at the desired shutter speed and aperture.
modeling light used to create accents (underlining highlights) or soften individual shadows on the subject. Typically, modeling light is highly focused, and its power is set so as not to interrupt the main cut-off pattern.
Backlight(it is also called contour) is created using a source located behind the model. It is usually used to separate the model from the background, to create accents and artistically highlight the contours of the figure. In classic portrait photography backlight directed either from behind or from behind at an angle (behind the shoulder). Schemes using backlight are the most beautiful. Backlighting looks spectacular in male portraits, and also looks interesting for highlighting the lush hairstyles of girls. By the way, it is thanks to the backlight that the pictures taken at sunset seem so magical!
background light- as you might guess from the name, it is used to highlight the background. The fact is that due to the distance between the background and the model, when using, for example, one light source, the background turns out to be darkened. This does not mean that it must be highlighted, sometimes background light is not used precisely to create such an effect of the depth of space. The light is directed to the background either pointwise (they create a light spot behind the model), or evenly (they illuminate the entire surface of the background equally), or create a soft gradient transition. I do not recommend using the latter option in inexpensive studios with cheap paper backgrounds, because they tend to be imperfect. As a result, such a homeless effect is obtained in the pictures, forgive me for such an expression.
Light and shadow in a landscape. How to photograph a landscape beautifully?
Most often articles about light in photography devoted to studio photography. Based on this, some amateur photographers get the impression that if they do not shoot in the studio, you can not bother with the issues of light and shadow at all. This is fundamentally not true.
The word photography is translated from Greek as "light painting", everyone probably knows about this. The success of a photographer largely depends on how effectively he can work with light and shadow. In this case, we are talking not only about studio lighting, but light in general - from the sun, from a window, from a light bulb, from a flash, in a word, everything that can be used in artistic and everyday photography. If an amateur photographer is not familiar with the basics of building a light picture, a photograph is obtained, he regularly receives frames like this ...
I think detailed comments on the photo are unnecessary. The main problem with this shot is that the type of lighting does not match the capabilities of the camera. As a result, only a dark silhouette of foreground objects against a whitened sky is obtained in the photograph. This is just one of the situations when you need not to trust the "machine", but turn on your own brains - choose a shooting point and set up the device in such a way that there is something to look at the photo.
This chapter will deal exclusively with shooting landscapes, in which the main light source is the sun. Despite the fact that there is only one light source, many options for illuminating the scene are possible - some are better, some are worse.
First of all, two categories of lighting can be distinguished - diffused and directional.
diffuse lighting
The most striking example of diffuse lighting can be seen outdoors on a cloudy day. All objects are illuminated evenly, the cut-off pattern is practically absent. For landscape photography, this is one of the most inappropriate types of lighting. The picture is dull, the colors are faded and boring.

It is very difficult to convey volume in such photographs, especially if the nature of the foreground and background does not differ (trees against the background of trees) - they seem to stick together with each other. In cloudy weather, you should try to avoid taking too much sky into the frame, since the relatively dimly lit ground often turns out to be unnecessarily dark:

You can, of course, "stretch" the shadows in Photoshop, but still, the photo will almost certainly be rather boring and inexpressive. After all, the mood of the picture in most cases is determined by chiaroscuro, but in this case there is almost none, and, in general, there is no mood either.
Directional lighting
In the case of street photography, the source of directional lighting during the day is the sun, at night - sometimes the moon, but more often - artificial light sources, such as street lamps. Depending on the location of the light source, directional lighting can be divided into three types:
- Frontal
- Lateral
- back
front lighting it turns out if the light source is located behind us and illuminates the object or the entire scene "head on". A characteristic feature of this lighting is a very weak play of light and shadow, as a result of which the volume suffers - the photograph seems flat. Here is an example of such a photo:

Let's leave the flock of birds alone, pay attention to the landscape itself. By itself, the volume in this photo is conveyed very mediocrely. For example, it is not clear how far the birch is from us and we have to guess about it by indirect signs - it is clear that the leaves turned out very small, so the brain tells us that the tree does not grow on the edge of the cliff, but much further. The cliff line itself merges with the river bank. In general, the transfer of volume in this photo leaves much to be desired.
But even if we have to deal with frontal lighting (especially true when shooting landscapes on long trips), it is often possible to solve the problem of conveying volume by choosing a shooting point. Here is another photo from the same series, similar in composition, in which a slightly different point and shot is chosen:

Quite another matter! Thanks to the presence of shadows, a clear separation of plans appeared, thanks to which the photograph is "read" much better. We can immediately determine where is the foreground, where is the middle, where is the background. I found a very good trick to improve the transfer of volume in lighting close to the front - the border of the illuminated foreground should pass against the background of a shadowed fragment of the background. Pay attention to the edge of the cliff - the dry grass lit by the bright sun in the foreground contrasts perfectly with the shaded area located below the slope. However, this technique is applicable only on hilly terrain. If the terrain is smooth, then getting a good volume in the photo with frontal lighting, alas, will not work.
Side lighting gives a much more interesting cut-off pattern than the frontal one. With frontal lighting, even if we get a play of light and shadow on the terrain, single objects are still illuminated "head on" and look pretty flat (see the tree trunks in the previous two photos). In side lighting, objects look more voluminous. Here is an example of a photo taken with side lighting.

Although the sun is not strictly to our side, but to the side-behind, the light-and-shadow pattern here appears not only on the landscape itself, but also on the objects themselves, in particular, on the tree trunk on the right. It is noticeable that it is thanks to chiaroscuro that the round shape of the object and its texture are emphasized. It is also important to mention here that the best lighting occurs in the morning and evening, when the sun is not high above the horizon. In this case, the shadow from the crowns of the trees does not fall on their trunks, due to which the texture of the tree bark is transmitted in the best possible way. Plus, from objects on the ground there are long shadows that can become elements of the composition. However, when the sun goes too low, the lowlands of the landscape are immersed in shadow, which often negatively affects the expressiveness of the picture. Here is an example of a photo when the best moment for shooting has already been missed - the foreground has gone into the shadows.

However, the most interesting, in my opinion, photographs are obtained in backlight, that is, when shooting against the sun. I must say right away that shooting a landscape in backlight is not an easy task, but if successful, the result may exceed all expectations.
I must immediately warn you that in backlight it is far from always useful. When photographing a sunset over high-rise buildings, it’s not worth beating yourself in the chest, they say, I have mastered the art of landscape photography and know how to use backlight! :) The main thing is not that the light source hit the frame, the main thing is how the light spreads in the frame and how much it was possible to convey in the photograph.
With proper use, backlight can create a unique black and white pattern in a landscape (and not only in it). To implement this type of lighting, you need, at least in the frame, to have a favorable environment in which this light will "play". Let's start simple...

The photo was taken with a telephoto lens, the setting sun was left out of the frame. This simple study shows how backlighting can be used to create light fringing around objects. The only condition is that the object must have a rough or even furry surface. The hairs on the stems and flowers scatter the sunlight, creating some pretty interesting edging in the photo.
Another example is more difficult...

First on the positives. The volume is wonderfully conveyed in the photo due to the active alternation of lights and shadows. Foliage is able to transmit light and create the illusion of glow, especially if it is located against a dark background. In the presence of haze, an additional type of perspective appears - aerial, that is, objects in the foreground are clear and contrasting, in the background - as if in a haze. All this has a positive effect on the perception of photography.
However, there are also pitfalls. The most important of them is the limited dynamic range of the matrix. Even a serious DSLR is often unable to work out shadows and highlights at the same time. The above photo shows that the texture of the oak bark is almost lost, it has gone into a deep shadow. If you try to increase the shutter speed in order to work out the shadows better, another trouble awaits us - the previously small and neat sun (in this case, its reflection in the water) will begin to spread rapidly in width as a result of blooming (this is a phenomenon when the charge from overexposed matrix cells begins to flow to neighboring cells, which also overexpose and overflow - and so on, and so on). Because of the blooming, the sun "knocks out" a significant part of the photo in an absolutely white color, devoid of shades:
In some cases, an ND filter helps to cope with the sun, but it allows you to achieve an acceptable result only if the horizon is straight on the frame and nothing crosses it. This is what the ND filter looks like:

And here is the result of its application. The darkened area of the filter fell on the top of the frame. This allowed us to darken the overly bright sky and reduce blooming, while at the same time allowing us to better work out the dark lower part of the frame.

When dynamic range is lacking, many photographers often resort to HDR imaging techniques. The essence of this technique is that instead of one frame, three are taken - one with a normal exposure, the other underexposed (the sky is good on it, the earth is in black), the third is overexposed (the earth is good, the sky is white). Then one of the three shots is taken using Adobe Photoshop or some specialized program for creating HDR. Here is an example HDR image:

The second problem with shooting in backlight is the glare resistance of the lens. Not all lenses can boast of the ability to give a "clean" picture when shooting against the sun and, as photographers say, "catch hares". Here is an example of what these "hares" look like:

Sometimes sunbeams give a photograph a special zest, but more often than not, they only spoil it, appearing in the most unnecessary places. An effective way to deal with "hares", except for buying expensive optics, has not yet been invented, alas.
I can't help but give another example of a backlit photo taken from a helicopter:

Photo - Drilling. Western Siberia.
In addition to the very expressive chiaroscuro, this photograph is also notable for the fact that the sun behaves here as a source of point light. The shadows do not run parallel to each other, as we are used to seeing when we are on the ground, but with a perspective effect, which gives the photo a powerful internal dynamics. The photo was taken on a full-frame DSLR with a 16mm ultra wide-angle lens.
Speaking about light in photography, one cannot fail to mention such a light source as a flash - built-in or external. Read about the features of using this device.
Pictures convey an image of the world through the means of displaying light and shadow. The shadow can tell a lot. This is volume, and depth, and time of day, and lighting, and weather conditions.


Can be used as a silhouette that looks contrasting in a bright shot. Shadows can unobtrusively add a certain atmosphere to the image or be the main component of the image. Each time, before you press the shutter button, you need to take into account the position and nature of the shadows along with the entire composition of the frame. They should not argue with the subject of the photo. The worst mistake in shadow work is when the photographer's shadow enters the frame.


Often, even when the lighting is normal, additional light sources should be used. They can act as fill light. This light softens the shadows in the picture.


If you use the built-in flash in the evening, you get not the best result. The subject is usually bright, and everything behind will be dark. It will look like a black hole. An external flash with a rotary head can give a good result. It can fill a room or space with light. If the light is directed to the ceiling or wall, then the reflected rays will create a good volume.


Working with light in photography is a complex section of photography. By studying the technical nuances and experimenting with external and built-in light sources, as well as using diffusers, filters and other accessories, you can get very interesting pictures.

