How to make unusual ones. What you can do with your own hands for sale: handmade business ideas. Let's start production
Many people prefer not to work "for someone else." Such citizens need to earn money somehow. For example, by organizing your own business. This is the most correct solution for those who want to receive money without being hired. But in this case, every businessman faces the question of defining activities. Quite often people prefer handmade things. They are highly valued in the modern world. Today we have to find out what we can make with our own hands and sell. What tips and tricks will help you make good profits from your business? Where and how best to distribute handmade things? If you thoroughly study the answers to these questions, you can become a famous businessman with a good income.
About popularity
With the advent of man on Earth, handicrafts arose. In the past, people made things out of necessity. With the development of society, handmade things began to be valued not only because of their importance, but also because of their beauty.
The so-called handmade is usually genuine, original and unforgettable. It carries the love and positive energy of a person. Many say that the philosophy of art of conserving the planet's resources is promoted through the creation of handmade things. After all, craftsmen usually use only natural materials in their work.
Owning and wearing handmade items means always being on top of fashion. People also think about what they can do with their own hands and sell because such things are distinguished by their originality and uniqueness. They emphasize a person's individuality. Besides, not everyone can do something with their own hands. Some people don’t know how to do anything, some are good at embroidery or sewing, others have a talent for drawing or forging. In any case, in the modern world, handmade items are in great demand.
Problem of choice
Is it possible to sell something you made yourself? Yes. A similar prospect opened up in ancient times. As already mentioned, people used to make things for themselves. Then they started exchanging objects. With the development of the economy on Earth, handmade goods began to be sold. This is normal.
But every businessman who wants to create handmade things faces a number of problems. The first of them is the question of what you can make with your own hands and sell. Next, the most common, relevant and useful ideas will be presented for those who plan to try themselves in the field of handmade. 
Jewelry and decorations
The first thing we can recommend is to make jewelry and accessories. They are usually worn by women. Such handmade things are always in price. They never go out of style. Such items are unique and eye-catching.
What can you make with your own hands and sell? Any jewelry and accessories. They can be either male or female.
You can make beads, bracelets, pendants, brooches, keychains and so on. In this case, the use of absolutely any materials is allowed - beads, clay, wood, wire. This is not an exhaustive list.
What can you make with your own hands and sell? Bracelets made of beads and beads made of polymer clay are now popular. Even a schoolchild can make such decorations.
Many people say that kanzashi style jewelry is very popular - these are unique hair decorations. When making such handmade items, they use the technique of folding fabrics in a variety of ways.
Please note that many jewelry made from semi-precious stones without a clear cut cannot be found in stores. Such items can only be purchased secondhand. They look original, which attracts buyers.
Paper filigree
What can you make with your own hands and sell at a profit? The next idea is suitable exclusively for diligent and neat people. We are talking about paper filigree. It is called quilling.
What it is? The art of creating various crafts (decorations) from paper. Typically, craftsmen use paper tapes for their handmade items. They create different decorations that can be used to decorate cards, letters, frames and gift wrapping.
In addition, using quilling you can make a variety of decorations. What exactly should I do? It's difficult to predict. Any figures made from paper ribbons will be bought up by modern fashionistas. 
Some ideas for paper filigree:
- creating flowers;
- crafts in the form of zodiac signs;
- paintings;
- toys.
Paintings are especially popular today. Making them with a certain skill is not difficult. And such hand-made items are sold at a high price.
Quilting
What can you make with your own hands and sell? At home, modern people can create a variety of objects. The range of available materials is practically unlimited. Therefore, there are plenty of ideas for business.
The next interesting direction to work is quilting. This is the process of creating objects from scraps of fabric. Usually such things turn out to be bright, original and original.
The art of quilting has come to the modern world from past centuries. Ancestors quite often sewed from scraps of fabric. Modern craftswomen use expensive fabric of different colors in their work.
What can be done this way? Here are some ideas:
- blankets;
- pillows;
- towels;
- paintings;
- rugs;
- toys;
- bags.
This is not a complete list of what can be done with quilting. But these ideas will help you test the activity and evaluate its profitability.
Decoupage
Not everyone can do tinkering. Some people have certain talents for art. What can you do with your own hands and sell in this case?
When decoupage, the use of any materials is allowed - from napkins to fabric. Such a business will not require any special expenses. The main thing is to have talent in the field of decoration.
You can paint anything - plates, saucers, cups, vases, stands and even furniture. It all depends on what exactly a person wants to do. At first, it is recommended to work with available items - dishes and vases.
To keep you in a great mood in any weather, make new things from available materials. Quick crafts that take less than an hour to make.
The content of the article:
Sometimes you want to pamper your child with a new toy, but you don’t have the financial resources or time to make one. Therefore, we decided to select for you the fastest simple crafts that you will spend no more than an hour on. The family budget will not suffer, since they are made mostly from waste material and all sorts of leftovers.
How to make a doll from threads and a dandelion with your own hands?

You will create it while relaxing in a cozy chair. The main thing is to place everything you need nearby so that you don’t have to get up again. This:
- threads;
- half a sheet of cardboard;
- scissors;
- strip of flesh-colored fabric;
- markers.
- Wrap the threads around the card in an impressive layer.
- Tie the finished winding with thread. Determine where the doll's head will be. Mark it by also rewinding it with thread.
- Do the same for your right and left hands. To make a doll's hands from threads, wrap your hands at wrist level and cut the yarn in the area of the toy's fingers.
- Also use threads to separate the torso from the legs, and perform them using the same technique as the arms, just make them longer.
- Measure a strip of flesh-colored fabric according to the volume of the head, glue its sides.
- Wind hair threads around your hand and cut through the resulting roll on one side. Glue to the head, trim the bangs if desired.
- Use markers of different colors to draw facial features.
- Sew a sweater for a toy or tie it with a piece of fabric to make an apron. You can tie a handkerchief to make it a cloak. Children are happy to make such clothes, and they will certainly appreciate a new doll made from threads.
If you are making a girl doll, then you do not need to mark her legs. Let the threads cut evenly at the bottom become a skirt.
Such simple crafts will surely delight the kids. You can also create a fluffy dandelion from leftover threads.

For this charm you will need:
- yellow and green yarn;
- wire;
- PVA glue;
- knitting fork or metal staple;
- scissors;
- gypsy and thin needle.
- Wind the yellow yarn around a crochet fork. Thread a thread of the same color into the gypsy needle. Sew it down the middle.
- Lubricate the resulting line well with glue. Remove the created fabric of yarn from the fork and roll it with a roller.
- A thread is wound in the middle to give the workpiece a dumbbell shape. Coat the middle of this part with glue on top and wait until it dries.
- Such simple crafts are interesting for both adults and children. They are made quickly, but part of the time is spent waiting for the glue to dry. Therefore, it is better to make crafts in the evening, and continue the entertaining needlework the next day. What are we going to do now?
- Cut the resulting dumbbell in the middle. On the first and second flowers, you need to cut the loops with scissors and carefully comb them to get fluffy caps of two dandelions.
- The green yarn from which we will make sepals must be cut into pieces 4 cm long. We thread the same thread into a gypsy needle, sew the pieces across, but not in the middle, but 2/3 away from the edge.
- Trim the top with scissors, trim it, make another line parallel to the first.
- Apply glue to the back side of the flower and attach the sepals here. Wrap it with the same thread you used to stitch it. Glue both ends and leave the workpiece to dry.
- Meanwhile, you will wind the green thread onto the glue-coated wire. You will get a stem.
- Insert a thick needle into the sepal from below and twist to make a hole for the stem. Install it there, having previously lubricated this part with glue.
- The leaves can be crocheted, but since we are making simple crafts, cut them out of green paper or cardboard and glue them to the stem.
How to quickly make crafts from animal tissue?
If you want to spend less than 30 minutes making a new toy, then make these funny mice. They don't even need to be sewn. By making the slits in a certain way, you will make these rodents.

See if you have:
- pieces of felt;
- juice straws;
- beads or small buttons.
- For each mouse you need to cut two parts from one fabric. The first will become a body, pointed on the muzzle, rounded on the other side. Cut out the ears in the shape of a figure eight.
- From a fabric of a different color you need to cut out a small circle for the nose and two larger ones for the ears, and glue them in place.
- Using scissors or a utility knife, make 4 cuts on the body of the mouse. Two will be vertical, at the back of the head, and the other two you will make in the rump area to place the straw here. Place the ears on the head, threading them through the slits.
- All you have to do is glue beads or buttons instead of eyes and marvel at how quickly crafts are made from simple materials.

If your child is bored, you can make a fabric applique with him. Such funny bunnies are also sewn onto the worn knees of children's trousers to update this item.

Transfer the applique onto the fabric and cut it out. The bunny is decorated by sewing a bow to his ears and a carrot on his body. Attach eyes and other facial features. If this is an applique, then you need to glue the hare onto the cardboard.
And here are some simple crafts - in the shape of birds. You can cut them out from leftover felt, glue on a nose, eyes, wings and perform a home performance.

DIY crafts from pine cones for children

They are also made simply and quickly.
To make gnomes, take:
- Pine cones;
- light plasticine;
- pieces of felt or fleece;
- glue;
- brush.
- Let the child roll a ball out of plasticine and use the back of the brush to make indentations for the eyes, mouth, and nose. They will be filled with pieces of plasticine of the corresponding color. So, the eyes can be brown or blue, the mouth red.
- Attach the head to the top of the pine cone. Cut a triangle out of felt and glue its sides together to form a cone. Place this cap on your character's head.
- Cut out mittens from the remaining fabric and attach them to the pine cone with plasticine.

For a craft made from pine cones like an owl, we will also need:
- 2 acorn caps;
- yellow paint with a brush;
- plasticine;
- accessories in the form of feathers, ribbons.
- First, you need to paint the cone and the acorn cap, and continue subsequent work when they are dry.
- Let the child roll small balls from black plasticine and stick them to upside-down acorn caps - these are the pupils.
- Make a nose out of orange plasticine, attach it in place.
- This owl craft made from pine cones is decorated with feathers or ribbon.
- pine cone;
- pieces of thick fabric;
- two toothpicks;
- cotton wool;
- 2 ice cream sticks;
- white paint.
- Let the child paint the pine cone and remove it until it dries completely.
- Mom will cut out a scarf from plaid fabric and tie it around the snowman’s neck. Make headphones from felt and glue them to the character’s head.
- The child will make a snowman’s nose and mouth out of plasticine and attach it to his face.
- Make your hands from wire wrapped in a strip of fabric or ribbon. You need to wrap the wire around the bump.
- Place toothpicks in the snowman's hands, with pieces of cotton wool glued to the bottom of these sticks.
- Paint the popsicle sticks and when dry, place the snowman on these skis.
Quick and easy to make and these are the piglets. Glue the scales from the cones to the fir cones in the form of ears. Attach the snouts that will become the acorn caps. You can use plasticine rather than glue for this.

Paint the piglets pink, you can use spray paint for this. Once it's dry, only then will you attach the little black beads that will become the eyes.
For this craft you need an unopened pine cone. But over time, the scales open up. To avoid this, dip the cones in wood glue diluted with water for half an hour.
Remove them from the solution and shake them off. After 3 days, the cone will dry completely, securing the scales, which will now not open. After this, you can cover this natural material with paint and make new objects.
The next simple craft is a forest corner. For her, take:
- CD disk;
- plasticine;
- spruce and pine cone;
- acorn cap;
- glue;
- paints;
- eyes for toys.
- Paint the disk green and draw flowers on its surface.
- Let the child roll the caps and stems of the mushrooms and connect them.
- The base for the hedgehog can be sculpted from plasticine or polymer clay. Then cover it with brown paint.
- When it dries, stick scales from a fir cone into the back of the hedgehog. Place a cap on his head.
- Glue the eyes, nose, mouth, put a cane stick in your hand. In the other there will be a basket with mushrooms, which are molded from plasticine.
- Attach the hedgehog to the stand, after which another wonderful craft is ready.
Tie floral wire to the pine cones and place picturesque flowers in a jar previously wrapped with twine.

You can also make another craft from pine cones for the garden, such as a wonderful decorative basket.

If you need to quickly make a hedgehog to bring to kindergarten, mold its body and head from beige plasticine, and roll out its eyes and nose from black plasticine. Stick in the seeds, which will become spines.

Simple crafts for a great mood
Now the sun rarely comes out, and the weather is increasingly cloudy. To avoid succumbing to despondency at this time of year, create mischievous tricks that will certainly improve your mood.

Place these cheerful flowers in a vase at home, which can be made from almost nothing. All you need to do is:
- colored paper;
- cardboard from a white box;
- marker;
- stationery knife;
- tape;
- scissors.

Color the eyes with a black marker and bend the petals forward.

Cut a stem from cardboard. At the top, on one side, glue the finished part, on the other, a pre-cut flower with petals.

Fold a green sheet of paper in half, draw an oval line on it, and cut along it. If available, use zigzag scissors. Keep the notches simple.

Tie the paper flowers with a ribbon, and if you have taffeta, then use this fabric for decoration. You have got a bouquet that will never fade and will make you happy.

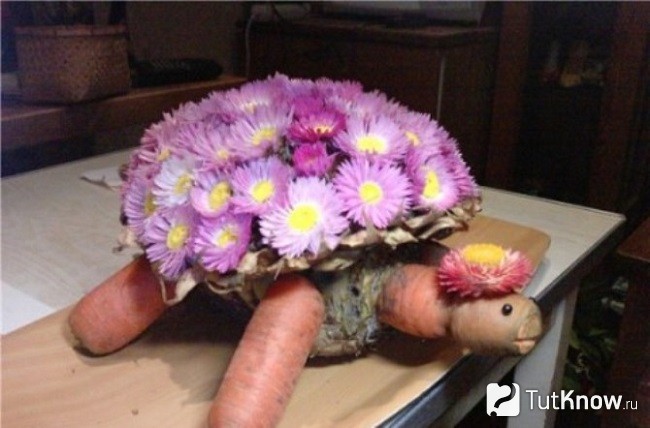
You can attach flowers with a toothpick to washed beets or pineapple. You will get a beautiful shell for a turtle. You will make her arms, legs and head and neck from carrots. Attach these parts to the body using toothpicks as well.
If you want the New Year to come quickly, decorate white objects in your apartment by turning them into snowmen.

Attach black magnets to the refrigerator, and now a holiday character has taken up residence in your kitchen. If you draw on a white vase or glue round eyes and an orange nose in the shape of a carrot, then another snowman will amuse everyone gathered at the table.
See what other quick and easy crafts you can make.
What has not been invented in the world of design for a comfortable, stylish and at the same time original interior. Experienced craftsmen know how to surprise their customers. Do you think it’s impossible to do something like this? But in vain! We've got 80 luxury home ideas that are not unlike designer bells and whistles.
1. Beaded curtains
Instead of an ordinary door, lovely curtains made of beads and beads look much more interesting. It’s very easy to make these, you just need to buy a lot of beads.
In the process of work you will need: scissors, a base for the curtain (cord, fishing line), a cornice, large beads and the beads themselves.

Think over the pattern, then measure the fishing line, folding it in half. Leave some extra space to attach it to the bar and start weaving.

We decorate the bar and fasten the bead threads.

2. Decor on the wall in the form of a world map

Materials needed: twine, hammer, pen, stationery metal nails, a plain area on the wall, world map.


The finished panel can be decorated with anything - photographs, pictures, postcards and other things that you always want to look at.
3. Marine motifs: unusual clock on the wall
How to transform your home environment and maintain a romantic beach mood? We recommend making a watch from sea pebbles.

To work, prepare pebbles, clockwork, scissors, ruler, paints, marker, glue, cardboard and wrapping paper. 
We wrap the frame with paper (you can also use a nice thick fabric).

We paint the pebbles in different colors, draw the dial, mark the place for attaching the mechanism and attach a loop to it.

Glue the pebbles.

We install the mechanism and admire the unique masterpiece!

4. Magic lamp
Even an ordinary glass jar can shine without electricity. And it won’t be difficult to make such magic happen.

For a sparkling lantern, prepare a glass jar, a lot of glass balls, alcohol, cotton wool, fluorescent paint and a brush.

First, wipe the inside of the jar well with alcohol, and only then use a brush to make strokes and dots of paint. Let it dry completely. All that remains is to pour in glass balls - so the rays in the wonderful lamp will playfully echo.

5. Picket lamp

6. Paintings of flower buds
Everyone can do artistic crafts when they have flowers, paints and inspiration.


7. Felt rose basket for small items
Felt is a convenient material primarily for those who are just learning the basics of cutting and sewing. It is not necessary to skillfully sew and cut out, since such fabric does not require an overlocker. Simply cut and connect.

So, prepare: felt, ruler, knife, pins, thread, hexagon-shaped stencil.
 Transfer the shape and cut it out.

Gather the core with pins.  Attach the remaining petals.
 A wonderful basket in the shape of a rose is ready! It can have a lot of functions - from storing small items, to a newspaper rack and flower pots.

8. Natural composition of branches and fresh flowers
 Materials: wire, wire cutters, a beautiful ribbon, small branches up to 15 cm long (about 60 pieces), pruning shears and the best flowers.

Making a frame.

We twist our composition and secure it with the remaining wire.
 The final touch is decor. We wrap the branches with ribbon, place the flowers inside and place them in a glass flask. The result is incredible!
9. Decorate the walls with origami paper

10. Functional board organizer

11. Original shelf with jars

12. Gorgeous lampshade “Luminous lace”
 Materials: lace fabric (this could be a piece of an old curtain), a brush, PVA glue, an electric mechanism and an inflatable balloon.
First of all, we cut the lace fragments.

We inflate the balloon, coat it with glue and overlap our lace circles. Let it dry for a day.

We pierce the ball with a needle, peel it off from the lace surface.

We make a hole in the opposite side for wiring. We install the electrical mechanism.

13. Bucket lampshades
This original lampshade imitates an old bucket, creating an antique effect. But in fact it is made of dense specific fabric.

14. Signs with messages

15. Colorful photo collage

16. Impressive photo wall

17. Creative pendant with photos

18. Letter of Memories

19. Exclusive vase made from a jar and nuts


20. Laconic cute vases on the wall

Materials: planks (preferably square), fasteners, leather tape, cute glass pots, screws, hammer, screwdriver and scissors.


21. Decorative clay pot


22. Transforming old shoes

23. An extraordinary panel - a new role for old-fashioned ties

24. Decorate the wall with children’s hats and elegant dresses

25. Vintage window frame cabinet

26. Not a standard place for skis
 27. “Ski” photo frame

28. Musical wall of guitars

29 ... and vinyl records

30. Headboard made from old pallets
A very simple idea for creating a cozy interior identity. You can hang different things on pallets: mini garlands, ribbons, cute fabrics.

31. Cork mat
A great alternative to regular bathroom bedding! It is convenient, practical and beautiful. This rug repels moisture, and its natural color will harmoniously fit into almost any environment.

32. Old storage boxes

33. Picket fence for a hanger - an element of vintage decor

34. Retro idea: decorate the inside of furniture with beautiful wallpaper


35. Wallpaper on the doors

36. Wall frame - a place of honor for a luxurious wallpaper ornament
 37. Double function of one pattern
Support the theme of the wallpaper on the wall by wrapping books in it.

38. Update your table lamp by decorating the lampshade with some pretty wallpaper.

39. Nature in your home


40. Another role of an ordinary hanger

41. Hanger with clip as a holder for paintings, photographs and other decorative items

42. Office tablet for compositions on the wall

43. Artist's experiments

44. Bright chandelier with pompoms for a nursery

45. Lush paper balls for decoration

46. Garland in boho style

47. Cute braid for a Roman blind

48. Transforming the lampshade with lovely fringe

49. A fun interior detail – a garland of mini pom-poms by the window

50. Restoration of a high chair for a nursery
It’s easy to make a beautiful and stylish piece of furniture from an old chair with scuffs and scratches. Gather your paints, masking tape, and colored wool threads to make a cute pom-pom pillow for the high chair.


51. Snag as a hanger

52. A vintage chest is a great alternative to a coffee table
 53. Original bedside table from a chest


54. A chest as an exhibit inside a glass box - a central piece of interior decor

55. Extravagant dressing table from a suitcase

56. Unusual minibar

57. “In limbo” – chests a la shelves


58. Storage cases

59. Adorable pet bed

60. Music wall

61. Cities and countries above the desktop

62. Note board

63. Instead of wallpaper, old newspapers

64. Precious bookmarks
In the modern world of computer technology, books have also acquired electronic format. But for some of us, the ritual of reading good old books in their original form still takes place. A luxurious bookmark will not only further emphasize its significance and value, but will also become a decorative highlight of your interior. This kind of thing is easy to do with your own hands.

Any decorations are suitable for decoration - beads, brooches, stones.

For work you will also need: wide colored ribbons (velvet or satin), scissors, thread, needles, wire cutters, glue and clips for decoration.

Find the perfect combinations for your taste. 
Glue the ribbons well by folding them in half.

We decorate the ends with clips.

65. Serving decor – butterflies made from napkins

Add a romantic touch to your table decor by turning paper napkins into cute, colorful butterflies. You just need a thin wire, scissors and, of course, the napkins themselves.

Fold the napkin in half. 
We form triangles along diagonal lines.

On one side, we connect the ends of the triangle to the vertex.

Turn it over and bend the top to the base.

That's all! All that remains is to make the antennae from the wire.


66. Bird on canvas


68. Stylish decoration of plates

Materials needed: white plates, tape, special markers, water, cotton swabs and an oven. Cotton swabs with a glass of water will be needed to adjust the pattern.

Option N°1


Option N°2


The final touch is to secure the resulting drawings by placing our plates in the oven. For porcelain 220°C for 30 minutes, for ceramics – 160°C for the same 30 minutes.

69. Unusual cover for a vase
A vase made from a plastic bottle with a decorative cover made of multi-colored lightning bolts looks much more attractive!

Materials: 12 zippers (20-25 cm), plastic bottle, thread, knife.

Sew along the length of the zipper.


Sew the two edges together (you can do this by hand).

Let's try it on.

Cut off the top of the bottle.

We trim the flowers and enjoy the composition! 

78. Family organizer: making a menu
 79. Luxurious basket “Pink Heart”
80. Romantic decor – heart made of branches

Such options for great ideas for handmade crafts and other things for the home are what you need when the usual interior is no longer inspiring, and you can’t afford to radically change the decor.
2 213 936
The anticipation of the holiday is often more pleasing than the holiday itself. Especially if you approach this matter responsibly and start preparing gifts in advance. And you don’t have to go on a shopping spree, buying all the little things that catch your eye. It’s much better, cheaper and more enjoyable to prepare cute gifts with your own hands.
Panel made of threads and nails
A stylish picture made of threads and carnations is a creative gift for all occasions. You can present it to both relatives and friends. A chic handmade panel will not leave anyone indifferent.
To work you will need:
- a piece of board or plywood of a suitable size;
- paper template of the desired image;
- thick threads (floss or yarn);
- thin cloves;
- masking tape;
- hammer.
Prepare a drawing template on paper in advance. Secure it to the base with masking tape and hammer nails along the contour at equal intervals. Their height should be the same - do not forget to control this.
Remove the paper pattern. Now comes the most creative stage of the work - wrapping the nails with threads.
Tie the end of the thread to one of the nails and cut off the tail. Start wrapping the nails with threads in a random order, you should get sharp corners between them - constantly change the direction and try to grab each nail at least once.
At the end of the work, tie a thread to one of the nails and cut off the tail.


Some ideas for inspiration:


If you still have questions, watch a step-by-step video master class on creating panels from threads. You will see that there is nothing complicated about it, and it can be made quite quickly and at minimal cost.
Edible bouquets
Edible bouquets of fruits, vegetables, sweets and snacks are a new fashion trend for unusual gifts. They are gaining more and more popularity for a variety of reasons:- it's unusual and cool;
- You can eat such a bouquet with pleasure; it will not be thrown away withered, unlike a traditional flower arrangement;
- To create them, it is enough to arm yourself with imagination and patience, having first visited the nearest supermarket.
Bouquet of vegetables and fruits
It is difficult to surprise anyone with a basket of vegetables or fruits, but an original composition assembled from them will be an excellent gift. Stock up on fresh gifts from nature, toothpicks and patience. Additionally, corrugated paper, ribbons, lettuce leaves, foil and other decorative elements will help decorate the bouquet.Tangerine tree
An unusual topiary made from tangerines is a wonderful winter gift idea. Such an interesting tree will create a festive atmosphere and fill the whole house with its aroma. Armed with your imagination, try to create decorative trees from small oranges or lemons, decorate them with pine needles and shiny ribbons and New Year's tinsel. The main thing is not to be afraid of experiments.
Men's bouquet of fish, beer and nuts
Even such banal products as beer and nuts can be presented beautifully and tastefully, using them as a heartfelt bouquet for a male company. Even a novice lover of DIY crafts can make it at home.
Bouquet of sweets
Flowers and sweets are an ideal gift option for all occasions. Do you want to surprise everyone with a non-standard approach? Feel free to visit with a unique one. It will be a wonderful surprise not only for those with a sweet tooth and will be remembered for a long time by everyone present. How to create an original present, watch the detailed video tutorial.And here you can see how to design a “Sweet tank made from Pepsi and candies” for boys:
Tank made of socks - an original gift for a man
Socks for your husband on February 23rd are the subject of many jokes. But they can also be presented in such a way that the loved one, out of delight, cannot even utter a word, not to mention jokes.
To make a gift you will need:
- 5 pairs of plain socks in dark and gray:
- a 0.3 liter bottle of your favorite drink, preferably with a high neck;
- colored paper;
- wine stopper;
- toothpick;
- 2 rubber bands for money;
- leg-split;
- glue;
- ribbon.

Roll gray socks into tight rolls and secure with elastic bands.
Connect them together by putting loops of twisted elastic on them. You should have one garland of 6 rollers.

Wrap the resulting structure with 2 dark socks. Tuck the toe of one into the elastic of the other.

Place the sock over the bottle, pulling it up to the twine. Fold the remaining part up and tuck it under the elastic band.

Wrap the bottle crosswise with the other sock, placing the heel inward. To make it clearer, look at the photo. Hide its ends under the fold of the first sock.

The design should look like this. It can be secured in the corners with sock staples or small paper clips for strength.

Wrap the wine cork in black paper. Place the tank turret on the tracks. Smooth out any rough edges. Make a flag from a rectangle of construction paper and a toothpick. Insert it under the twine and secure the entire structure with tape.

A cool gift for your favorite tanker is ready.


Candles of original shape
An unusual multifaceted candle will be a wonderful and useful souvenir. Despite the apparent complexity of the form, it can be made easily and quite quickly.
To work you will need:
- candle template printed on glossy photo paper;
- paraffin;
- wax crayons of the desired color;
- wicks;
- scissors;
- ruler;
- PVA glue.


Carefully cut out the template along the outline.

Using a ruler, bend all the edges.

Glue the edges of the template: they are numbered so that it is clear in what order to connect them.

Press the edges tightly to ensure good adhesion of the parts.

The glued workpiece can be coated with a layer of acrylic paint to prevent possible paraffin leakage.

Melt the paraffin in a water bath, add crushed wax crayon of the desired color and aromatic oil (optional).

Place the wick in the center of the mold so that it reaches the bottom and carefully pour in the paraffin.

When it has completely hardened, remove the paper mold from the candle. Your creation is ready.


Want more ideas for flights of fancy? Watch another step-by-step master class on creating colorful scented candles.
Unusual candlesticks
Still wondering what gift you can make with your own hands? Make a beautiful candlestick. It will fill your home with comfort and will be an excellent gift for your family and friends.
To work you will need:
- small glass jar;
- matte black paint;
- masking tape;
- a simple pencil;
- sharp knife or blade;
- twine, braid or ribbons for decoration.

Cut it along the contour with a sharp knife. Carefully remove excess tape, leaving the heart still attached.

Paint the entire outside of the jar with black paint. To do this, it is convenient to use spray paint.

Let the piece dry completely and decorate it as you wish. You can tie the top of the candlestick with a ribbon or twine, draw a dotted line around the heart with white paint - use your ideas about beauty.

All that remains is to place a small candle inside the jar and light it - the house will immediately be filled with an atmosphere of warmth and comfort.

A picture of what was
Do you want to please your loved ones for a housewarming with a painting of your own design, but you don’t know how to draw at all? No problem. You can easily create a spectacular panel from scrap materials, and you don’t even have to pick up a brush.
To work you will need:
- large wooden or plastic frame with base;
- white Whatman paper;
- two sheets of black or other contrasting color;
- glue gun;
- pencil;
- scissors;
- ruler;
- scrapbooking paper;
- braid, ribbons, rhinestones, beads and other decorative elements.

Glue scrap paper of any color with random patterns into each small frame. Elements of the picture can either harmonize with each other or contrast.

Decorate each blank of a large panel as desired: glue on a lush bow made of satin ribbon, interesting buttons, voluminous flowers made of corrugated paper, decorative stones or large beads. The design of the painting and the flight of fantasy at this stage are limited only by the available materials. You can supplement the work with inscriptions or photographs.


The main features of such a painting are that it is unique in its kind, exists in a single copy and was made with love for loved ones.
Mirror with frame made of branches
Mirrors with spectacular and unusual frames can completely transform even a dull room. The cost of such decor in stores is quite high. But why pay for something you can do with your own hands practically for free?
To work you will need:
- wall mirror with simple frame;
- willow twigs of the same thickness or wooden skewers;
- glue gun;
- masking tape;
- a can of spray paint in the desired color.

Glue the remaining rods tightly to each other, alternating their lengths. Let the glue dry.


Paint the bars and frame of the mirror with the desired color and leave until completely dry.

Attach a loop to the back of the mirror so it can be hung on the wall.
Looking in such a mirror is pure pleasure. Don't believe me? See for yourself.

We give money in an original way
Are you completely tired of searching for the right gift? Give something that is always needed and invariably causes sincere delight - money.You can present them to the hero of the occasion in the most unusual ways. 
Ideas for original handmade gifts
Beautiful and cute souvenirs made with love cannot be compared with store-bought trinkets. They carry love and positive energy. This is also a great way to spend leisure time with the whole family, because even a child can be involved in creating various crafts.Every housewife and owner wants to make their home beautiful and comfortable. This article contains a variety of ideas for the home that allow you to achieve this result with little time, money and effort.
Decorating the walls
Recently, walls painted or covered with plain wallpaper have become very popular. Yes, they serve as an excellent backdrop for accessories, furniture, etc. But large empty spaces require some additions. How to decorate an empty wall? There are a lot of ways, you just need to choose the right one.
Geographic maps on the walls
An extremely simple and very effective idea for the home that helps solve the problem of empty walls is to stick a geographical map. It is not suitable for every room or every interior, but you can find options for a child’s room, office, balcony or loggia, and in some cases even for a bedroom or living room. It is important to choose the right map for the interior, and there are not only “ordinary” ones - geographical ones. There are vintage, navigational, stylized, etc.
Where can I look for similar cards? Geographic maps can be found in bookstores or stationery stores. You won’t find stylized or antique ones there. Some options can be found in wallpaper stores. There they come in the form of photo wallpapers. There are many different ones on the beloved Aliexpress, you can search in other online stores. But there is another option: find the card you like on the Internet, save it to a medium and print it out at a company that deals with outdoor advertising. The only requirement: a large format card. They, of course, will be able to increase it, but not indefinitely. So the initial image must be of high quality and large.
We make modular paintings
The idea for the home - paintings and photos on the walls - is not new and many people are tired of it. Yes, it's a classic, but I want something new and unusual. One option is modular paintings. This is one image divided into a different number of fragments. Fragments can be different in size or the same. Often these “pieces of images” are called “modules”, hence the name “modular picture”.

You can take any poster, banner, or photo wallpaper as an object. You can, again, print the image you like at an advertising agency. In this case, you can even take a photo of yourself or close friends, your favorite landscape, etc. Based on the composition of the drawing, it is divided into several parts and cut. Frames are made for the fragments. The dimensions of the frames should be 3-5 cm smaller than the fragments so that the module can be wrapped and secured on the back side.
Nature is one of the most popular motifs. Sunset on the sea - what could be more romantic? Beach, sun, summer...  And flowers again... Symmetrical division is also possible Fantasy - an option for teenagers
Frames can be made of wooden planks, covered with thin plywood or fiberboard. But the easiest way is to take foam plastic of sufficient density (300-350 g/m³) with a thickness of 4-5 mm or more. It doesn't cost much, you can cut it with any hacksaw, it won't damage the paper, it weighs a mere trifle, so you can even secure the modules with double-sided tape. You can attach images to the tablets using glue (find a suitable one), or using a construction stapler and staples.
Decorative mirrors
Ideas for the home using mirrors are not new. The first examples of this magical glass appeared before our era and were extremely expensive and rare. And no wonder. The mirror itself is an excellent accessory, and if it has an unusual shape or an amazing frame, it will definitely become an interior decoration.
It’s so simple - circles made of mirrors, and the interior is transformed Butterflies from the mirror - an interesting idea  If you decorate a shelf, chest of drawers, bedside table in the same style...
Such compositions can be made not only from an ordinary mirror - coated glass. There is an acrylic mirror on the market. This is a flexible and absolutely safe material. It does not give such an ideal reflection as a “normal” mirror, but for these conditions it is not required. You need a plastic material that is easy to work with. They sell sets of fragments of different shapes and sizes, with double-sided tape glued to the back side. Attaching such a mirror is simple: remove the protective film from the adhesive tape, apply it and press it. All.
We make accessories for home decoration
Many ideas for the home concern the creation of unique designer crafts that make our home memorable and cozy. These are the things that create the atmosphere of a home. Moreover, it is not at all necessary to spend an incredible amount of time and money on their creation. There are very simple ideas using the most ordinary, and sometimes even junk, things.

Ideas for your home are a whole sea of possibilities for improving your interior or making your life more comfortable...and sometimes both
Decorating vases and bottles with lace
Amazing transformations can take very little time. For example, from an ordinary vase, bottle or jar you can make a uniquely beautiful vase. Moreover, the process itself will take 10-15 minutes. This is if you have everything at hand. And besides decoration objects, you only need lace, PVA glue, scissors and a brush.
Everything is exactly as you thought. We simply wrap the vessel in lace, cut it to size, glue it, and wait until it dries. This is all. But the result will please you.
Who said lace has to be white...
Lace can be bought or knitted. The second option allows you to decorate vases of complex shapes, which can be decorated with great difficulty with ordinary lace. If you don’t know how to knit, but want to decorate a vase with an unusual shape, look for a stretch one. There is such a thing, and in a fairly wide range. With the help of a stretchy openwork, most problems are removed.
Zen garden
If you're looking for creative ideas for your home, consider a miniature zen garden. It’s not difficult to make, it looks great, and it can also help you relax and calm down after a hard day at work. Only this accessory is not for families with small children.... You will understand why.
The original Zen garden is a rather complex system, but stylizations can be made from a transparent round container or even from a glass candy bowl, vase, or small aquarium. You will also need sand for landscape design, terrariums or aquariums and a Crassula plant or cactus.
First, let's figure out what to do with the plant. it can be planted in a small pot and buried in the sand. Instead of a pot, you can use a sock with soil (tie the sock). Some plants (cacti) can be planted directly in the sand. In general, you choose any method, but when planting directly in the sand, you need to take care of normal drainage - put pebbles on the bottom.
Sand is poured into the container, a pot with a plant or its roots is installed, and the whole thing is covered with sand to a certain level. All is ready. Now the surface of the sand is leveled and drawings are applied to it. There is a special metal stick for drawing, but a wooden one is also suitable for starting.
If you want to get closer to the original, you can make a tabletop version of a Japanese garden from a small box. The frame of the box is assembled from wooden blocks or bamboo trunks, the bottom is usually made of plywood or well-fitted and treated wooden planks. You can also make legs.

The resulting container is also filled with fine sand, but what else to add there is up to you. You can plant several plants, lay stones, pebbles, put candles, a Buddha statue. In general, everyone here already creates their own zen))
Mini garden in the house
There are two types of miniature gardens that can be made to decorate the interior of a house or apartment: open and semi-closed. An open mini-garden is made in large flat pots and pallets. You can use miniature bonsai plants, succulents and small cacti.

When selecting plants, pay attention not only to size, but also to the soil in which the plants grow. If the mini-garden area is large enough, it can be divided into zones with different soil acidity, but this will require physical separation, as well as delimitation using physical plastic partitions so that the soils do not mix.

This interior decoration recreates a real garden. With paths, benches, rockeries, etc. You can put up a toy house or make a pond. Whatever your imagination tells you.
Semi-closed mini-gardens are made in glass containers. Round ones look very interesting: aquariums, vases. Soil or stones are poured into them and plants are planted. But in such a limited volume, it is necessary to select plants not only by soil type, but also by the degree of illumination, watering regime, etc. It will not be possible to care for plants in a jar differently.
The smallest gardens... And then - a garden of moss... a piece of a fairy tale
In such containers you can grow different varieties of moss. In fact, they are very beautiful and only in such miniature gardens can you examine them down to the smallest detail. Some of them resemble trees or shrubs, others are more like herbaceous plants. A wide variety of compositions are created from pebbles and moss, reproducing real landscapes or transporting us to a fairyland.
DIY sofa pillows
If you look at the photos of interiors, you will notice that in most of them, pillows add zest to the interior. With their help, a boring interior turns into a lively and memorable one. In addition, a large number of pillows allows you to rest comfortably. Such home decor ideas allow you to quickly change the “mood of the interior,” adding home comfort.
In the case of using fabrics, everything is clear - we select the color and texture to match the interior. But there are homemade pillows that exude coziness. A striking example of this is knitted pillows. A variety of patterns, colors, shapes. But the result is the same - you really want to hug them and cuddle them. They look very unconventionally.
From old flannelette pajamas and a sweater And these old jeans turn into an original pillowcase...all you need is fabric with an adhesive base Knitted miracle - very cozy Lace for finishing pillows - you need to choose the style Fleecy fabrics - simple and effective
What to do if you don’t know how to knit? It's no problem. There are old sweaters. Yours or children's. They make very interesting and neat pillows. Cut the old knitted items along the sleeves, put the pillow in the half-finished pillowcase, and sew it up on both sides. That's it, the designer pillow is ready.
You can also use lace, fleecy fabrics, old jeans, even pajamas. Everything is going well. And the stranger the coloring, the more interesting the result.
Ideas for the home: various little things with your own hands
The atmosphere and comfort in the house is created not only by global things. Many small things that can be made from scrap materials bring no less and, sometimes, more pleasure and benefit. You use them often. And after a month you don’t look at the same paintings or mirrors anymore. A number of ideas for turning your home into a cozy and comfortable place have been collected in this section.

Opportunities are a sea
Shoe tray with pebbles
Owners of private houses have to go out into the yard regardless of the weather. That’s why shoes don’t always shine clean. Many people get out of this situation by placing a rubber mat near the door or by placing a rubber tray. Yes, the dirt does not spread, but the view is not the most attractive. You can significantly improve the situation by simply pouring pebbles into the tray. The water will flow over the stones, the drips on them will not be visible, and neither will the dirt. Periodically, you will need to soak the pebbles in water and rinse them to remove accumulated dirt, but pebbles are a reusable material and they simply cannot be “erased off.”

If there is no rubber tray, you can knock down a wooden box with a side height of about 10 cm. Pebbles can be found on the banks of a river, sea, etc. As a last resort, you can find it in designer stores or where aquarium products are sold. But buying this “charm” is expensive.
Scarf storage
Every family usually has a lot of scarves, neckerchiefs and other similar items. How to store them so that they don’t take up a lot of space, are always at hand, and don’t get wrinkled? There are several life hacks that you can easily do yourself.
First. We attach metal rings to a regular hanger. Rings can be plastic or metal. Both can be found in departments selling. There are all sorts of them, in shape, size and material. Rings can be nailed to wooden hangers/hangers/trempels, attached with staples, or glued or tied with thread to plastic hangers. And that’s it, you have a device for storing scarves.

The situation is a little more complicated with the second device. You will need a treated board and a dozen or two clothespins. We attach clothespins to the bar with one side. They can be nailed, screwed, or glued. You will also need hinges to secure the structure itself to the wall.

Both ideas for the home are practical, require a minimum of money and a little time. And evaluate the benefits yourself. Especially in the spring-autumn period, when there are a lot of scarves, scarves, and flowerpots on the shelf.
Instead of a bookshelf
- a good thing, but they are not appropriate everywhere, and good copies cost a lot of money. But books need to be stored somewhere. The solution is metal staples. When installing them, the lower book serves as a support for 4-5 pieces, which are simply stacked on it.

Book holder - everything ingenious is simple
The disadvantage is obvious - the lower book is inaccessible. The solution is to put the most unpopular or unnecessary one down.
Holders for keys and other small items
One of the biggest problems is where to hang the keys so that they can be quickly found, and also instantly hung or removed. One of the good options is a magnetic board, but where to look for it is a question. But you can make funny holders from tennis balls. They are cut to about a third of the diameter. That's all. The holder is ready. It just needs to be secured somewhere. You can - on the wall using nails, you can attach several pieces on a separate board, and then attach the board itself to the wall, cabinet, etc.

Instead of a key holder - cute faces
You can make such a holder for small items in a matter of seconds. Look longer for tennis balls. And to make it even more interesting, eyes are glued to the ball. It turns out to be such a cheerful smiley.
Basket made of plastic bins and clothespins
Every household is full of plastic food containers, but ideas for the home using them are rare. We found one such option in which the hero is a liter mayonnaise container. In principle, any can of large diameter and small height can be used. Otherwise, the “basket” will be inconvenient to use.

Waste into income - a basket made from a plastic can
Using universal glue, we glue the containers with clothespins. When the glue has dried, coat the surface with varnish or wood oil. We cover the inside with a cover made of cotton or linen. We make it a little longer than necessary so that we can hide the unsightly edge behind the lapel.
We make the handle from steel wire with a diameter of 3-4 mm. We bend an arc from it. We make a loop at one end, and in the side, using a nail heated over a fire, we make two diagonally located holes (one opposite the other). We thread the formed loop on the handle into one hole. We bend the wire on the second side, thread it through the second hole, and then form a loop. We decorate the handle with hemp rope. You can also make decorations for a basket from it. If you know how to weave macrame - great, no - a regular braid woven from several threads will do.
Stand for a sofa or chair for cups/glasses/newspapers
Sipping tea in your favorite chair is a great idea. But there’s nowhere to put the cup, the phone always falls between the seat and the “bytsy”. The armrests of modern models are soft, you can’t put anything on them. So smart people came up with the idea of making a stand for cups/glasses (pictured). An extremely simple and very convenient thing. Few ideas for your home will bring you more pleasant moments.

You will need three boards with a width of at least 25 cm. They are knocked down in the shape of the letter “P” (the connection can be strengthened using carpentry corners). The height of the jumper is slightly greater than the height of the armrest; the table should protrude no more than 1/3 of the width of the seat, otherwise you simply will not sit in the chair. The structure is placed on its side, the lower part is pushed under the chair. It serves as a stop and prevents the structure from turning over. To be sure, make the lower part much longer than the “table”. Also, for mobility, you can install wheels, but do not forget that the legs of modern furniture are low and the wheels need small ones, and they will have to be attached from the side. Otherwise, the stand simply won’t fit under the chair.
Where to hide dog bowls
Dog owners know how difficult it is to find space for their dog bowls. Dogs living in an apartment or house are usually fed in the kitchen. There they are given bowls. But they are needed for half an hour a day, and then they get underfoot on the floor all day. The problem can be solved, and elegantly. We place the bowls in one of the drawers. If they were needed, they opened the box and poured in food. Feeding is over - the bowls have been washed, put back in place, and the drawer has been pushed back. Everything is perfect and does not bother anyone.

This idea will require a little modification to the drawer. A small section bar or corner is placed around the perimeter. A rectangle of the required size is cut out of plywood or other sheet material. We cut holes in it for the bowls, then paint (if necessary). That's all, the idea has been implemented. All that remains is to train the pets.
Idea for storing slippers
In any house or apartment with two or more inhabitants, slippers always get lost, confused and disappear somewhere. One of the interesting ideas for solving the problem is such pipes/holders for slippers. Each pair has its own pipe. Order is guaranteed.

The pipes can be made of stainless steel, or they can be cut from large diameter plastic pipes. You just need to process the cut well - so that it is comfortable and beautiful.